...since I (Lauren) have made a scrapbook layout! But my niece Maddie turned sixteen last week, and since a party (or any other social activity) was obviously out of the question, my sister came up with the rather brilliant idea of compiling a surprise scrapbook. She sent blank pages, a few supplies and postage-paid return envelopes to family and friends, and got back unbelievably beautiful and touching results. I was surprised, once I got going, not only how many ideas I had... but how many of my ideas involved Eyelet Outlet Brads! Here's maybe my favorite of the pages I made:
I love using brads to make a frame on cards, but it turns out they're even cooler around a photo! I took this picture of Maddie and her Nana (who also happens to be my mom!) when Maddie was one day old and it is still a favorite. To surround it, I chose brads and bling that either had a baby theme, or were pink, or both. I've got Heart Brads, Teddy Bears, Safety Pins, Ducks, a Colorful Lady Bug, a Butterfly, Flower Jewels, Heart Pearls, and tiny Pearl Bling.
One of the great things about making a scrapbook for an older kid in the year 2020 is that they (and their parents) have their own social media feeds, full of pictures you know they like. So it's possible to do a bit of lurking and photo-stealing, to get shots you might not have thought to take! This beautiful selfie records the day that Madeline got her braces off. As soon as I saw that smile --and the white space above her head-- I started thinking "thought bubble". I used a combination of stickers and brads to make a little collage of a few happy things I thought she might be thinking about, like school, treats, the beach, etc. I scattered a Computer Brad, Spring Bubble, Selfie Brad, Light Bulb, Scissors, Sun and some Mini Emotion Brads around my sticker sentiment, #Sixteen.
Whether you make layouts or cards, Eyelet Outlet has the perfect embellishments for all of your projects. Check out the huge selection of Brads, Bling, Sequins, Washi Tape and more!
Showing posts with label scrapbooking. Show all posts
Wednesday, May 20, 2020
Wednesday, August 8, 2012
what do you call something that's one-sided, and too big for an envelope, but smaller than a layout?
ok, sorry, that's a bit of a trick question. i actually still call it a card, no matter what size or shape it is, and whether it has photos or collage elements or... whatever. if i make it for, and give it to you on your birthday, it's a birthday card. the end. :) in any case, they are currently calling for birthday projects of all types over at corrosive challenges; whereas opus gluei challenge #136 is to celebrate the season(s) of your choice (mine being summer!) so this, ummmmm... thing... i made for my brother works for both of those, whatever you call it:
i was very inspired by laurel seabrook's awesome superhero party photo, obviously; and used almost every aspect of it, FULL ON:
and then there was the rather fab coincidence that my mother had just happened to give me a little stack of instamatic family photos, of which this one, of my not-quite-five-year-old brother, is a big favorite:
it's the last couple of points that matter most to me, a fact i discovered during a discussion with my husband over whether my brother would appreciate this or not. we went back and forth a bit; and i still honestly have no idea, but i finally said, "riley and lindsay will LOVE IT, though!" to which jeff immediately agreed; and i realized that's more than enough for me.
it's a bird... it's a plane... it's ♥SUPER BILL♥!!!
ps: i was pretty excited that miss laurel singled out my round birthday party card from last week, and also the very talented folks at merry mondays had some nice things to say about my santa baby card; but you could've knocked me over with a hexagon-shaped feather when i saw this comment (towards the end of the post) from cath edvalson about my we've been hexed card at moxie fab world!!!!!!!!!! could i possibly trouble someone to bring a ladder and get me down offa this cloud now?! ok, on second thought, maybe not quiiiiiite yet...... gimme a couple more minutes, k?! :) :) :) (thank you ♥ thank you ♥ thank you to all concerned!!!)
(vintage photo sleeve shared with me by my fellow thrift shop warrior, kirsty vittetoe--ta, missus!; notebook paper + stylized ocean waves from a magazine; fancy "s" from t'internet; alphas: making memories, american crafts, ki; clouds and airplane brad: amy tangerine; heart deco tape: love my tapes; ribbon: girls' paperie, ki memories; heart + arrow chips: heidi swapp (and i mean the ooooOooOoLD "hs for advantus" heidi swapp, people! still looks *good* though, dontcha think?!) magnetic metal buckle: basic grey; font: B0bmono; adhesives: staples gluetape runner, 3m foam tape, gluedots, staples, sewing machine)
i was very inspired by laurel seabrook's awesome superhero party photo, obviously; and used almost every aspect of it, FULL ON:
and then there was the rather fab coincidence that my mother had just happened to give me a little stack of instamatic family photos, of which this one, of my not-quite-five-year-old brother, is a big favorite:
it's not technically a *GOOD* photo, i suppose. i think it must've been at the end of the roll of film, because there are some big streaky light flares down one whole side of the frame (for once, that is not my bad photo of a good photo, that's really on the print); for another my brother's eyes are shut; which is probably why my mom (who's on a big "clean out, pare down" mission) elected to discard it. i don't care, i love it! i love that he's showing us his "muscles" with such concentration; i love that you can see a little bit of wildwood, nj, c.1973 in the background; i even love the processing defects and the off-center placement that just seemed to cry out for me to embellish it! i love that when i give this to bill, my nieces will see that their daddy liked the beach as much as they do; and liked posing for silly photos as much as they do; and that despite good health and plenty of yummy nutritious food, he occasionally grew fast enough to look just a wee bit too skinny, like they sometimes do.
it's the last couple of points that matter most to me, a fact i discovered during a discussion with my husband over whether my brother would appreciate this or not. we went back and forth a bit; and i still honestly have no idea, but i finally said, "riley and lindsay will LOVE IT, though!" to which jeff immediately agreed; and i realized that's more than enough for me.
it's a bird... it's a plane... it's ♥SUPER BILL♥!!!
ps: i was pretty excited that miss laurel singled out my round birthday party card from last week, and also the very talented folks at merry mondays had some nice things to say about my santa baby card; but you could've knocked me over with a hexagon-shaped feather when i saw this comment (towards the end of the post) from cath edvalson about my we've been hexed card at moxie fab world!!!!!!!!!! could i possibly trouble someone to bring a ladder and get me down offa this cloud now?! ok, on second thought, maybe not quiiiiiite yet...... gimme a couple more minutes, k?! :) :) :) (thank you ♥ thank you ♥ thank you to all concerned!!!)
Sunday, April 15, 2012
are you sick of seeing travel journals?!
if so, then i am REALLY very sorry indeed, because not only do i have a bunch more to show you, miss kirsty has also let me hijack the pixie dust paperie blog today to talk about my philosophy and process for making those as well!!!
something that *IS* brand new is that the journals are the latest group of items i'll be selling in my etsy shop! i've got six in there right now, and will be making more in the months to come. i'm doing three standard sizes: regular (9.25" x 4.5"--this is the size and shape of nearly all of my personal travel books!) mini (4.5" x 6.5"--great for postcards and photos!) and extra-large (11.5" x 4.75"--this is like my san francisco book) most of them have removable acrylic "over covers" that can be taken off for the duration of one's trip... or permanently if you'd like to do your own decorations!
want to see?
i am also willing to make custom journals to your specifications using a mix of vintage and new supplies! feel free to ask me any questions you might have by email (llaurenb @ hotmail [dot] com) or via the comments form below! planning a few more etsy additions this week, so stay tuned, darlings! ♥♥♥
something that *IS* brand new is that the journals are the latest group of items i'll be selling in my etsy shop! i've got six in there right now, and will be making more in the months to come. i'm doing three standard sizes: regular (9.25" x 4.5"--this is the size and shape of nearly all of my personal travel books!) mini (4.5" x 6.5"--great for postcards and photos!) and extra-large (11.5" x 4.75"--this is like my san francisco book) most of them have removable acrylic "over covers" that can be taken off for the duration of one's trip... or permanently if you'd like to do your own decorations!
want to see?
standard
measures: 9.5 x 4.25"
great for full-sized brochures and everything else!
(this one has a solid cover with no transparency elements)
standard
mini
measures: 4.5 x 6.5"
♥SOLD--thank you!♥
(this one has a solid cover with no transparency elements)
standard
measures: 9.5 x 4.25"
here you can see the transparent "over cover"... underneath is chipboard wrapped in a vintage map
standard
measures: 9.5 x 4.25"
this one has some of my new custom alphas--chipboard covered in loads of different vintage maps and then die cut--i am IN LOVE with these and will be listing them later this week in my etsy shop!
♥SOLD--thank you!♥
♥SOLD--thank you!♥
mini
measures: 4.5 x 6.5"
♥SOLD--thank you!♥
perfect for postcards!
measures: 4.5 x 6.5"
punch and add standard sized photos!
measures: 4.74 x 11.5"
holds everything *INCLUDING* the kitchen sink!!!
(this one is like my most recent SF book)
i am also willing to make custom journals to your specifications using a mix of vintage and new supplies! feel free to ask me any questions you might have by email (llaurenb @ hotmail [dot] com) or via the comments form below! planning a few more etsy additions this week, so stay tuned, darlings! ♥♥♥
Wednesday, April 11, 2012
fly away with me!
it's time for april's pixie dust paperie challenge, and this month the theme is "fly away with me"!
your assignment is to create a project that's related in some way to the city of your choice: new york, london, paris, rome... somewhere you've been, or would like to go? the place where you live, or where you grew up? ...it's up to you! just link it up at this pixie post between now and april 30th for a shot at a $15 gift certificate to the pixie shoppe! i don't think anyone will be too shocked to learn that my project is inspired by san francisco, seeing as how i have just visited that lovely city for the first time:
(photo from a vintage travel book; patterned paper: pink paislee, anna griffin, creative imaginations; transparencies: hambly; foam alphas: american crafts; tape: freckled fawn, bazzill; fabric flowers: prima; glossy black cardstock and plastic alphas: tim holtz/ranger; ink: color box, stewart superior; heart sticker: ek success; adhesives: xyron, tombow monorunner, 3m foam tape, glue dots, uhu gluestick, sewing machine; other: plaing chipboard, book ring, japanese newspaper; digi: photobooth frames #2 by katie pertiet, designer digitals)
i made an extra large travel book this time; whereas i generally make them 9.25 x 4.5" this one is 11.5" by nearly 5"! other than that, i pretty much stuck to my usual routine of making the "bones" of the book--printed pages sandwiched between plain chipboard covers--before the trip; this time, since i knew it was going to be a three-part trip, i also added in some transparencies as dividers:here are the supplies i took... you can see it's just the basics plus a few clear stamps and an ink pad; in actual fact, i never used the latter; i always think i will get a bit "artsy" on my pages and it never happens, you would think i'd just accept that, eh?!
whilst i was in san francisco (and later carlsbad, ca, followed by las vegas, nv) i spent about 15 minutes each night writing what we did that day, and using the hole punch or stapler to add in the ephemera i was collecting from the places we visited: ticket stubs, postcards, menus, museum badges, bus (and train and cable car!) passes, brochures, stickers, business cards, etc, etc; so that by the time i came home, my book looked like this, and was 90% done! (all i've done since then is decorate the cover, and add a few photos... more on that in a minute!)
you can also see the three sections are pretty equal; i really love my "dividers"...
...so much so, i thought i'd add in a few more transparencies to hold my photos, which i've mostly formatted into little filmstrips in order to incorporate the most images in the least space... also because some of the pics i really wanted to use were frankly just not all that fabulous, so making them a bit smaller really helped! :)
here you can see what some of the photo pages look like IN the book; i love that you get a glimpse of the things behind them... and of course when you flip the pages over you get a glimpse of the things in *front* of them, which is equally cool!
here's a shot of the back of the book, which basically coordinates with the front:
and finally one of the "stacked" book... which makes me want to flip through it and re-live this awesome trip once again!!!
be sure to stop by the pixie blog to see the amazing projects created by our uber-talented pixie challenge design team!!!
Saturday, November 19, 2011
why yes, i DID make a hawaiian travel book!
how kind of you to ask! it's not done yet, mostly because as soon as we got home i was back into deadline city, but i figure i'll show you the "bones" of it now and the finished product later.

i've said this before and no doubt i will again, but BY FAR the most crucial step for me actually KEEPING a travel journal whilst on vacation is to make a dedicated book for it 
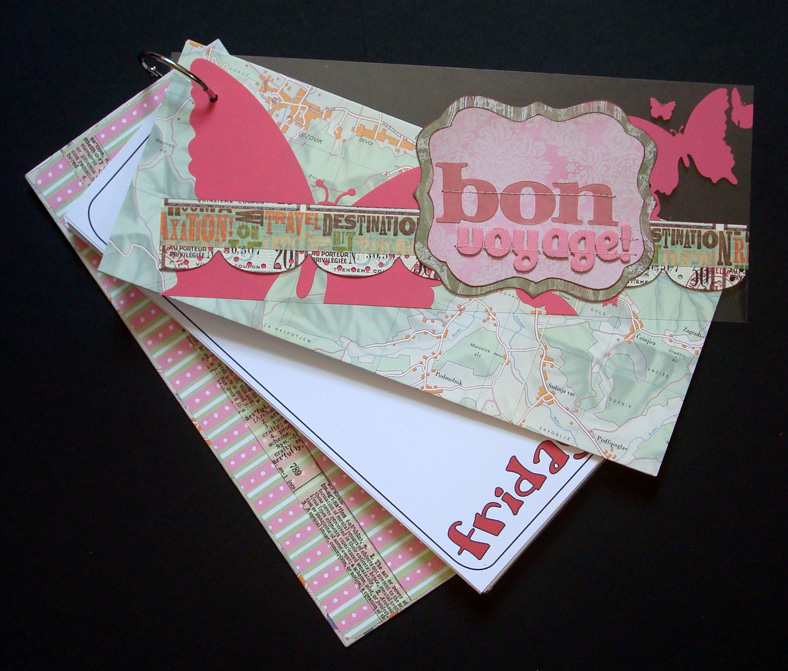
before we leave. bottom line--for me--if i haven't put in a bit of time & work already, i am not sufficiently committed, and in the fun chaos of traveling and the less-fun chaos of re-acclimating when we get home, my good intentions evaporate. so i make a cover and cool pages in advance. (ali e. has been talking about her "december daily" this week and she calls this bit her "foundation".) i made a plain chipboard cover, and two different digital collages, for my date and theme pages; i printed one of the yellow ones for each day of the trip and one of the white ones for each potential sight i thought we'd take in:

(paper: color splash kit by deviant art for somerset digital magazine; brushes: travel clusters #1 and messy stitches, both bykatie pertiet, designer digitals)
this time i actually made two different digital collages for my date and theme pages; i printed one of the yellow ones for each day of the trip and one of the white ones for each potential sight i thought we'd take in. i saved them as .jpgs, and you're welcome to share them. (email me if you want .pdfs instead!)

(paper: notebook paper pack, katie pertiet, designer digitals; brushes: travel clusters #1, katie pertiet designer digitals; mermaid's treasure box kit, mystique, o'scraps)
each night of the trip, i spent about 15 minutes or so writing down an outline of what we did each day. this, in my opinion, is another CRUCIAL thing--to write it down on the day! because the details FADE! it can be a list, it can be narrative, it can be just notes if you like. you could even do this bit on your computer, but i like to write in the book; because again, i have a long and glorious history of starting --and abandoning-- travel journals. the more i write IN THE BOOK, the more committed i become to the project!

while we were in hawaii i acquired plenty of fun things to put in the book. some were purely decorative, like this FAB vinyl sticker:

most were the sorts of ephemera one collects whilst travelling. when it comes to ticket stubs, stickers, takeaway menus, business cards and other small bits, i like to get them right in the book, preferably when i write the day's summary.


big things become their own pages. i just punch holes, and in they go:
medium-sized things like postcards and brochures can go either way, and when i'm not sure what i want to do, i'll often put them into the 1-gallon ziplock bag i bring with me, so i can decide later. but most things go right in, because watching the book *GROW* is one of the best bits!!!
when we got home, nearly everything i've shown you was already DONE. i spent a few hours last weekend finishing up the "writing bits". because while i really have to do the daily pages on the fly; the themes and sights sometimes need a bit of time to percolate inside my head, if i want to write about not only what we did, but also what we impressions we took away with us.
i have a few more bits and bobs i'm considering adding, and of course i need to make the cover. (which is my favorite part, so i always save it for last!) i'll come back when it is done and show you the finished product!
ciao for now, darlings!
♥♥♥
Saturday, October 8, 2011
blue moon baby book (& a SECRET one day deal!!!)
today's project on the pixie dust paperie blog is this fun baby-themed minibook i made using the BLUE MOON anniversary kit:

at the risk of being increasingly obnoxious as the month goes on, i have to tell you i am inordinately proud of my projects this month--i think they are some of my very best work! well, i guess it's not exactly a mystery that if *I* chose all the items that went into the kit, they'd be things of which i am especially fond, and thus i'd be even more usually comfortable using them, design-wise, right? i hope you'll swing over to the pixie blog and see ALL the photos of this little book--i've shown the inside pages in detail, and talked about the specific products over there.
while you're there, perhaps you might like to pop into the pixie shoppe and see if there's anything which strikes your fancy??! like, perhaps, the BLUE MOON kit??!?!? i only mention it because, inspired by the very happy FIRST ANNIVERSARY of pixie dust paperie we are celebrating this month, pixie-in-chief kirsty vittetoe has gone just a liiiiiiiittle bit *NUTSO* with the great promotions and specials... so i took the opportunity to talk her into giving the very BEST possible deal exclusively to my blog readers! and here it is:
BUY ANY MAIN KIT
AND GET
ANY OTHER KIT
*FREE!!!!!!*
♥HOW COOL IS THAT♥??!?!?!
here's what you do:
Add a main kit of your choice into the shopping cart
and then any other kit into the cart,
type in coupon code AA7-Lauren during check out,
and the amount of the second kit will be taken off your total!!!
however...
this special is ONLY good for today:
october 8, 2011
from 12:00 AM to 11:59 PM eastern time
so now my only question to you, darlings, is
*WHY* are you still here, lol??!
shouldn't you BE SHOPPING??!?!??!!
♥♥♥♥♥
Wednesday, September 28, 2011
SEPT--instant accordion booklet
possibly my favorite project from september's pixie dust paperie kit, TECOLOTE, is the mini-accordion book i made for my friend paul's birthday:

it holds a hand-stamped poem called "field guide" by paul's favorite american poet, tony hoagland. it's an unusual project, but i think it's really fun and sort of different, and i hope you'll hit the pixie blog and check it out today! ♥
Tuesday, July 19, 2011
a different (weirder!) kind of travel book
i don't scrapbook, as such. i do make travel books, which mainly consist of souvenirs, brochures and photos collected from a vacation, punched & held together with a bookring. they have a sort of loose handwritten narrative that i work on each night whilst on the trip, mostly it's an outline of what we did each day, plus any funny stories i want to remember, or details i think would come in handy on a return trip. usually i make them myself from chipboard and patterned paper, and until now they have been finite, covering one trip-- from start to finish and then ending. this works for me, and i really enjoy both making and then owning those keepsakes.
but when it came to new york, i was kind of stumped. because, living in central new jersey, i'm lucky enough to spend a fair amount of time in the city, and i have an accumulation of cool things i've been collecting for years. ...but... we're talking about day trips, with maybe a few overnights; and the "documentation" is sketchy at best. and you can't make a travel book full of completely random, non-chronological and utterly unrelated junk!!
...ummmmmmmmmmm... who says??!?!

actually, the dictionary definition of a scrapbook is, "a blank book used for the mounting and preserving of pictures, clippings and mementos". DUDE!!! that's totally what i *HAVE*!!! :)

the other thing that's different about this book is that i built it around a ready-made volume. i got this beautiful desk calendar for like $1 at borders in march. i was going to use the abundance of gorgeous b&w new york photos in artwork or... something... but about a month ago it occurred to me that it would make an excellent home for the NYC stuff!

the problem was, sometimes i had loads of "stuff" (tickets, photos, postcards, museum badges, business cards, etc) but no photos. sometimes i had photos--but they're snaps i took b/c they looked cool and don't really relate to anything significant that we did. sometimes i just have stories and nothing at all to go with them.


...but again... why does it have to be in a particular order? up until now everything has been in a couple of hanging files that i'd occasionally take out and flip through. and i still enjoyed taking it out and flipping through it! if i put it all in a book at least i wouldn't have to worry about dropping the file and having stuff go EVERYWHERE, right?! ;)


when i had things/photos that related to a particular day, i grouped them together and labelled them, and wrote as much or as little as i remembered from that outing. i deliberately spaced these throughout the book, leaving gaps in between, so that if more are found, they can go anywhere at all.

when i didn't have any kind of chronology, i worked thematically. for example, a few years back, my mom asked if i'd take her to see the the xmas spectacular at radio city music hall, which she remembered as a very special treat when she was a girl. that trip spawned other holiday adventures, and now we go every december, to check out the department store windows, have a nice lunch, do some shopping, etc. it's a day we both look forward to each year, and i have loads of stories, but honestly, i could not tell you what happened when, and i don't have many pictures.


i had (& still have) plenty of photos-- either in a natural state or which i have altered--that i adore, but they just don't go with anything. which didn't stop me from wanting them in the book. i arranged a bunch into a grid for my title page (shown several shots above), and i made a "farewell" page at the end. i expect to fill in here and there with more of these shots. at the same time, i'm keeping in all of the beautiful b&w photographs by christopher bliss. afterall, they are what made me want the book in the first place.
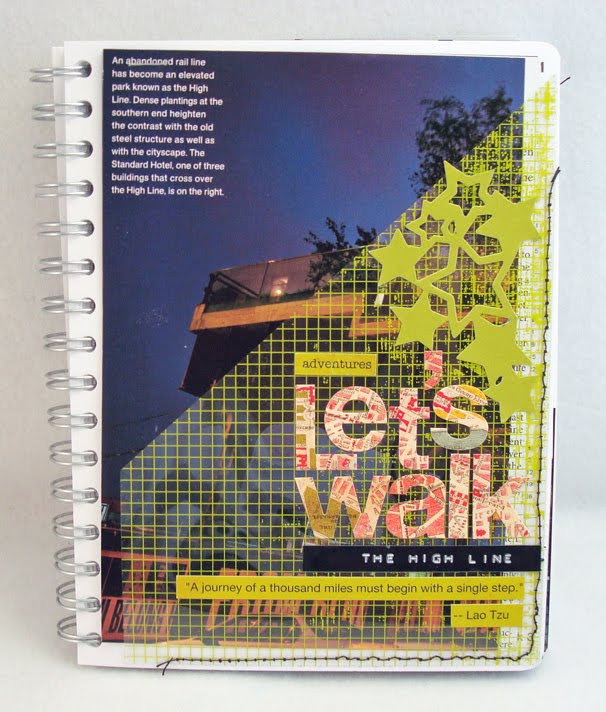
i've also got things like old letterman "top ten lists", and a digi LO i made last year, and funny new york cartoons, newspaper clippings, etc. if i like it, and it's "new yorky" it's going in!!! :)


so what's my point in telling you all this, or i am just showing off?! well, yeah, i am a bit! ;) but also, i think there's maybe a bit of a moral here: sometimes, we make things harder than they need to be. sometimes, we get so fixated on problems that we don't stop and consider possibilities. and SOMETIMES if we just trust our instincts a little bit, forget what everyone else is doing, and work only to please ourselves, things turn out really, REALLY cool! ♥♥♥
ps: many thanks, yet again, to the ineffable bruce mau and his incomplete manifesto; especially point #3!!! (process *IS* more important than outcome!) (definitely!) :)
Saturday, July 9, 2011
a project just for ♥ME♥!
if you've been reading my blog for awhile, you may remember that last year i talked A LOT about bruce mau's incomplete manifesto for growth. and as much as i talked about it, i *thought* about it even more. i felt like it was one of those things that seriously revolutionized the way i think about art, life and creativity.
i bookmarked the link above and went back to re-read it every couple of weeks. at some point i printed it, as well, and whenever i'd find the print, i'd sit and read it all AGAIN. different bits of it would take turns being the most interesting to me. sometimes a point i previously found uninteresting would suddenly strike me with cartoon-lightbulb-style emphasis. "OH!" i would say, "THAT's what he meant!!!"
eventually i decided i wanted to MAKE a keepsake for myself which would contain the entire manifesto... a little book, maybe? ATC's?? i wasn't sure about format or style or, well, anything. but i figured a really good idea would come to me eventually, if i waited for just the right thing.
then july's pixie dust paperie kit, MIDSUMMER NIGHT'S DREAM just happened to have a set of pink paislee flip notes in it. if you haven't seen them, they're little diecut tabbed cards, kind of like you find in a rolodex, but waaaaaaaay prettier. these happen to be from the "sweetness" collection and have a lovely floral theme. and immediately i knew these were just the right thing!
the photo above shows the cover and gives you an idea of the style. there are lots more pictures, and a description of how i put the project together on the pixie blog today. i hope you'll stop over and check it out. i am particularly proud of this, and especially pleased that i get to KEEP IT! ♥
Tuesday, May 24, 2011
flowery ring-bound pixie notebook
today's project, made from this month's pixie dust paperie kit, LA DOLCE VITA is a pretty fancy little notebook i made from scratch!
i love how it looks... well heck, it's covered in sassafras "sweetly smitten" goodness, so how could i go wrong??! as for the experience of building a little book from the ground up using a tim holtz ring binder mechanism, i'd have to say my bottom line is: it was not realllllllly worth the time and engineering involved. i think i'd've saved a lot of time by starting with an ugly little blank book from the dollar store, actually, and just making cosmetic changes; and henceforth that is what i'll do! but i'm happy to have *TRIED* it once, and can now file it under "lessons learned"! :)

there's more detail and loads of photos on the pixie blog, so do feel free to hop over and see 'em! ♥
ETA tuesday morning: sorry, folks, this is embarrassing; the lovely notebook you see above is actually the featured post at PDP *tomorrow* wednesday, may 25th! i got myself a little muddled there, sorry for the confusion!!! do stop over today and see kirsty's fab card, however; and then mine is on in the morning!
Saturday, April 16, 2011
PDP-lunchbox minibook
last month, along with april's fabulous COUNTRY FARM STAND kit, pixie-in-chief kirsty vittetoe sent me a neat lunch-box-shaped maya road chipboard tin, asking if i had any ideas of something cool that could be made from it. at first, i was actually completely BLANK... (not a promising start!) ...but that night when i was trying to fall asleep it hit me: OF COURSE it wanted to be the carrying case for a school-themed minibook!!! luckily the april pixie kit had absolutley everything i needed to make one!
there are lots more photos, and some details on constructing the custom-sized album over on the pixie blog, i'd love for you to see them! ♥♥♥

recruiting niece madeline as the supermodel for this project, i got straight to work, and i think the results are pretty cool. this was such a FUN AND EASY project and the best part is, whereas i often go "out on a limb" creatively, a tiny lunchbox filled with school pictures is an utterly practical thing to make as either a gift or a special keepsake!

Wednesday, November 10, 2010
christmas minibook
i am even more than usually pleased and proud that today's featured project on the pixie dust paperie blog, utilizing november's SNOW SHOE kit, was made by me! it's a mini-book version of "the night before christmas" starring niece madeline and nephew matthew, and it is--if i do say so myself--pretty darned cute! here's a sort of "overview" photo...in this case taken quite literally OVER the book!
of course, there are loads more photos, closeups, and details about the making of the book and the products within over at the PDP blog, and i cordially invite you to have a peek at those, because i think--again, all modesty aside--it really came out very well indeed! :)
here on my own blog i want to say a few words that might be easily be tag-lined, "in defense of bad photos"! when i first asked my sister about using her xmas pictures from last year, she was willing, but didn't think she could help, because her photos were (according to her):
1. not that great
2. of the wrong stuff
3. really, REALLY casual
4. not all from the same occasion
and finally
5. there weren't nearly enough of them to fill a minibook
i am printing this because i've had this conversation SO MANY TIMES with myself--in fact, every vacation we take, when i get home and edit my pics, my main thought is, "well THIS is gonna be the year the travel journal HAS NO photos!!!" because inevitably it rained part of the time, and i had the camera on the wrong setting for the really CRUCIAL shots of the biggest icon of the whole trip, and i forgot it entirely on another un-missable day, and so on, and so forth. and yet, somehow, i nearly always figure a way AROUND such problems...and when the project is finished, and the pictures bring back all the wonderful memories i think, "OMG, i nearly talked myself into deleting these!!!"
b&w conversion, judiciously cropped & sized
2. collage is your other friend!
not close enough
too close
nobody realllllllly looks good here...
...that's better!
5. sometimes drastic measures are called for
one more gratuitous picture...but do check out the PDP blog!

of course, there are loads more photos, closeups, and details about the making of the book and the products within over at the PDP blog, and i cordially invite you to have a peek at those, because i think--again, all modesty aside--it really came out very well indeed! :)
here on my own blog i want to say a few words that might be easily be tag-lined, "in defense of bad photos"! when i first asked my sister about using her xmas pictures from last year, she was willing, but didn't think she could help, because her photos were (according to her):
1. not that great
2. of the wrong stuff
3. really, REALLY casual
4. not all from the same occasion
and finally
5. there weren't nearly enough of them to fill a minibook
i am printing this because i've had this conversation SO MANY TIMES with myself--in fact, every vacation we take, when i get home and edit my pics, my main thought is, "well THIS is gonna be the year the travel journal HAS NO photos!!!" because inevitably it rained part of the time, and i had the camera on the wrong setting for the really CRUCIAL shots of the biggest icon of the whole trip, and i forgot it entirely on another un-missable day, and so on, and so forth. and yet, somehow, i nearly always figure a way AROUND such problems...and when the project is finished, and the pictures bring back all the wonderful memories i think, "OMG, i nearly talked myself into deleting these!!!"
here are a couple of specific strategies, and a few illustrations from this project.
1. photo editing software is your friend!
it helps if you can identify what's bothering in about your pics. if you have lots of different pics that don't "match" why not make them all black and white, or sepia-toned? i use photoshop elements, but there are plenty of other inexpensive software programs (one probably came with your digital camera!) and free online tools like picknik and picasa; most of the online and store kiosk printing services have a some basic editing functions, too, that'll let you convert to b&w, fix red-eye, add frames, etc.

2. collage is your other friend!
if your photos are blurry or you've only got low-def file sizes, print them small and make little photo clusters. also, consider WHERE you want to use them...this mini-book is 5x5"; enlargements were not an option anyway! clusters and groupings are also great if you don't have ONE shot with everyone together. if you've got distracting backgrounds that'd be hard to lose, let another photo overlap!


3. you don't have to use the whole photo!
yes, i know you love your great aunt edna, but she's making kind of a funny face in this particular shot, and her motorcyle parked in the background is VERY distracting! the great thing about digi is, you can save more than one version of things-- if aunt edna doesn't work for THIS project it's fine to trim her!!! crop her electronically, or cut her out of a print with scissors, or place a couple of embellishments over her side of the photograph. remember, all your pictures don't all have to be the same size and shape, either; in fact a variety of shots is often more dynamic on a page.
4. play to your strengths!
having done a bit of "tinkering" with the photos for this minibook, they started to remind me of the snaps from my (1960's) childhood-- the vast majority of which are 3" b&w squares with a white border. when i realized that, i used this digital frame set to make the resemblance even stronger. (if you're printing at home you can also do this by just placing them far apart on the page and leaving some white on when you trim; you can make faux polaroids this way, too!) i cut out my pics a bit wonkily, and inked the edges, so they'd have a "messy on purpose" look that covered any "messy by accident" problems! (b/c no, many of these shots would probably not look as good if they were the centerpiece of a minimalist masterpiece!)


5. sometimes drastic measures are called for
in this case, the tricks from above were more than sufficient, but i have been known to do "CRAZY" things when the sane ones didn't work! in my new york travel book, most of the photos are printed on transparency; some as collages, some on their own. in my washington dc travel book, i used photoshop's "watercolor" filter...not to mention the "contrast" and "saturation" sliders...to change my disappointingly grey and lackluster photos extensively. do you want to know which photos in which travel books are unanimously the favorites of anyone who sees them?! yep. the ones that were so "BAD" they needed to be crazied up!!! :)
6. sometimes you just have to bite the bullet
hey guess what? i just found half a dozen photos of your mom & her siblings on christmas morning, 1947! oof, no, wait, you're not gonna want these...some of 'em are blurry...and your grandmom had not done her hair yet...and holy moly, in this one your 6-year-old future mom is bouncing on the bed and your uncle has a lincoln log in his ear! i should just toss these, right? they are inarguably BAD photos! what am i CRAZY--those are priceless treasures!!!!!! uh-huh. and so are yours! perspective really is everything. :)

in conclusion, my on-going photo-evangelical advice to myself... (and anyone else who needs it!) ...is this: KEEP the "bad" photos! USE the "bad" photos! i promise, in the future you will agree... if they contain people and places you love, THERE ARE NO BAD PHOTOS!!!
Subscribe to:
Posts (Atom)