Sunday, November 29, 2020

Merry and Happy

November is just about over, which means it's time to kick holiday card production into high gear! I'm fairly smitten with this fun Vintage Christmas Stamp Set from Rubber Stamp Tapestry, one of many awesome RST peg stamp sets available at The Ink Pad; it's on TIP Blog this morning!

Friday, November 27, 2020

Banner Redux

We're still making cards based on our festive Jingle Belles blog header and you're still invited to join the fun. 

Here's what I made this week:


This week my card is much less literal, though I've still incorporated the red white and green palette, the sketch (in a portrait-oriented format), plus green trees and red Eyelet Outlet bling snowflakes. My ingredients are all older stash items, and my obsession with torn paper and torn washi tape continues.

It's hard to believe this is the last official prompt of the Jingle Belles season, but the calendar says it's the last week of November so it must be true! Hop over to see Stephanie's card and link up your own.

Thursday, November 26, 2020

TREE-mendous!

It's amazing what a huge difference color makes, don't you think? Both of these cards use the same beautiful Impression Obsession stamp, "Mountain View"; one of The Ink Pad's many MANY wood-mounted stamps, which can be found in-store; or inquired for via phone or email. All the details on TIP Blog today!

Wednesday, November 25, 2020

Peace, Love and Coffee

It's all Peace, Love and Coffee on the Eyelet Outlet Blogthanks to our Holiday Coffee Cup and Santa Hat Brads, plus some fabulous Glitter Heart Washi Tape


Test driving my new stamps from The Rabbit Hole Designs: Caffeinated Flamingo, Marquee Words and Tattoo Affirmations, which work surprisingly well together! I love the expression on the flamingo's face, he looks like I do before I've had my coffee. 


Visit the Eyelet Outlet Store for lots more Brads, Washi Tape, Bling, Sequins and Flowers!

Tuesday, November 24, 2020

Let it Snow, Let it Snow, Let it Snow

In my opinion, BY FAR the best place for snow is on cards, so that's what we'd like to see at Shopping Our Stash this fortnight. Snowmen, snowflakes, snowy landscapes... if it's frosty and white, you're good to go! Here's what I made:


I got that sweet Happy Snowman (and a few other goodies) with a Pretty Pink Posh giftcard I won in the Coffee Lovers' Hop a couple of years ago, and I suppose at some point he will stop being the first thing I think of when you say "Snow Card" but that is not yet the case, lol. He matches the snowdudes on my ancient Basic Grey patterned paper perfectly, and my newish Taylored Expressions sentiment fit perfectly under my heart shaped shaker window; go, me! :)

Ski, sled, toboggan, ice skate or snowmobile over to SOS to see the crew's cards, then link up and join the fun!

Sunday, November 22, 2020

Join the FAN Club!

I'm pretty sure Nathalie Kalbach has never designed an un-interesting product, but her N*Studio Fan Stamps from Rubbermoon are especially cool and I had a lot of fun playing with them this week. The results (including two additional cards) are on The Ink Pad Blog today.

Friday, November 20, 2020

A Banner Holiday

We are finishing off the 2020 Jingle Belles season with a Banner Idea... quite literally. This fortnight we'd like to see holiday cards that are inspired by this year's Jingle Belles blog header. Just to refresh your memory, it looks a bit like this:

Now here's my card:

Ok so... yeah... I went realllllllly literal, lol; and I should stress the fact that you definitely do not have to use the sketch AND the colors AND some of the exact elements (bells, trees, glitter letters) as in the banner. In fact, any one of those selections would work perfectly well! But as I was putting this together, it just so happened that I realized I had quite a few products that would work perfectly, so I just kept adding them in. Next week I'll do something much more abstract, promise!

Meanwhile, I assure you it is well worth the trip to Jingle Belles to see Stephanie's amazing card; then start planning what you will link up with us! 

Wednesday, November 18, 2020

A Trio of Couples

Nothing's cuter than a happy couple, especially if we're talking about a COUPLE of Eyelet Outlet Brads, dressed up for the holidays; like Santa and Mrs. Claus, Mr. and Mrs. G. Bread, or our sweet Snow Couple!


The other day I came across a set of Lawn Fawn tiny shaped tag dies I bought in January and realized I had not yet used them?? Then I saw this week's Sketch Saturday (#636) and I had the perfect plan!


My first thought was that ATC's would be the perfect size to showcase the tags, and that I should start with the Snow Couple. A background of blue paper with polka dots seemed like a tiny snowscape and I love this woodgrain cardstock for extra texture. I added a strip of Pink Checked Tape and solid pink Skinny Tape to represent the strong vertical line of the sketch.


Santa and Mrs. Claus are probably the most famous Christmas couple, and the heart of the North Pole. I rotated the sketch and added Heart Washi and Red Stripe Foil Tape this time.


The Gingerbread Brads are the newest in the EO line-up, but they're very sweet... in every sense! This time I flipped the sketch and paired them with Poinsettia Tape and Skinny Striped Washi.


ATC's are always fun to make and swap; OR you can build them into the focal point of a bigger tag or card. And there's definitely an Eyelet Outlet Brad to suit every taste!

Sunday, November 15, 2020

Anniversary Card Round-Up

In addition to hostessing, I also made cards for a few of Elisabeth, Shari and Linda's challenges in the Paper Anthology 9th Anniversary festivities. And here they are now:


To CASE Elisabeth's beautiful holiday card I chose a similar medium woodgrain background paper, dark green mat and a kraft cardbase. I used lots of foliage dies, plus some pretty Penny Black Pinecones. My sentiment is a slightly different shape, but I've tried to echo the corner element by placing it a bit higher.


I chose the bottom row of Linda's fun Tic-Tac-Toe board and combined about five different diecuts, some Lawn Fawn variegated twine and a plaid I hand-painted using Olive, Terre Vert, Chartreuse and Sepia ColorBurst. 


Clean and Simple cards are definitely not my metier, but I was determined to have a go at Shari's CAS with a Spin challenge. The "spin" is that you cannot use white or cream, which turns out to be harder than I thought! Luckily I had Spellbinders' Kaleidoscope Tiles die set to be my focal point and some Lawn Fawn Woodgrain cardstock to give all that (non-white) white space a bit of texture.


Many thanks to everyone who played along this weekend, there is still a bit of time to finish up challenges, answer trivia and poll questions... all of which earns you tickets for the big raffle drawing! Everything you need to know is on the Paper Anthology FaceBook Page.

Challenge #10: Hip to be Square

Welcome back to the big Paper Anthology 9th Anniversary festivities, I hope you've been hanging out on the Paper Anthology FaceBook page and following all of these cool challenges, there is some serious inspiration over there and there are raffle tickets awarded for however many you complete, with ten awesome prize packs to giveaway at the end! 

This is my last challenge for the weekend, and it's to embrace one of my favorite formats. I love square cards, they have such beautiful balance and they just always look good to me. Here's my square card, this one happens to be 6" square, which is probably my favorite size because there seems to be the best selection of envelopes:


For this card I was excited to be test-driving a brand new product at Paper Anthology: Picket Fence Studios Paper Glaze, which comes in sixteen beautiful colors AND can be mixed together to make even more. In this case I just used it straight out of the jar. I love how it retains it's bold color no matter what type of paper you use it on. I used a palette knife to spread Succulent Green through Taylored Expressions A New Leaf Stencil on glossy black cardstock, and also on white watercolor paper. In the second case, I also took a little bit of the Black Pansy, and spread it right on top of the green, so that it has a sort of feathery effect. However if you mix two colors together thoroughly (on say, a paper plate) you will get a consistent third color, which is handy!


After the glaze was completely dry, I trimmed around the white version of the design and adhered the cut out portion on top of the black one. I added Memory Box's Rose Sketch Flower Spray Die (cut from copper and purple shimmer paper) and finished off with some vintage lace trimming, stick-on pearls and Hero Arts Sequins.

Stencil Sunday ♥

I've always loved vintage and shabby chic style cards, but I've just discovered how to make them even more appealing, by adding Tim Holtz Baseboard Dolls. I've named this one Beatrice, and she is the star of today's post on The Ink Pad Blog

Saturday, November 14, 2020

Stampin' with the Sisterhood!

I am honored to have been named Queen of Snark for my Pink Halloween card at The Sisterhood of Snarky Stampers; especially since the prize is being a guest designer on their new challenge, SoSS173: P is for Penguin! 

Here's my card:


I was slightly bummed out to realize I don't actually have a penguin stamp; but then I remembered I had Eyelet Outlet Penguin Brads! This also meant that I could use my current favorite stamp set, Mythical Grumplings from Taylored Expressions. I'm not gonna lie... I'm kind of obsessed with that Yeti! I built a wintery landscape using scraps of a bunch of white and blue snowy-looking patterned papers and finished off with a few EO Snowflake Brads.


I hope you'll join me and the Sisterhood for this super-fun challenge, which runs through November 27th! ♥

Friday, November 13, 2020

Cue Elvis!

Have you been joining the fun of Paper Anthology's 9th Anniversary Party on the Paper Anthology FaceBook page? We've been having a lot of fun and we love that our friends from all over the world are able to play too!


There have been some AWESOME cardmaking challenges revealed so far, now here is my latest, it's called Blue Christmas. Did you already guess that the brief is to create a holiday card which is predominantly blue? If so, you're ready to roll! Here's what I made:


I started with a base of blue chippy-peely woodgrain patterned paper from Craft Consortium's 6x6 Wood Texture Paper Pad, added a fussy-cut snow globe and a couple of pine cones from Ciao Bella's Northern Lights Paper Collection, and embellished with glittery blue foliage using Penny Black's Juniper, Holly Branches and Bountiful Berries dies. I stamped one of the sentiments from Taylored Expressions' Flip the Snowflake set onto Lawn Fawn Pearlescent Vellum, added a Eyelet Outlet Cardinal and Pinecone Brads and called it a day.

I hope you'll join us at Paper Anthology's 9th Anniversary Party, the fun continues through Sunday night! ♥

Shake Things Up

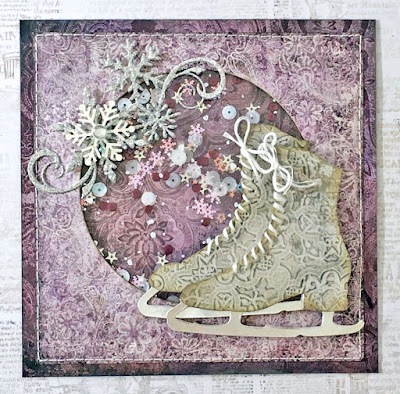
I don't make enough shaker cards, which is a shame because I quite like making them and know that folks love to receive them. So when I needed a second card for our Jingle Belles theme, "It Came Upon a Midnight CLEAR" I thought a shaker, with it's acetate window, would be a great way to incorporate a see-though element and have some fun with the interactive format.

My friend Elisabeth at Paper Anthology special-ordered this beautiful Tim Holtz/Sizzix Bigz Ice Skates die for me in January, and I absolutely loooooooove it, so it's a bit of a mystery that I have somehow not used it until now?? I'm really pleased with my card, though, so I'm sure I'll be using it again soon. I cut the shoe part of the skates from an older Ciao Bella collection; and the blades from matte silver metallic cardstock. The background of the card consists of two beautiful rich purple papers from Blue Fern Studios' Eclectic Charm line, and the Hero Arts Snowflake Cluster is cut from silver Non-Shed Glitter Paper. I made a custom mix of Eyelet Outlet Sequins, featuring some Round, some Snowflake and some Stars.

Be sure to visit Jingle Belles to see Stephanie's clearly beautiful card and link up your own!

Thursday, November 12, 2020

It's Paper Anthology's 9th Anniversary!

In other years, we've celebrated this festive occasion over the course of a riotously fun weekend, in-person, at Paper Anthology in Kenvil, NJ. Obviously a party with loads of people jammed into one place with self-service food is not on the cards for 2020. But... we've come up with an alternative that features four days of fun, challenges and prizes on the Paper Anthology FaceBook page (which means our friends from all over the world are invited to play along!); plus four awesome Take and Makes for anyone who shops in-store or online during the party, and there might just be a few surprises as well.


There will be twelve awesome cardmaking challenges revealed over the next few days on the Paper Anthology FaceBook Page. I'll be hosting three of them, and the first is called Put a Doily On It. If you've already guessed that the brief is to create a card, layout or journal page with a DOILY ON IT... you are definitely on the right track, lol. Here's what I made:


My card is a bit like a Greatest Hits collection... it has all my favorite elements: Prima and Blue Fern Studios papers, dimensional florals, distressed edges, machine stitching and of course, the inspiration for the whole thing: a lovely 3" paper doily. Of course your card needn't be shabby chic, your doily doesn't have to be white and for that matter, you might make something besides a card! I can't wait to see what it will be.

I hope you'll join us at Paper Anthology's 9th Anniversary Party, the fun continues through Sunday night! ♥

Stamps + Doodles = Joy

Do you always have a firm plan when you sit down to make a card? I usually have a fairly strong idea, but sometimes I just start playing with some fun products --like Rubbermoon's fab and funky Gustav Inspired and Eccentric Concentric stamps-- and a card just sort of evolves organically, like this one, which is on The Ink Pad Blog today!

Wednesday, November 11, 2020

Seriously.

I am a big fan of coffee in real life and of Eyelet Outlet Coffee Brads for making coffee themed cards. Like this one: 


I used Walnut Stain Distress Ink to stamp the super-fun Midge with Coffee and Signaling with Decaf stamps that I won from Riley and Company via a Sketch Saturday challenge earlier this year. I knew when I chose them that they would be perfect for the Fall/Winter Coffee Lovers Blog Hop and I stand by that decision.


I added a pink Heart Pearl to Midge's coffee mug and a decorative border of Coffee Cups from the Eyelet Outlet Coffee Brads set, paired with Donut Brads. I matted my corner-rounded panel on a background of Donut Tape and a mat of the darkest brown before adding the whole thing to a white A7 card. 


Be sure to check out the Coffee Lover's Blog Hop which runs through this Friday, November 13th. 

Tuesday, November 10, 2020

Tic-Tac-Toe

We're playing our favorite crafty challenge game this fortnight at Shopping Our Stash. To join the fun, simply choose any horizontal row, vertical column or diagonal line from the board and include those three items in your project.


I selected the middle row of string/twine/yarn + stamp over 5 years old + bright colors, and this is how my card turned out:


I smooshed droplets of Cerulean and Lemon Yellow ColorBurst randomly over a piece of watercolor paper and let the colors mix and mingle at the edges. When the panel was completely dry, I used a bunch of older stamps (see pic below; the Newton's Nook set might only be 2-3 years old, but the rest are 5+ for sure!) to add patterns in tone-on-tone colors of Distress Oxide Inks (Fossilized Amber, Cracked Pistacio, Salty Ocean and Peacock Feathers to be precise). I stamped Dina Wakley's handsome Scribbly Birdie in black archival ink on a second panel of smooshed-then-dried ColorBurst (this one mixed Fuchsia with Yellow Ochre, plus a bit of splatter on top) and fussycut. A salmony-orange mat, some pale blue cord, machine stitching and a Dymo label sentiment round things off nicely.


Be sure to visit SOS and see the design team tic-tac-toe creations, then start planning what you will make!

Monday, November 9, 2020

Coffee Mandala

It might not be very zen to create a mandala consisting entirely of caffeinated beverages, but when I saw all of the fun little icons in Everyday Explorers Co's Coffee Snob Stamp Set from The Ink Pad, my first thought was that they'd make a really cool mandala. I stand by that belief!


I confess that I "saved" this idea especially for the Coffee Loving Cardmakers' Fall/Winter Blog Hop, because the cards that link up to that are always AMAZING and I felt like I needed to bring my A-Game! That's "A" as in Amy Tsuruta, who never, ever, fails to inspire; and like me, rarely turns down a delicious caffeinated beverage!


This is one of those times when a MISTI turns a job that would be seriously daunting, into something perfectly simple. Because while I suppose I could have hand-stamped each icon four times, I doubt I could have lined them up as precisely as this. With the MISTI, though, I just used the grid to center my first element ("more coffee") on my 3.5" square of paper, stamped it, rotated the paper 90 degrees (WITHOUT moving the stamp!) and stamped again; repeating those steps until I had all four sides completed. Then I removed the "more coffee" stamp and placed the cafetiere, heart and star in a little cluster and repeated the stamping + rotation operation four more times. I made two separate mandala layers, cut out and matted both, then finished off with a single icon ("now I'm fully awake") which I fussycut neatly and added to the center.  


To make the mandala into a card, I matted with the cloud paper from Lawn Fawn's Into the Woods Remix paper pad and made a 5.5" square card from some Distress Woodgrain Cardstock.


Now that I've mastered this technique I want to get out ALL of my Everyday Explorers Co stamp sets and see what other fun mandala designs I can create! Happy Mandala Monday and Happy Coffee Lovers' Blog Hop! ♥

Friday, November 6, 2020

A Midnight, CLEAR

Can you tell from the title what this fortnight's brief is at Jingle Belles? If you think that we'd like you to incorporate at least one see-through element, then YES, you have guessed correctly! So what could you use for this? glass, acrylic transparencies, vellum, acetate or "ghost" shapes, lucite, shrink plastic... basically, if you can see through it (and figure out how to attach it!!!) you're good to go.

Since I'm lucky enough to still have a bit of a collection of well-hoarded Hambly Transparencies (mostly thanks to Stephanie who is brilliant at finding small caches of them all over the midwest!) I made a 6" square card from one of them, then added vintage collage elements and diecuts on top. I hadn't planned for this to turn out entirely neutral colors, but it is fun for a change; especially since I have an aunt whose favorite color is white! 

Hop over to Jingle Belles and see Stephanie's card, plus there's a little prize for one lucky random cardmaker that links up with us this fortnight!

Thursday, November 5, 2020

It's Not Just for Traveling

It's tempting to argue that 2020 is the year in which we needed calendars and planners the least, but I to the contrary, I've found I've used and worked in my Traveler's Notebook from The Ink Pad more than ever. Because it's a system that you can customize to work perfectly for your life! For example, did you know that there are many TN refill options that don't even involve a calendar? Such as Sketchbook, Watercolor, Gridded and Kraft Paper inserts that turn your TN into a portable sketchbook, art journal, or creative writing habitat. The Traveler's Notebook Master Blog Post from the end of September lays out all of the basics about sizes, refills and covers; you might like to check it out if you're thinking about jumping into the TN universe. Meanwhile, I've got these three brand new pages on TIP Blog today!


Wednesday, November 4, 2020

Tag, You're It!

What do you get when you pair Eyelet Outlet Brads, Bling, Washi and Flowers with Jumbo Christmas Tags from EZ Laser Designs? Holiday magic, of course!


The jumbo Christmas Tags measure 3 x 5" and come in packs of six beautiful laser cut overlays, each with a plain white backer tag. Each pack has a tree, a deer and bells cut into a deep green tag; plus a stocking, candies and baubles in a rich red. The tags are nice and sturdy and the pre-punched holes are generous enough to thread ribbon or twine through easily.


For the bells tag, I filled the white backer tag with Holiday Flower Bling and Holly Brads in a pretty pattern, then used another Holly Brad to affix a couple of white Paper Flowers to the ribbon at the top. I made the tree tag into a simple shaker by backing the laser-cut tree with a scrap of acrylic packaging, then filled the shaker compartment with Red Snowflake Bling as well as Snowflake and Star Sequins; the backer tag is adorned with Merry Christmas Script Tape and I framed up the design with red Jewel Strips. For the sweet reindeer, I neatly lined up strips of Seasons Greetings Washi on the white backer tag, then added Snowflake Brads to the green tag.


I used Twig Tape on the white backer of the candy tag then affixed a bit of golden patterned paper behind the sweets and added some Peppermint Candy Brads in purple on top. The stocking tag is adorned with green and white Paper Flowers held on with a Poinsettia Brad, which coordinates perfectly with the Poinsettia Washi in the background. The ornament tag has a backer of Ornament Tape and an assortment of Ornament Brads to match.


EZ Laser Designs has many other varieties of tags and overlays for all your cardmaking, giftwrapping and scrapbooking needs... and of course Eyelet Outlet has embellishments to make them even more lovely, as well as uniquely yours!

Monday, November 2, 2020