Friday, September 28, 2018

snow far, snow good

we're still making cards that feature snow at ♥JINGLE BELLES♥ and we'd still love for you to join us! here's what i made:

snowman journal card and noel sticker: simple stories; plaid paper: reminisce; dymo paper: rusty pickle (which literally has to be 10+ years old, so kind of ridiculous that i saved it, but then, it's perfect for this, lol!); glossy white cardstock: the paper cut; snowflake stickers: provocraft; holly brad: eyelet outlet; adhesives: elmers brand gluetape, 3m foam tape, sewing machine

i'm not sure i've ever made a holiday card in shades of burgundy, grey and a tiny bit of holly green, but i have to say i quite like this one! i trimmed down a snowman journal card (since i didn't actually need any writing space, lol) then found some ANCIENT papers that matched it really well. a sticker sentiment, some exceedingly elderly snowflake stickers, skinny white mats and an eyelet outlet holly brad complete the design!

be sure to check out stephanie's card at ♥JINGLE BELLES♥ then link up one (or more!) of your own!

Wednesday, September 26, 2018

The Saint Nick Express!

The most daunting thing about Christmas cards, at least for me, is that I need A LOT of them (60+) and obviously I need them all at the same time. For those of us who don't enjoy mass-producing cards, this can really add up to a lot of time spent. Fortunately, I've learned a few tricks. One is that I make holiday cards all year long with Stephanie at Jingle Belles. Another is to use pre-made products whenever possible. I love the pocket scrapbooking cards that come with so many paper collections. There are a million varieties, and give cards an automatic focal point. Oh, and did I mention that they are the perfect size to feature some of our brand new Eyelet Outlet holiday brads? When I adorn journal cards with brads and place them on top of a custom background of EO washi tape, I can make a lot of unique and individual cards, very quickly! Who doesn't like that?!
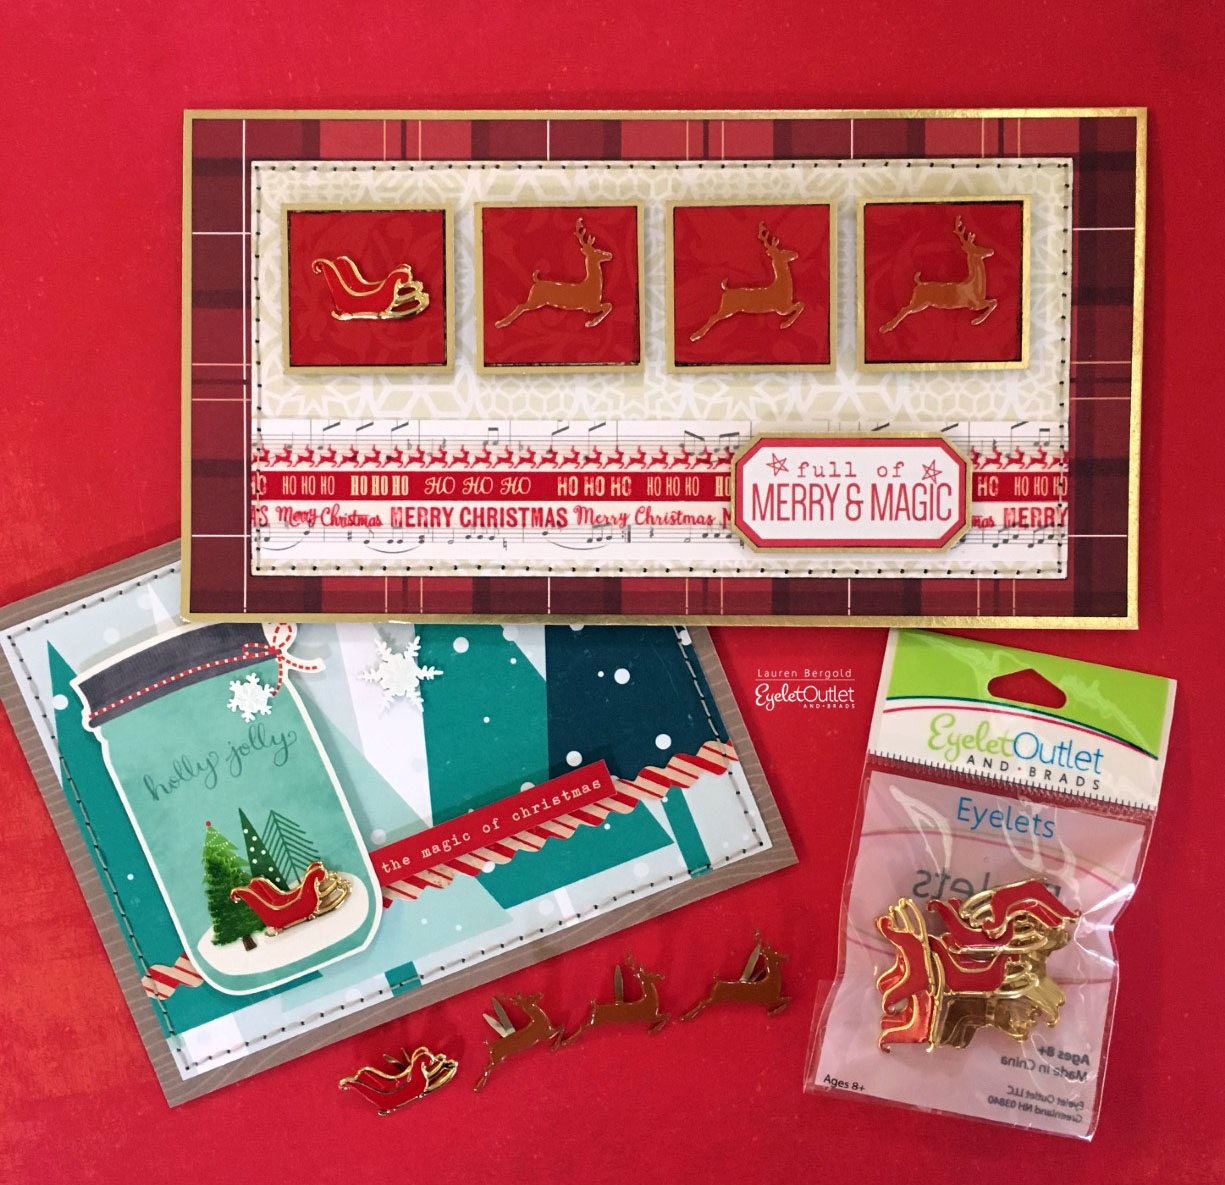

When I saw this "Ho Ho Ho" pocket card, I immediately thought of our new Santa Suit Brads which come with both coat and boots. They are exactly right with last year's Santa Hats, as well. I matted the card on some gingham paper and then popped it up on a background I made by filling a slightly smaller than A2-sized panel with Red Tree Tape.


Stickers are another great time saver. I like to look at the features and scale of the design, and think about where I could slip in a brad or two to add texture and interest. This fun holiday car just happened to have a wreath on its front grill, exactly the size of our brand new Wreath Brads! The wreath on the sticker featured a red bow which overhung slightly and looked a bit odd, so I added a Poinsettia Brad at the top to cover. Mounting them so closely, I had to turn the second brad's prongs both facing the same direction. They were pretty secure, but just to be extra safe, I added a small piece of double stick tape at the back, over the prongs. Trust me, they are not going to slip or slide anywhere! The car's headlights were just a smidge smaller than our 6mm Pearl Brads, the size and profile of which really do resemble a vintage car don't you think? Finally, there I added a Heart Brad over the one printed on the card. My background is this fun argyle Christmas Pattern tape, and I've added a few red and grey Skinny Tapes behind the car, as well.

At 4" square, the pocket card with this fun snowglobe on was just a little bit too big for a standard A2 card. I often "size up" to a five or six inch square card, but this time I wasn't crazy about the original background. So I decided to neatly trim the words and fussycut the snowglobe, whose little house was just the right size for our Santa and Mrs. Claus to stand in front of, with a couple of Snowflake Brads for authenticity. When making tape backgrounds, wide washi covers lots of area fast, and this Tree Tape is an old favorite of mine. A strip of Red Dots Tape grounds the sentiment and fills in the panel perfectly.


I bet you have LOTS of pocket cards and stickers already in your collection that you could "fancy up" with a few Eyelet Outlet brads, bling or enamel shapes to make super-fast, super-fun cards!

Tuesday, September 25, 2018

birds of a feather...

...flock together! this week at shopping our stash we're playing with the smoosh technique. my favorite product for smooshing is colorburst, and my favorite thing to smoosh is fancilful birds. so much so that i taught a class doing just that last year, and then blogged a little photo tutorial to show all the steps, which you can find here. so of course when i heard this week's challenge, it didn't take me long to figure out what i wanted to do:

smoosh birds made by applying drops of clear water to strathmore watercolor paper, sprinkling them with 2-3 shades of colorburst per bird, then placing a sheet of clear acrylic on top to "smoosh" the colors, allowing them to spread and blend semi randomly. when dry, i drew in the eyes where my round label stickers had masked the paper and outlined the patches of color with squiggly lines, to look like tufts of feathers. (for a step by step photo tutorial, click the link in the paragraph below this one) other supplies: various sizes of pitt artist pens by faber castell; purple core'dinations cardstock mat; gloss black cardstock from the paper cut. adhesives: elmers gluetape, 3m foam tape, sewing machine

i made a 5x7 card so that i'd have room for three of these funky little fellas. i used various analogous shades of colorburst: lemon and fuchsia on the smallest dude; gamboge, tangerine and alizarin crimson on his taller brother; and finally wisteria, orchid and a tiny bit of peony. it's been a while since i've done this, but the method came back to me pretty quickly and even faster than that i remembered how much fun it is. especially when the colorburst has dried and you draw their eyes... there is a moment when they stop looking like random splodges of color, and start looking like, well, birds! admittedly wistful, goofy birds, who kind of walk the line between muppets and vegas showgirls, but they're still pretty hard to resist, lol. so yeah, i got on a bit of a roll and made a whole flock of smoosh bird cards, and i've listed a few sets of A2 cards in my etsy shop, just enough stuff.


OR... you could read the tutorial and make your own, then link up with us at SOS. of course, you can also use the smoosh technique in plenty of other ways, and if you check out the design team's beautiful projects, i'm sure you'll get plenty of great ideas! ♥

Friday, September 21, 2018

let it snow, let it snow, let it snow!

this fortnight at ♥JINGLE BELLES♥ we'd like to see... (you've guessed already, haven't you?) ...cards which feature SNOW! Snowflakes, snowballs, a snowy landscape or even an adorable snowperson, like this one:

snowman sticker: my mind's eye; sentiment dies: elizabeth craft designs; washi tape, snowflake brads and heart pearls: eyelet outlet; patterned papers: crate, doodlebug, studio calico; border punches: recollections; glossy white cardstock: the paper cut; adhesives: stick it by ken oliver crafts; elmers brand gluetape, 3m foam tape

my card features an adorable mme snowperson sticker, set atop a background i made with my brand new, utterly awesome set of winter wishes word dies from elizabeth craft designs. the set has nine sentiments, but the current theme so clearly called for "let it snow" that i decided to use it a bunch of times. i cut all of the words from scraps of glossy white cardstock backed with "stick it" from ken oliver crafts, so all i had to do was peel off the backing and arrange them... easy peasy, but quite a dramatic look! i embellished with eyelet outlet snowflake brads, heart pearls and washi tape and called it done.

be sure to check out the awesome snow-centric holla-day card miss stephanie has created, then start planning to link up your own at ♥JINGLE BELLES♥!

Wednesday, September 19, 2018

Sleighin' It

There are some fab new holiday brad styles in the Eyelet Outlet Store, with more to come! One that I especially love is the Sleigh Brad, which pairs perfectly with the Prancing Deer from last year.


My first card features an Inchie version of the Sleigh Brad being pulled by three Prancing Deer. I've also worked in some Skinny Tape from a set of five which will be in the store very soon!


My second card contains my favorite cardmaking hack: I love to use journaling cards and stickers! By starting with premade ingredients, all I really had to do for this one was attach my Sleigh, Pine Tree and Snowflake Brads and I was *done*!


There are more adorable NEW holiday brads in the EO store right now, with more designs being added weekly. Be sure to check the Eyelet Outlet Blog periodically to see the design team's awesome and inspiring ideas for using them!

Tuesday, September 18, 2018

welcome home

we're celebrating our roots this week at shopping our stash. for "welcome home" we'd like you to create something using items that represent where you live; or maybe where you come from? i grew up pennsylvania, but have lived in central new jersey for my entire married life ...which is coming up on 33 years next week!!! most people from my home town consider philadelphia their city, but for me it has always been new york. and i'm now lucky enough to live within walking distance of a commuter train into manhattan, which is really quite a nice thing.* so my card is entirely new york centric:

view of central park south with boat pond in foreground, the small statue of liberty photo and a bit of text with tourist advice all cut from out of date nyc guide books which i collect at garage sales; suatelier nyc-themed stickers and diecut navy blue deco tape are actually from the ink pad ♥; cloud washi is a retired eyelet outlet product, the tiny hearts tape is from lawn fawn i think; all of the tapes are stuck on top of an old nj transit commuter train schedule; numerals were sized in outline form in a text document using "impact" font, printed on plain cardstock and used as templates on scraps of prima patterned paper from the "havana" line; slide mount and sheet music from my stash of vintage goodies; ink: colorbox; adhesives: elmers brand gluetape, scotch gluestick, 3m foam tape; we r memory keepers corner rounder; this design was built on a 4x6" vintage (but ugly) pc, so the back has the dividing line, stamp holder, and a bit of text about the original photo which was of some rather unattractive carvings in a church somewhere in france... 

you may be wondering why there's a big "20" in the center of my design? i confess it's because i did a bit of creative multitasking, and actually made this to also be my entry in the ink pad's 20th anniversary postcard contest! i haven't known anna chiang for quite as long as that, but we've been friends for a good decade, and i wanted to join the celebration of that awesome store! i confess i was excited when i saw that my card was in the midpoint reminder FB post about the contest. and i was quite amazed that on the day it ran, two different friends messaged me to say they were sure card with the vintage slidemount MUST be mine! :) :) :) thus, i'm showing the pic in question; and also because although i never show the envelopes i mail or hand to my card recipients, they are often decorated, and i was pretty happy that my rainbow stamped envie made it into the shot! for once, i added lots of detail to the back of the card, as well, but of course i forgot to take a pic of that. dang.


be sure to check out all of the amazing projects from the design team darlings at SOS and then get cracking on your own "home" work! ♥

*though you would probably not envy our traffic. or our property taxes.  

Friday, September 14, 2018

give peace a chance

we're still celebrating a peaceful holiday at ♥JINGLE BELLES♥ and you're still invited to join the fun! here's what i made this week:

cyanotype deer illustration: from a vintage ideals magazine, diecut with nestabilities circles; patterned papers: basic grey; peace die: spellbinders; snowflakes diecut with th/sizzix snowflake die from a colorburst essperiment; fancy pearl bling: eyelet outlet; ink: colorbox; adhesives: elmers brand gluetape, 3m foam tape, gluedots, sewing machine

once again i've incorporated the prompt by using a peaceful scene (in this case from a vintage ideals xmas magazine) and the word peace. i've used lots of lovely and elderly bits of leftover basic grey holiday papers (for the record: basic grey, how i miss thee!!!) my snowflakes were diecut from a (rejected) colorburst background* i made with various shades of blue with white modelling paste on top. 

be sure to check out stephanie's newest peace card at ♥JINGLE BELLES♥ and link up one of your own! 

*i hardly ever throw away colorburst essperiments, however weirdly they turn out, because honestly i find the ones i like least in their "raw" form make the best diecuts! ;)

Wednesday, September 12, 2018

Hoppily Ever After

Yes, someday, I promise to once again make something that does not include a diabolical pun. But today is not that day, lol! Case in point, a card that features the frogs, waterlillies and cattails which all come in the Eyelet Outlet Frog Brad Set:


This card also includes one of my favorite hacks for our Paper Flowers. I've mentioned before that I love cutting the petals of the green flowers apart, to make leaves and vines. This time I cut the whole flower across the center to make a lilypad!

Of course, no one likes a uni-tasking pun, right? Luckily we also have Rabbit Brads, which work equally well with the sentiment. I liked the little "scene" in the frogs' card, so I tried to give the bunnies a bit of context by putting them on a sunshiney mini journal card and adding a cloud from the Sun and Cloud Brads as well as a Mini Butterfly.


As I was grabbing the ingredients for the other two cards, I came across the Beer Brads, and realized that "hop" can be a noun as well as a verb. So obviously I had to make a third version. I couldn't come up with a realistic landscape for this one, but I added one of my favorite Heart Brads for good measure!


I hope you're having a very HOPPY day, and that you'll be inspired to make a fun card (or three!) before it's over! ♥

Tuesday, September 11, 2018

SOS371: upcycling

i love challenges where i get to re-use, re-cycle or up-cycle a non-crafty ingredient, especially when it's something i might actually have thrown away. more on that in a minute, but by now you'll have sussed the this week's challenge at shopping our stash is to perform such a feat, and here is the card i made:

upcycled plastic packaging as a shaker card window + flower images cut from an old falling apart book; mason jar stamp and die: art-c; patterned paper: k and co; crystal drops: little birdie; butterfly sticker: sticko; stamping ink: staz-on; ink for edges: ranger distress; glossy black cardstock: the paper cut; adhesives: elmers brand gluetape, 3m foam tape, sookwang scor-tape 

yes, that's TWO shaker cards this year-- a new record for me, lol! but i recently found an entire tin of little crystal beads, which reminded me of the glass marbles used in flower arranging, and thus the idea for a vase/shaker emerged. luckily, i had the sturdy plastic box in which my colorburst inks and reinkers were packaged, so i had the perfect material to make a somewhat realistic mason jar:


I stamped the jar with staz-on, and used the coordinating die on my absolutely ancient k and co paper... which, by the way, i still really love! i've got a sort of secondary-line in upcycling on this card, too: instead of stamping or diecutting flowers, i chose a lovely vintage illustration from a falling-apart garage sale book, backed the slightly brittle paper with scraps of cardstock, and fussycut the flowers. i generally run just a tiny bit of distress ink around the edges at times like these, otherwise you get that glaring white of the cardstock backing. i mounted the blooms on a bit of foam tape for even more dimension, and this pretty butterfly sticker came and perched on the leaves!


don't forget to check out the glorious cards from the SOS design team for more inspiration!

Friday, September 7, 2018

peace on earth...

...is the theme this fortnight at ♥JINGLE BELLES♥ so we'd like to see holiday cards that include the word peace, OR the peace symbol, OR a scene that evokes peace for you. i combined the first option with the third:

vintage pc from my collection, scanned, scaled down slightly and printed on semi-gloss paper, then distressed a bit and inked at the edges; patterned paper: crate, k and co; white glitter cardstock: best creation; gold metallic cardstock: idea-ology; sentiment cut from a simple stories journal card; ribbon: may arts; pearl holly berries: eyelet outlet; poinsettia stamps, stamens, dies and shaping molds: heartfelt creations, via paper anthology; adhesives: elmer's brand gluetape, 3m foam tape, gluedots, sewing machine

i used a (scanned and reduced) vintage postcard for my peaceful scene and trimmed the word "peace" from a journaling circle in which the overall design didn't fit my vintage vibe at all, but the script word worked just fine! i'm still obsessed with heartfelt creations' dimensional flower system, so the sweet poinsettia clusters are making another appearance; this time in white and gold. if i had set out looking for flowers to specifically fit around the circle shape in the postcard without covering all of the holly, i don't think i could possibly have hoped to do better than this, lol! i partook of this week's awesome sketch saturday layout (week #529) though i rotated it ninety degrees counter clockwise.


be sure to check out stephanie's beautiful card and start planning your own peaceful masterpiece at ♥JINGLE BELLES♥!

Wednesday, September 5, 2018

down on the farm (part two)

Last Autumn I made a set of Farm Animal Artist Trading Cards to celebrate the release of our adorable Eyelet Outlet Cow and Goat, Pig and Sheep and Rooster Brads. Recently it occurred to me that I'd left out the Duck Brads and it was a shame the Horse and Pony Brads hadn't been available yet. So I thought I'd go back and fill in the blanks!


ATC's are traditionally the size of a standard playing card, which is 2.5 x 3.5". These ATC's are, in fact, built on top of actual playing cards. Because they are quite sturdy, plastic coated, and really there isn't much else to do with a deck when you've lost or damaged one of the cards!
 

Each ATC in this set features a base of ledger paper, an appropriate dictionary definition, and a strip of Red Dot Washi plus some Skinny Gold Tape


But the real stars are the Animal Brads, which I've framed up in some vintage slide mounts. You can build a little scene right on top of the image, but generally I remove the original photograph and adhere the cardboard mount to some sturdy patterned paper. Then I set my brads within the window, which is a perfect size to show them off!


In this second set I've featured the Horse and Pony Brads (which combine a mix of two colors of adult horse, plus adorable foals), Duck Brads, Llama Brads, Trout from the Trout and Bass Brads and Sketched Owls which I think are one of the prettiest designs we have.


I made all of the short, punny sentiments with my old school Dymo labelmaker, having recently found Dymo brand tape for sale at Target, of all places! (There are other brands of tape that fit the Dymo, but they don't all STICK like Dymo, and I'll never experiment again, no matter how pretty the colors are!)


I hope you'll be inspired to make some fun ATC's featuring your favorite Eyelet Outlet Brads and Washi Tape!

Tuesday, September 4, 2018

crazy for coloring!

yes, that's the name of the new challenge from shopping our stash, so break out your favorite coloring media --markers, pens, pencils, gelatos, or all of the above-- and get going! personally, i'm more often crazy *FROM* coloring, because realistic shading is one of my weakest attributes. so even a few small images (like those below) take me several hours to complete. i should probably practice more... ah well... i'm pretty happy with the results this time:

polynesian paradis stamp set: my favorite things; colored with tombow dualbrush pens and prismacolor pencils; sandcastle, seashell and flamingo brads: eyelet outlet; sentiment sticker: crate paper; patterned paper (mostly scraps): echo park, amy tangerine/american crafts, scenic route, basic grey; plain white cardstock: staples; adhesives: elmers brand gluetape, 3m foam tape

my usual coloring method is to do a "base coat" with my tombows, then add shading, blending and highlights with prismacolor pencils. and that's what i've done here. i thought about painting a beach background again. as you know, i LOVE painting beach backgrounds. but having just done that last week, i thought i'd change it up and paper piece the background instead. which let me use up a bunch of seriously old paper scraps... very much in the SOS spirit there! i couldn't resist a few eyelet outlet brads in the foreground either. the beachy ones are some of my faves. 

i haven't linked up with retrorubber in a bit, and probably getting back into the habit would help me stamp and color more confidently, right? their current challenge is "anything goes" so i'm cool on that score. you also need to use stamps more than a year old, which is perfect, because i know that this adorable mft hula girl was a birthday present from stephanie last june.

RRCB 94

as adorable as the girl is, my favorite stamp in this set is the chameleon. he could probably be my spirit animal, one of the few creatures on earth who loves COLOR as much as i do, lol! originally my plan was to place him on the lower righthand side, where the brads are. but somehow, as i was applying foam tape to the back of the heart, i managed to get a big black smudge up towards the top. so a hasty chameleon relocation operation took place at the last minute. (shhhhhhhh don't tell, k?!)


there's loads more inspiration awaiting you at SOS, where my design team darlings have gone all out. i know you don't want to miss it, so off you go! ♥