Friday, April 29, 2016

warm washi wishes

we're still celebrating the joys of decorative tape at ♥JINGLE BELLES♥ and there's still a fun little prize from our lovely sponsor eyelet outlet for a random cardmaker who links up with us this fortnight, so why not join in the fun? here's what i made this week:

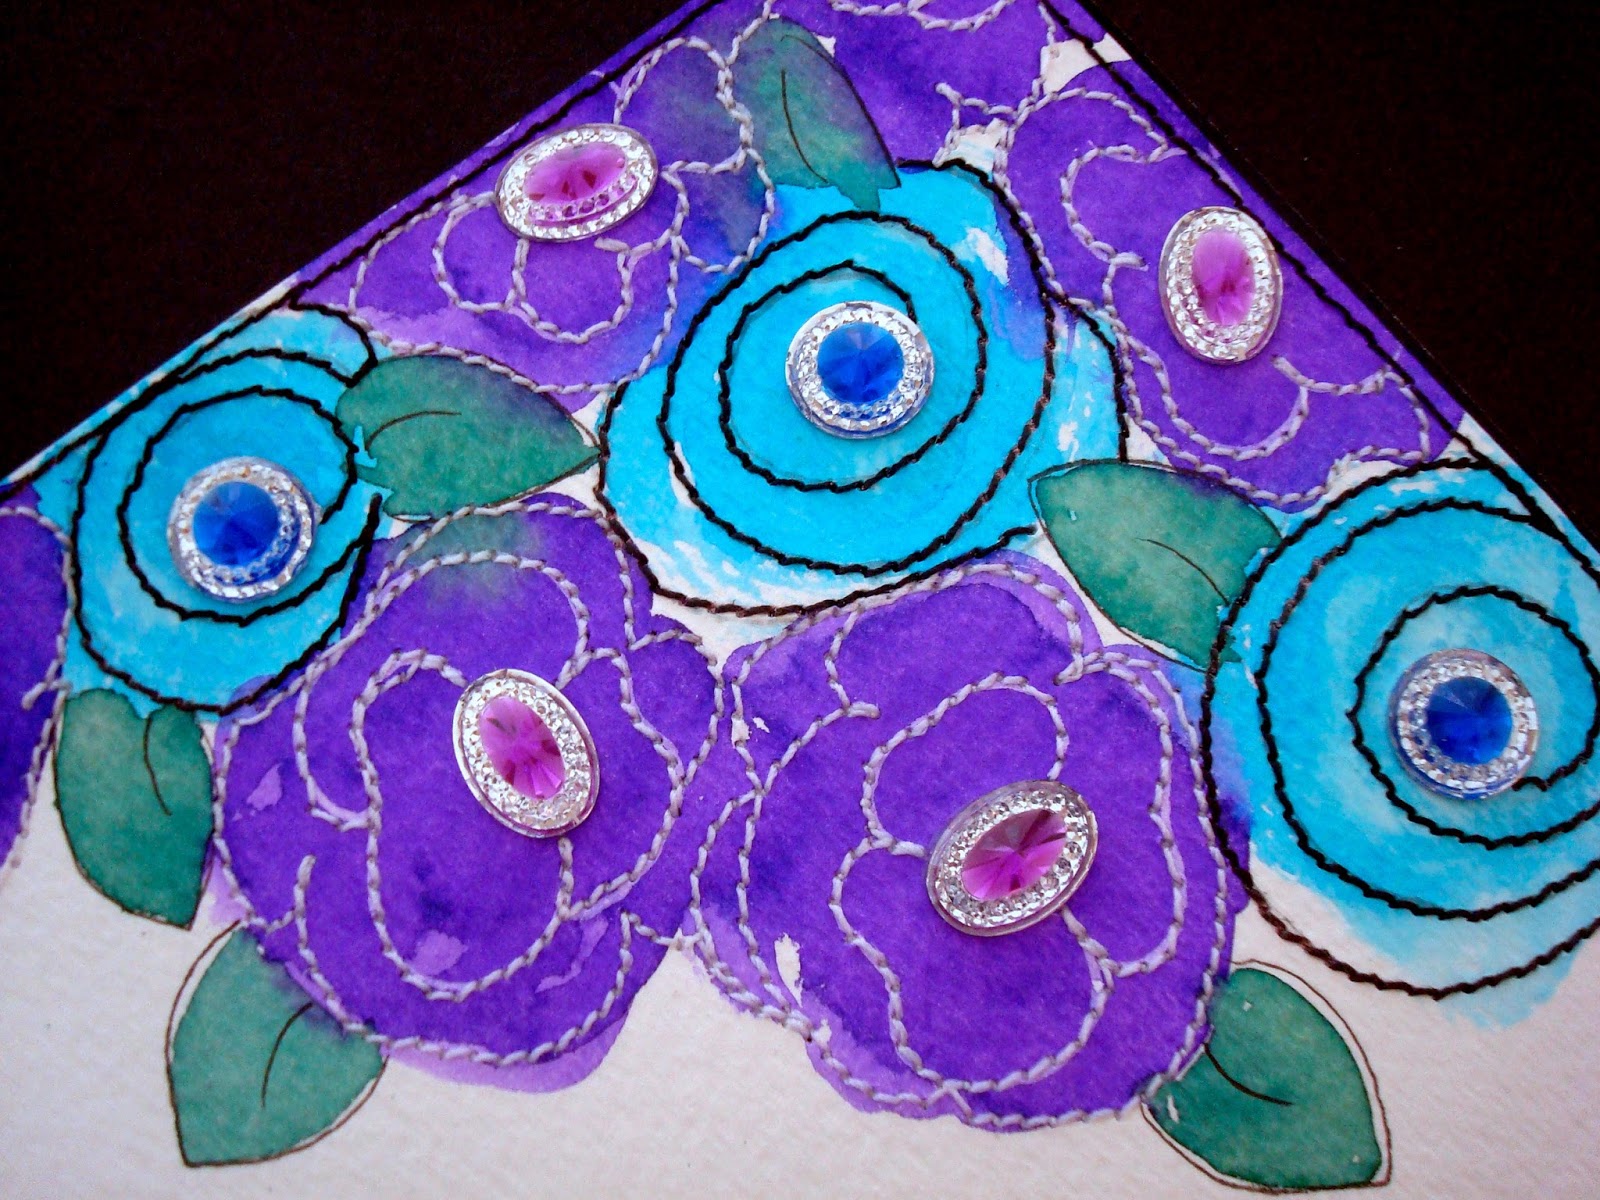
eyelet outlet washi tapes: holiday dots, ornaments, pink foil with white dots, music notes; sticky back bling: bumpy hearts, pink flower jewels (recolored with an alcohol ink marker), pearl strips; paper flowers in red and white; kromekote glossy cardstock: the paper kut; scraps of polka dot paper: doodlebug; adhesives: staples brand gluetape, 3m foam tape, sewing machine

this is one of my go-to tape techniques because it's EASY; it always comes out great each time; and (especially, lol!) you get to use a whole bunch of different tapes all at the same time!!! ♥

for once i actually remembered to take a pic before cutting the squares apart, so you could see just how very easy this is. you fill a (perfectly square) scrap piece of cardstock (or 1/2 fill in this case, i wanted there to be some of my original panel showing) with strips of various eyelet outlet washi tapes; to get a bit of variation, either use tapes of different widths, or overlap a few of them. in this case i worked diagonally, but for other styles you can lay the strips parallel to one edge, or even criss-cross for a sort of plaid effect! when you're all done, you cut the panels up into triangles (think quilt blocks!) and re-arrange them back together. how many triangles? it's up to you! 4... 8... 16... heck, you could probably do 32, if you have that kind of patience; these cards have eight segments each. to mix it up a little bit more, i covered two panels-- with the same tapes, but over different background papers; then i *swapped* four squares from each card. i arranged them in different patterns, and finished them with slightly different eyelet outlet paper flower stacks and sticky back bling


need a little more tape-based inspiration? stephanie has a fab card to show you and there are not one but TWO lovely designs from our awesome eyelet outlet design team cohort dawn mercedes barrett... so please do hop over to the ♥JINGLE BELLES♥ blog for a glorious eyeful of inspiration!

Tuesday, April 26, 2016

think ink!

a little bit of a change-up challenge at shopping our stash this week; we want to see LOTS of ink... but no coloring in! so you can stamp... but as outlines or using solid stamps or as resist; or you can do one of the gazzillion direct-to-paper ink techniques, use stencils, fill a page with handwriting or doodles or... well, you can do anything inky EXCEPT COLOR! don't worry, it's easier than you think and as a public service the SOS ladies have made awesome examples for your inspiration!!! here's what i made:

vintage papers from my stash, torn and glued together somewhat randomly; stencils used on top: quatrefoil by folk art decor; hexagons by teresa collins; various shades of blue and green ranger archival and distress inks applied and blended on top; wood veneer pieces by american crafts... tinted with liquid colorburst in a few shades of blue and green; letter stickers: plastic stars: pink paislee; tapes: freckled fawn, recollections, hambly; outlining pen: faber-castell pitt in size XS; black glossy cardstock: ranger; adhesives: scotch gluestick, 3m foam tape, staples

there are plenty of weeks where me-being-me is a bit of a crafty hindrance, but luckily this wasn't one of them. i love stencils, generally; and i especially love to make the patterns reallllllly blendy with lots of different shades of ink, so that's what i did. one new thing i tried (having seen it on pinterest!) was "dyeing" some nekkid wood veneer shapes with colorburst, which worked really well, actually! i did have to go back and re-outline (with a sharpie) the incised words "right here" on the little banner piece, b/c the color soaked right into the wood and you couldn't read it, but otherwise, it worked perfectly and i know i'll do this again!

need more ideas of how to use ink without coloring? check out the fabulous work of my design team darlings over at shopping our stash! ♥

Sunday, April 24, 2016

H2-OH-my-gosh... there's MORE??!

sorry if you're getting thoroughly tired and fed up with watercolor, but the month's* almost over, so bear with me, k? ♥

day 17: squares
may have gotten a teeeeeeeny bit carried away with the doodles... 
(this actually fills a sketchbook page, lol)

day 18: song lyrics
i sing along with the radio or a playlist ALL DAY LONG, 
but if someone says, "write down some song lyrics" i go 
***...utterly blank...*** 

day 19: yellow
hey lauren, didn't you notice that the next day was going to be 'yellow' when you did a bright yellow sun for song lyrics?
(...NO...)

day 20: alcohol
many thanks to @foxandhazel for showing a little demo of a technique of dropping rubbing alcohol onto wet watercolor... and hello, new obsession! 

day 21: purple
eerily enough, this was the totally coincidental, pre-set-far-in-advance prompt on the day that prince died. 

day22: tulip
i was going for a bit of a "realistic" shading effect which realllllllllly didn't turn out AT ALL... so i downshifted into funky illustration mode, lol.

*i've been playing along with @foxandhazel's "30 days of watercolour" via instagram; everyone is welcome to join in --for as many or as few days as they'd like-- and those days COULD take place in may or june instead of april, for that matter!!! i'm finding this to be a great way to stretch my skills and try new things, but it's flexible enough for beginners or even kids who want to try out their paints in a fun way! check out fox and hazel's blog or instagram account for details!

Friday, April 22, 2016

walkin' in a ♥washi♥ wonderland

if you've been here before, you're probably already aware that i have a mini-obsession* with washi tape. something you might not realize is how many gorgeous varieties of tape are available at eyelet outlet. so this week at ♥JINGLE BELLES♥ we are killing two crafty birds with one stone: we're making holiday cards that feature tape (it can be washi, deco, glitter, fabric, packing, etc; from any manufacturer) and we're sponsored by eyelet outlet, who'll be providing a fun little prize! here's my card:


i realize that when i say, "for this challenge i had TOO MANY ideas" it's the creative equivalent of, "no matter what i eat, i just cannot seem to gain weight!" and expecting sympathy. but sometimes, too many ideas are just as un-fruit-ful as too few. in this case, tho, once i slowed down and thought about each one, i was able to incorporate quite a few of my ideas into this card. i was inspired by the ornament washi tape; in fact it might be my current favorite, but don't tell the other tapes, ok?! ;)


the first thing i thought of was to make some ornaments similar to the ones on the tape. i started making them out of patterned paper (like the green one on the right, which is adorned with some eyelet outlet paper flowers and some clear edge bling) but then i realized the golden one should really be sparkly, and it just so happened that i also own some glitter gold washi tape, which i applied in strips, just to add a little more interest. while i was doing so, i realized that the design of the holiday dots washi tape could also be applied in strips, but if i lined up said dots neatly, it'd look like patterned paper, so that's what i did next.


obviously my ornaments needed hangers, and nothing beats bling for that, am i right? the white pearl strips reminded me i also have smaller pearl bling strips in red that'd be great for setting off the original piece of tape i started with, so i added those at the top and bottom. of course i knew exactly how to arrange everything because i had the super-cool current (#408) sketch saturday right in front of me:


need some more awesome "washi wonderland" ideas? why not stop by ♥JINGLE BELLES♥ where stephanie has another gorgeous card to show you. while you're there, check out the details on that eyelet outlet prize and start planning your own bid for world washi domination, darlings!


*the term "mini" being relative, o'course; compared to... say... the alps, my stash of tape is actually quite small... :) :) :)

Thursday, April 21, 2016

watercolor update

yep, i'm still doing @foxandhazel's "30 days of watercolour" via instagram; which is somewhat idiotic b/c i really DO NOT have any "spare" time at the moment... but it's just soooooo much fun i can't seem to resist. ah well, let's just go with it, kthx. :0

day 11: flower
yes, i've totally put these out of order, just so my favorite one can be on top! 
(je ne regrette rien, mes amies!)

day 9: triangles
started out argyle-ish... ended up alligator-y; it happens...


day 10: mother
yes, i have a lovely mother, but i went in an earth day direction b/c i thought it'd be easier to draw a planet than a person. 
(and i was right!)

day 12: blue
wet-into-wet is my favorite way to play with watercolors. just sayin...

day 13: leaves
most of the time, when i can't decide what to draw or paint, i go with a mandala. sometimes the results are better than others, but this one's not a bad mash-up...

day 14: dots
honestly, i thought this'd be a "gimme" and it turned out to be the hardest one so far... it's more difficult than you think to make NEAT/ROUND dots with a paint brush. who knew??!

day 15: masking
the experiment with the vinyl letters and my name (from the last group) went so well, i wondered if i could make a design out of them. yep. it was fun, too! (there's a flipagram here of the steps, it's kinda cool if you like that sorta thing; depending on how you're viewing this, it may start automatically when you click the link or you might have to press the arrow/play button.)

day 16: black
wondering about the quality of your watercolor paint? try using black. water it down... let it dry... take a good look... for better or for worse, all will be revealed!!! 


EVERYONE 
is welcome to join in "30 days of watercolour" for as many or as few days as they'd like; you don't need to catch up, you don't need to do every day, and it's a really great format for beginners who want to try out their paints in a fun way! check out fox and hazel's blog or instagram account for details!
♥♥♥

Tuesday, April 19, 2016

SOS248: chip off the old block

if you're anything like me, you've still got plenty of chipboard embellishments... they've fallen out of favor a bit recently, but really, there's a reason we all loved them so much: they're sturdy, they add texture and they came in soooooo many super-fab styles! From all of this you may well have guessed that our challenge this week at shopping our stash involves making cards or other projects that feature those neglected chips of awesomeness, whether they be handmade, store-bought, embellishments, alphabets, naked, painted, dimensional or any other variety you like!

textured chipboard butterfly of unknown origin, lightly painted with liquitex gesso; vintage text paper from my stash with a frame painted using leftover yellow and orange color burst; butterfly stencil: heidi swapp; flexible modeling paste: liquitex (also leftover from another project that i used up on the painted frame paper a different night); patterned paper and ancient yellow paper flowers: making memories; gold-edged pink pearl brads and silver heart pearl brads: eyelet outlet; lace: from my stash; adhesives: staples brand gluetape, scotch gluestick, 3m foam tape, sewing machine

i found some cool textured/embossed butterflies in my stash, which are old enough that i honestly don't even know who made them or where i got them, lol. but i still think they're great, so i gesso-ed this one and made him the star of my card:


there's loads more chipboard-usage inspiration over at SOS, where my lovely design team sisters have awesomeness to show you... why not check that out right now, darlings?! ♥

What do Flamingos, Owls and Ice Cream Cones Have In Common?

Two things, actually: They're all *AWESOME* (obviously!) ...and... they're all part of Eyelet Outlet's new collection of jaw-droppingly adorable flatback resin embellishments! I'm up on the Eyelet Outlet blog today, and as you can tell I'm pretty excited about these guys, so I'm going to start showing my cards right now:


Owls are famous for being wise, but Eyelet Outlet's Green Flatback Resin Owls are also pretty darned cute, don't you think? Whooooooooooooo could resist making anniversary cards that feature these guys? Not me, that's for sure! I've teamed them up with some Heart Brads and Heart Pearl Brads, just to emphasize the "love" in "Love, OWL-ways".


As fabulous as owls are, my favorite flying creature is still the flamingo... Let's face it, there's nothing cooler than a bird who's HOT PINK, as this Flamingo Flatback Resin proves quite conclusively:


A few Cloud Brads can't diminish the rays from my heart-shaped sunshine, in fact they make it even more lovely, especially when they're all floating in a watercolor sky!


Finally, we've come to my very VERY favorite embellishment (at least this week, lol!) the Ice Cream Flatback Resins! The detail on these is superb... they have textured cones, sprinkles, and even a cherry on top! What more could you ask for?


I've set them off with a few Eyelet Outlet White Paper Flowers adorned with Cherry Brads, between a couple of strips of Music Note Washi Tape. Can you spot the other tape I've used here? It's kind of subtle, but I love the shine that my scalloppy borders of Pink and White Dotted Foil Washi Tape give to the embellished panel. (Yes, I still use the Scallop Deco Scissors I bought when I first started papercrafting, years and years ago, lol!) One more Heart Brad sets off my stamped and colored sentiment.


Which of the brand new Eyelet Outlet Flatback Resin Collection is your favorite design? Is it one that I've used here, or one of the others in the shop, like the yummy Cupcakes, adorable Monkeys, or super-fun Schoolbuses? Tell me in the comments, or better yet, leave a link to your own creations!

Friday, April 15, 2016

peace on earth (day)!

we're still celebrating cards made with re-cycled, re-purposed and up-cycled elements at ♥JINGLE BELLES♥ and there's still plenty of time for you to join the fun! this week i had a blast playing with paint chips... no salsa required, lol!

christmas trees cut from benjamin moore paint chips using echo park's "story of our christmas" tree die; snowy hills made of collaged vintage text paper scraps covered with part of a doily; patterned paper: sei; glittery snowflake stickers with very visible plastic backing: from the dollar store; sentiment diecut: pebbles; glossy kromekote cardstock: the paper cut; adjesives: staples brand gluetape, 3m foam tape, scotch gluestick, sewing machine

i'm not sure why i love this little forest of trees sooooooooooo much... but i really do... so i didn't want to bring in too many other elements, i made a hilly foreground (vintage paper scraps covered in part of a doily) and a snowy sky (a scrap of ancient SEI paper and half a packet of dollar-store snowflakes) popped on a diecut sentiment and called it day!

there are loads more eco-friendly masterpieces in the earth day readers' gallery, not to mention a brand new, rather fabulous card from stephanie over at ♥JINGLE BELLES♥ won't you drop by and visit those now? ♥

Wednesday, April 13, 2016

a couple of collages...

...cause you know how much i like to glue random things to other random things, lol! :) both of these were based on prompts from #SistersWithHeartInArt... (the instagram art inspiration in which i participate; to which all artists and all media are welcome!) ...the first is for our current prompt which is "TEXTURE"; i may have gotten sliiiiiiightly carried away with adding dimensional items, beads, modelling paste, metallic flakes, crumply tissue paper, etc; but holy moly it was FUN!


last week we had "NUMBERS" and i went a little less lumpy bumpy; mostly i stuck with various vintage papers which had numbers or numerals on: there's an old (written on) ledger sheer, the table of contents from a children's encyclopedia, some play money, a train schedule and a few different washi tapes with rulers, which i especially love b/c they are somewhat transparent and are thus the best thing EVER for layering... plus they are self-adhesive... what's not to LOVE, eh?!


hope that you are having a fun and creative week, darlings, and that you will get to do something that makes you happy before friday has even arrived! ♥

Tuesday, April 12, 2016

you stamped with *WHAT*?!

this might be my all-time favorite challenge at shopping our stash. this week we're asking the musical question, "you stamped with *WHAT*?" and you may already have guessed that we want to see you "stamp" with items not generally intended for stamping. need some examples? ok, how about bubble wrap, corks, sponge or potato-carved shapes, painted leaves or branches, cardboard tubes, and... just for good measure... it turns out there's a whole category of stamping with veggies that i never, ever, even knew existed, which is actually pretty cool! but here's my card and let's see if you can guess what i stamped with:

watercolor painted on the less textural side of strathmore paper using various shades of ken oliver's color burst; petals and flower centers stamped with the bottom of the color burst bottles, the bottom end of a sponge applicator and a little medicine cup, using ranger archival ink in black; florals: petaloo paintables (tho ironically i left them white here, lol); velvet flower: creative imaginations; brad and orange ribbon: making memories; tiny red sticky-back pearls: eyelet outlet; white kromekote cardstock: the paper cut; outlining pen: faber-castell pitt in XS nib; additional outlining done on the sewing machine using white coats and clark upholstery thread and the highest stitch-per-inch setting; adhesive: staples brand gluetape and sewing machine

i had a few lids of jars out, and some other small-circles and had decided to watercolor some super-loose flowers with some new shades of colorburst (especially fuchsia and tangerine!) and then add the circles as centers and accents. but then, when i really looked at the little plastic bottles the colorbursts come in, it occurred to me that the elongated oval would make BRILLIANT petals! i stand by that decision, btw! :)


i was inspired by both halves of the current fusion card challenge, though admittedly, my card morphed a bit away from the inspiration board. but this is the thing that totally got me started, for which i am thankful!


speaking of inspiration, there's always plenty of that over at SOS... why not hop over and see the clever creations of my other DT darlings! ♥

Sunday, April 10, 2016

well, YES, i am a crazy person...

...if that thought's only just occurring, you must be new here: WELCOME! :)

so what's the latest crazy thing i've embarked on, you ask? i've been using all my "extra" (HAHAHA!) time to play along in a really fabulous instagram challenge called "30 days of watercolour" hosted by torrie of fox and hazel. i seriously doubt i'll make it thru the entire month, but at the moment, i'm knocking these out in a few minutes at the end of the evening, and i'm having a blast! as long as both of those remain the case, i'm gonna continue!

day 1: lines
because if you don't specify a color, i will use ALL OF THEM! :)

day 2: red
hmmmmm... how many red things can i draw a wonky version of? 
(...quite a few, actually...)

day 3: your name
coincidentally, someone had just given me a cache of those old-school, vinyl letters from the hardware store and i wondered if they'd work as masks for watercolor?
(YES!!!)


day 4: pink
hardest thing about this was NOT outlining it!

day 5: wash
the same cerulean blue done as wet-into-wet and wet-onto-dry... with a little blendy green between them so it'd be a little more interesting...

day 6: green
...un-be-LEAF-able... :) :) :)

day 7: circles
note to self: don't decide to fill most of a sketchbook page with circles; but if you do, don't make most of them TINY; but if you do... for pete's sake don't flippin' outline them all!!! 
(it looks coooooool tho... she said immodestly)

day 8: orange
i called this the "tequila sunrise mandala" because of the colors and the fact that i let some of them bleed into each other; partly b/c it looks cool and partly b/c at 11pm i have even less patience than i do the rest of the day! :0


just in case you're looking for a little bit of fun whilst sharpening up your watercolor skills, come along and join in the fun! the prompts are interesting enough to engage us, but still simple enough to be do-able in a short time at the end of a long day. ♥

Friday, April 8, 2016

it's almost earth day...

...and if you've played along with us the last few years at ♥JINGLE BELLES♥ you'll know that the one prompt we've had EVERY single year, including the first one, is an "earth day special" for which we make holiday cards that incorporate a re-used, re-cycled or up-cycled element. this can be anything from a piece of giftwrap or tag saved from one of last christmas' packages, to some pretty packaging which held papercrafting supplies, to bits of bakery box plastic or corrugated cardboard or... well, you get the idea! we're also thrilled to have, as our lovely guest star this fortnight, the wonderful kathe deck, whose idea this originally was way back in 2011 (i can hardly believe it's been five years since we've started this lark!) and who remains one of our favorite belles!

recycled bits: gold smoothed-n-saved giftwrap background + packaging from petaloo burlap poinsettias as a photo mat; vintage beaded applique from my stash of funky fabness; velvet and burlap florals: petaloo; vintage-style (but new) santa illustration: glitz design; label shaped ledger thingie: k and co; glorious glitter gold washi that makes me swoon: eyelet outlet; slightly slimmery pale kraft cardstock: core'dinations; ink: colorbox; adhesives: elmers brand gluetape, 3m foam tape, xyron (to fuse the giftwrap to plain cardstock for sturdiness), gluedots, sewing machine

it's tempting to think that i cheated here, since of course i knew this was coming i was able to save some especially fab bits and bobs to use on my card. but really... i've ALWAYS saved the prettier bits of giftwrap and other "fancy" papers that have come my way; like... seriously... since childhood.* in a way i think i took up papercrafting and collage mostly to have a good reason to save and use this sort of thing, more than the other way around! :)


in this case, the (metallic and hard to photograph, grrrrrr) gold paper in the background is giftwrap off a present from my mom last december (smoothed out and xyroned onto some plain white cardstock to make it a little sturdier) and the mat behind that cool vintage-style santa illustration is a bit of packaging from the yummy blue burlap ponsettias! the leafy gold thing is actually a vintage applique for sewing; it's HEAVY and needed about fourteen** gluedots to secure, but i absolutely fell in love with it, even before i realized how perfectly it coordinated with the gorgeous eyelet outlet glitter gold washi tape that makes me swoon every time i use it!


i used the current (#406) sketch saturday for my layout... quite faithfully, for once, as a matter of fact!

be sure to hop over to ♥JINGLE BELLES♥ where both stephanie and kathe have extraordinarily fab cards to inspire you! ♥

*don't worry, i have a clearout periodically, and i'm hopeful to avoid being featured in my own very special two-part episode of "hoarders", lol! :) :) :) 

**totally serious... that thing is ON THERE! 

Wednesday, April 6, 2016

Save the Drama For Your Mama

Ok, maybe not *actual* drama... your mom probably doesn't need that; but how about a little papercrafting drama in the form of Mother's Day cards? I'm up on the Eyelet Outlet Blog today with a few ideas for unique --and dramatic-- effects that are fun and EASY!!! Let's start with a floral watercolor background.


What's that, you don't paint? Can you make a messy circle? Seriously, the messier the better! Make six or seven of them. Let them dry. (This is by far the hardest part; luckily, we have heat guns!) Add a few squiggles or swirls, with a pen or your sewing machine, or your favorite floral stamps; top them off with Eyelet Outlet 12mm Clear Edge Jewels or Oval Jewels... or both... and that's *IT*! Wait, maybe we should have a sentiment: let's make a home for it with a few strips of Music Note Washi Tape, then our alphabet stickers will really stand out!


Still not into the whole painting thing? All right, let's make some patterned paper, instead. I went with argyle because I just got a roll of super-fun Road Washi Tape and the dotted lines reminded me of stitching. Plus, what mom wouldn't like to get *DIAMONDS* on Mother's Day, eh? ;)


I hand cut these diamonds, but we all have a zillion punches and dies, don't we? Start with one basic shape in a few colors and see how many fun geometric patterns you can make. When you find your favorite, affix the shapes to your background and start thinking about embellishments. I must've been channeling a 1950's vibe because as soon as I had pink-n-grey argyle I wanted to add pearls... and what could be easier than Pearl Bling Strips? A few blooms are always a nice touch, and these gorgeous Eyelet Outlet Solid Color Paper Flowers come in packs of *40* with three graduated sizes and they're available in a few different shapes! I popped on some Bumpy Heart Bling centers and I was done.


I hope you'll be inspired to try something new and different... be sure to leave me a link to your own dramatic creations in the comments, I love to see the things you make! ♥