Showing posts with label flowers and foliage embossing folder. Show all posts

Tuesday, September 9, 2025

SOS556: The Cat is in the Bag

There's a new challenge at Shopping Our Stash. For "The Cat is in the Bag" we'd like you to feature any kind of bag (purse, backpack, beach bag) and/or a cat; so there are LOTS of ways to go this time! I chose the "cat" option, as you can see:

I have several different "cat" options, but my favorite is this adorable guy from the Halloween Add-On to Wendy Vecchi's Essential Envelopes set. Since I had the bin out, I also used two of the Pinking Edge Frames and sentiment from the Birthday Add-On to her Not Your Ordinary Card Collection from Spellbinders; and one of the Heartfelt Thanks and Scallops frames as well as the Flowers and Foliage 3D Embossing Folder, which are both part of From the Garden Collection. I love piecing the cat using sticky-back black felt, it's hard to tell in a photo, but IRL it has lots of texture. I split the birthday diecuts and added "PURR" in velvetty pink letters to make the whole thing a tiny bit punny. ;)

SOS556: The Cat is in the Bag will run at SOS until the evening of Monday, September 22nd. Be sure to hop over to Shopping Our Stash and see the inspiring cards the Crew have made!

Saturday, October 19, 2024

You're Not the (EM-)Boss of Me!

Flashing back to Wendy Vecchi's first collection for Spellbinders (The Garden Collection) and specifically playing with the Flowers and Foliage 3D Embossing Folder with a selection of Wendy's Archival Inks from Ranger. I've used a bunch of different techniques that Wendy has shown off in various Tip Tuesday posts, such as inking and spritzing the emboss- or deboss-side before embossing; painting the flowers with diluted Archival Reinkers from the back or front; applying ink directly from the Archival Ink Pad (on the emboss- or deboss-side); and inking, stenciling, stamping (with some older Studio 490 stamps) and/or doodling on top. I love how you can get so many completely different variations with the same embossing folder, but they're all equally beautiful!

Friday, May 17, 2024

Taking (Card)Stock

It's week two of our Jingle Belles celebration of Cardstock Christmas for which absolutely NO patterned paper is allowed. I usually semi-panic at times like these, but luckily my Wendy Vecchi stamps, Chippies and 3D Embossing Folder stepped in to save the day!


I stamped half a dozen poinsettias from Wendy Vecchi's Doodle Christmas Stamp Set and a bunch of holly leaves from the Doodle Holiday set, embossing them in Ranger Lilac Pearl and White Embossing Powders, respectively. I colored them with Petunia, Peat Moss and English Ivy Archival Inks, then did a bit of fussy-cutting before adding Sunflower Liquid Pearls to the centers. I stamped the large swag of greenery from Doodle Holiday in English Ivy across the chunky chipboard "Joy" from Wendy's Statements Chippies; then mounted all of the above on a cardstock panel to which I gave quite an impressive bit of dimension with Spellbinders' Flowers & Foliage 3D Embossing Folder. One skinny Petunia mat later, my 5.5" square card was complete!


You still have until next Wednesday evening (5/22/24) to join our Jingle Belles' Cardstock Christmas fun, which we hope you will!

Sunday, April 14, 2024

Too Many Prints? (...naaaahhhh...)

I may have gotten slightly carried away combining Wendy Vecchi's Vintage Florals die set (from Spellbinders' In the Garden Collection) with some of her older Studio 490 background stamps (Herringbone and Perfectly Plaid to name just two!) and of course I had to try a few experiments with inking the Flowers and Foliage 3D Embossing Folder before running it through the diecutter... but... it's finally Spring and our gardens are full of a riot of real-life colors, shapes and patterns, right? (Not to mention what feels like record-setting amounts of POLLEN; but that's a completely different issue...

Thursday, March 7, 2024

The Embossable Dream

One of the best ever embossing folders has to be Wendy Vecchi's 3D Flowers and Foliage, featured in her Spellbinders' From the Garden Collection. It's nice and big; it embosses deeply; and you can turn it literally in any direction without feeling upside-down or off-kilter!

This time I embossed some grocer's kraft cardstock and a LOVE Chippie (from the Statements set), then painted all of the raised flowers and leaves with Wendy's designer series Liquid Pearls from Ranger. I diecut the smaller blossoms and leaves from the Vintage Florals set, and mounted the whole thing on a light green mat, made "edgier" by the largest frame in the Heartfelt Thanks and Scallops set. Not to brag, but I LOVE how this turned out!

Saturday, February 3, 2024

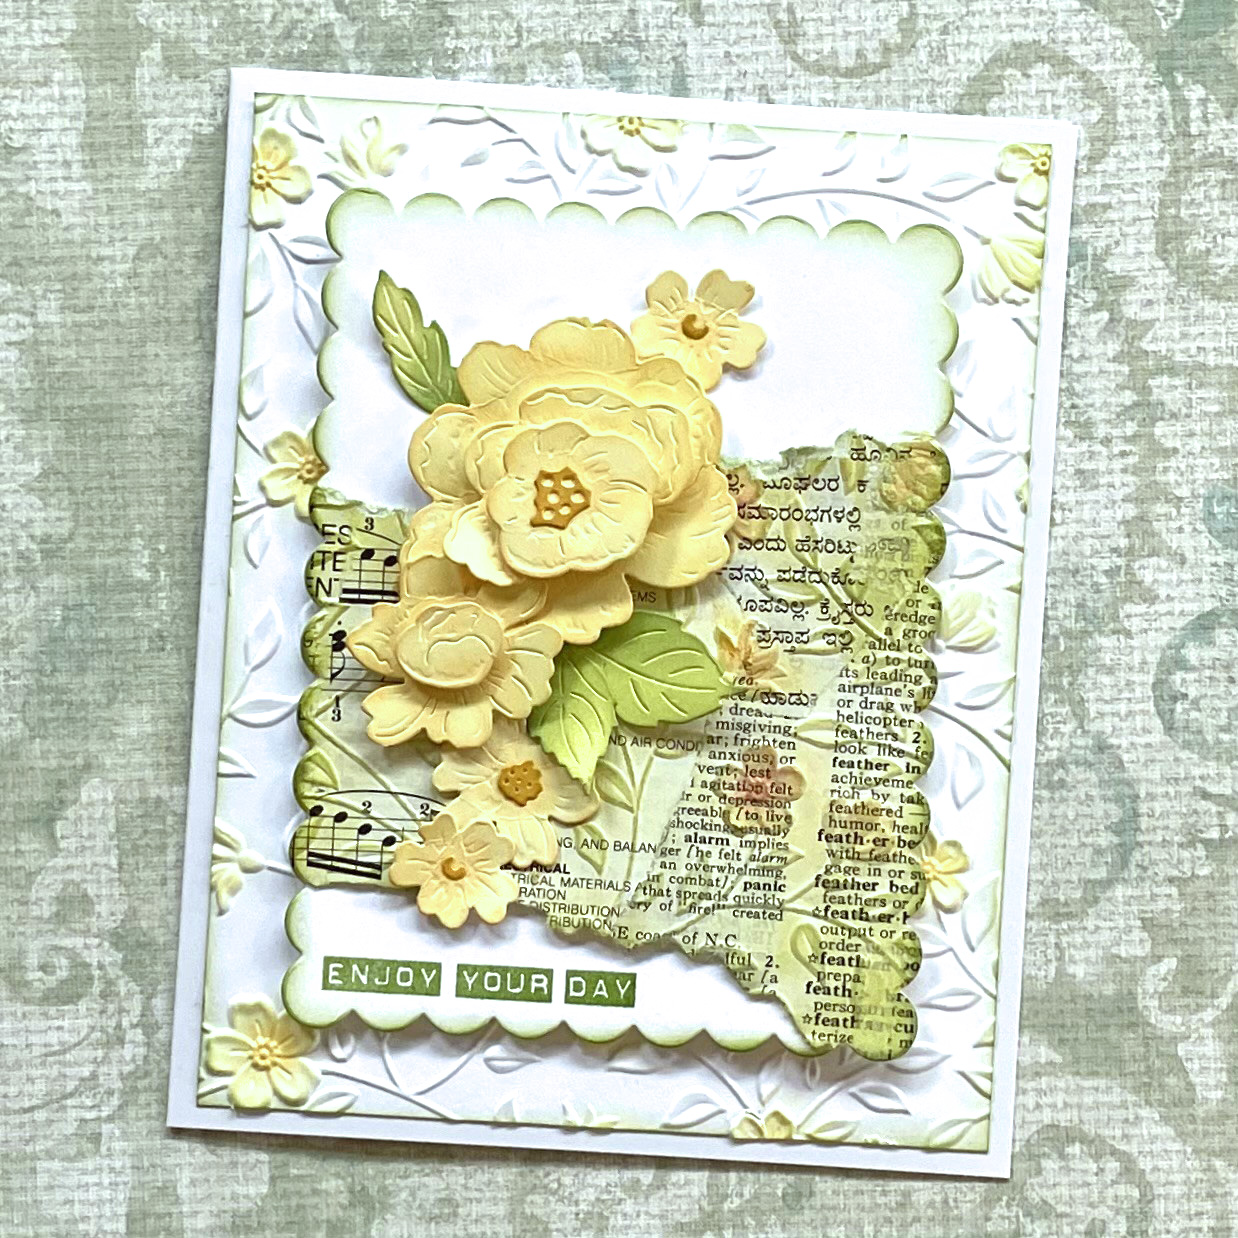
Enjoy Your Day

Happy mail ALWAYS makes my day, so I try to make sure I send out plenty of special cards to friends and family. This A7 card features Wendy Vecchi's gorgeous Vintage Florals die set (new from Spellbinders) colored with three shades of yellow Archival Ink from Ranger (Buttercup, Sunflower and Goldenrod, to be precise) and popped up on layers of foam tape for extra dimension.


My plan for this card was to make a mostly-white collage of vintage text paper, run it through with the Flowers and Foliage 3D Embossing Folder, and use that for the background. Unfortunately, the text paper kind of hid more of the embossed flowers than I liked, so I used a Mini Blending Tool to apply yellow and green Archival to the design, which is kind of cool; but the embossing still didn't show up as much as I had hoped. However, a torn section of the collaged piece did make a nice accent for a plain white panel that I cut out with the largest die from the Heartfelt Thanks and Scallops set. Then I embossed plain white cardstock with the folder, added a little bit of Buttercup Archival to the flowers and some Leaf Green around the edges and finally, I had the look I was going for! 


I used one of the label-maker-style sentiments from the Garden Party Stamp and Die set as a sentiment, et voila! Be sure to check out Wendy Vecchi's Instagram Account and the Make Art with Wendy Vecchi Facebook Group for lots more ideas and inspiration for using Wendy's fabulous Garden Party Collection!

Saturday, January 20, 2024

Hello!

It's time for more goodness from Wendy Vecchi's new Garden Collection for Spellbinders. This time I'm featuring the Flowers and Foliage Embossing Folder; as well as the Vintage Florals die set. The latter are cut from plain white Perfect Cardstock panels, then painted with Liquid Pearls for a shimmery, dimensional look.


I used the embossing folder on a panel of white Perfect Cardstock and a smaller panel of deep violet cardstock, which I then lined up on top of the white to make a continuous pattern. Of course as soon as I fitted them together it occurred to me that it would've been considerably easier to have affixed the violet piece to the white AND THEN embossed... but... well, hindsight is always 20/20, right?


I diecut all of the flower pieces, then painted the larger ones with Cornflower Blue Liquid Pearls accented with some Night Sky. The smaller flowers are done in Violet with some Petunia towards the center and the leaves are Prickly Pear. when they were dry, I used coordinating shades of Wendy's Archival Inks from Ranger in Night Sky, Violet and Fern Green to add a little more contrast around the edges. 


I wish I could capture all of the soft shimmer that the Liquid Pearls have added to the florals, but since I did not, maybe you'll give this technique a try and see for yourself?!

Monday, January 15, 2024

Garden Mandala

It's a bloomin' beautiful Mandala Monday, thanks to Wendy Vecchi's gorgeous new Garden Collection from Spellbinders. If you're new to mandala-making I have to tell you my all-time favorite trick: Using heart dies to make the "petals" of a mandala! Since it just so happens that Wendy's new Heartfelt Thanks and Scallops set has nested heart dies, the possibilities are pretty much endless. I wanted to make a card so I only used two of the sizes, but you could go all out and make a BIG art piece, using all five sizes in sequential order.


For this project I also used the Garden Party Stencils, the Flowers and Foliage Embossing Folder, and three of the sixteen dies in the amazing Vintage Florals set. And, of course, a selection of my favorite Wendy Vecchi Archival Inks, including Pink Peony, Rosey Posey, Sunflower, Leaf Green, Prickly Pear and Tea Rose. 


The first thing I made was the floral panel, using the Garden Party Stencils, but without the coordinating stamp or die. (I should mention here that these layering stencils are super-easy to line up and use with perfect alignment to use alone OR to color the stamped image; they have registration marks on all four corners, and they're numbered too!) On this occasion, I chose to line the stencil layers up verrrrrrrry loosely and then fill in any blank space around them with extra ink. At the very end, on top of the flowers, I used Wendy's Studio 490 Plaid Flannel Background, inked with light shades of yellow and green, and spritzed with Isoproply Alcohol. I love how it gave the finished panel a sort of textural look, like vintage table linens.


To make the center medallion, I cut a medium-sized circle from one of Wendy's MAKE ART Perfect Cardstock Panels, embossed it with the Flowers & Foliage folder, then used the Ranger Mini Ink Blending Tool with Domed Foam Applicators to add color to the flowers, foliage and background. In between applications, I spritzed the whole thing with rubbing alcohol to encourage the colors to blend into each other just a bit. 

I stamped another panel of white Perfect Cardstock with the Plaid Flannel Background first in Prickly Pear and then Tea Rose, and diecut a bunch of the medium-sized heart from Heartfelt Thanks and Scallops. I cut a second set of the same size from medium pink cardstock, then a set of the second-to-smallest heart in light pink, which I placed between and slightly behind the first ring of petals. I used the small double blossom die and the tiny leaf from the Vintage Florals set to add interest to both rounds of hearts. 


Here's one last picture of the center section, it's my attempt to capture the depth of the texture here. Because when Spellbinders calls something a 3D Embossing Folder they are not messing around! These products are currently available online at Spellbinders, Ranger and other fine retailers. Or, if you happen to be in Central New Jersey, these delightful goodies are also in stock at my favorite brick and mortar crafting store... Paper Anthology!