

if you're anything like me, you take a gazzillion photos on vacation, and LOVE to collect all those cool little pieces of paper even the shortest journeys produce: brochures, postcards, receipts, badges, menus, etc., with the firm intention of coming home and assembling everything into a fun travel book by which to remember your trip. and if you're anything like me, the process tends to stall a bit after the "coming home" part...when all those awesome tickets and tokens get placed reverntly in a box and are sadly left to languish as the more pressing demands of "real life" assert themelves.
or i should say, you are like i used to be a couple of years ago, before i discovered the infallible secret to finishing travel books, which is, of course TO CHEAT! :) ok, yeah, there is a teeny bit of planning involved but it's minimal and takes place BEFORE the trip when you're excited about both the vacation and the prospect of documenting it. if you do these couple of things before you leave, i can virtually guarantee that you will come home with a travel book that is practically done...oh yeah and did i mention it'll be practically *FREE* too??!
interested? ok, well try this:
1. make "the bones" of the book and take it with you
yes, you can buy a travel scrapbook, but it's so easy (& so cheap!) to make one tailored exactly to your needs and made especially for this trip! (which totally helps with the FINISHING part!) all you need is some chipboard (or cardboard) for front and back covers, a selection of cardstock pages, and a ring to hold them all togther. if you only do one thing from this entire post, making a specific, dedicated book, is the one to do! if you take a notebook or journaling cards, yes, you might write on them, but the impetus of having a "real" book on which you've already spent a bit of time, provides an UNBEATABLE psychological advantage!!! especially if you...

2. make your book a size and shape that is perfectly suited to the task
4. use a page template to save time and energy

6. pack minimal, basic supplies
or i should say, you are like i used to be a couple of years ago, before i discovered the infallible secret to finishing travel books, which is, of course TO CHEAT! :) ok, yeah, there is a teeny bit of planning involved but it's minimal and takes place BEFORE the trip when you're excited about both the vacation and the prospect of documenting it. if you do these couple of things before you leave, i can virtually guarantee that you will come home with a travel book that is practically done...oh yeah and did i mention it'll be practically *FREE* too??!
interested? ok, well try this:
1. make "the bones" of the book and take it with you
yes, you can buy a travel scrapbook, but it's so easy (& so cheap!) to make one tailored exactly to your needs and made especially for this trip! (which totally helps with the FINISHING part!) all you need is some chipboard (or cardboard) for front and back covers, a selection of cardstock pages, and a ring to hold them all togther. if you only do one thing from this entire post, making a specific, dedicated book, is the one to do! if you take a notebook or journaling cards, yes, you might write on them, but the impetus of having a "real" book on which you've already spent a bit of time, provides an UNBEATABLE psychological advantage!!! especially if you...

2. make your book a size and shape that is perfectly suited to the task
this is the biggest difference between my homemade books and store-bought travel scrapbooks. i make mine specifically to accommodate the standard travel brochure which is approximately 4 x 9"; this way i never worry about how to display my collected ephemera on "layouts"...pretty much each item i collect gets to be its own page! i punch a hole in it, and maybe write a note or two, and then let them stand on their own. apart from that, it's a good idea to...
3. give your book a structure that makes the journaling effortless
because let's face it, this is where most of us get intimidated, isn't it? we aren't professional writers, we're not going to be able to sum up the mona lisa or the statue of liberty or the beach at sunset with three perfect sentences no one's thought of yet. luckily, we are not attempting to win a pulitzer, we just want to REMEMBER the stuff we did on vacation. and to do that, we're gonna fill our book with pre-made pages, labeled with the days of the week we'll be away. believe me, having a page that says "saturday" in your OFFICIAL travel book for the trip, and knowing that it is the ONLY thing you have to complete on saturday, gives you a big edge in actually GETTING IT DONE! which is why the best plan is to...

4. use a page template to save time and energy
i make mine using broderbund's printshop (but microsoft word or any other word processing or graphics program will work) and i can fit two 4.25 x 8.5" travel book pages on one 8.5 x 11" sheet. i usually print on plain old staples-brand white index stock. the page design is never fancy--i know i am going to cover it with writing and/or photos anyway! i like to use one font throughout for consistency, and i don't feel the need for lines because i write pretty neatly...but these details are based on my personal taste. the main point is to save time and energy by designing *ONE* basic page and letting it work for the whole book.
5. be specific so you'll follow through
i like to make a labeled page for each day of the week, and one for each destination or attraction i think we'll be visiting on our trip. sometimes i also work thematically and make pages for things like food, accomodations, shopping, weather, fellow travelers, and so forth; plus i like to include some blanks, just in case i need more room for a particular story. do i use every single page i print? nope. but i love having lots of choices, and they're so inexpensive to make that i don't mind if a few get tossed at the end. (i always save the file when i am done, so that if i come home needing a few extra pages, it is super-easy to make more!)
ps: the examples shown are of the template for my washington trip, i have all the days of the week in pdf form--email me if you'd like those!

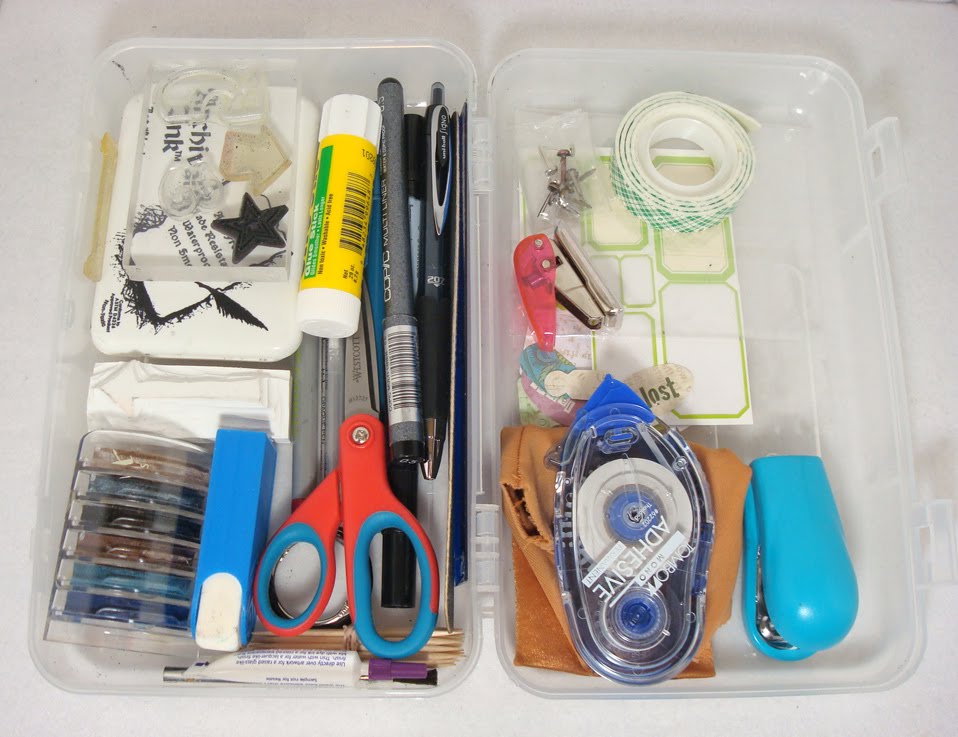
6. pack minimal, basic supplies
i realize it sounds counter-intuitive, but in my experience, the more i pack the less i use! this project isn't really scrapbooking, as such, i'm just recording my activities, and saving ephemera; that's all i'm going to have time to do; the fancy bits (if any!) will get done after i'm home, so i don't need much stuff. i need a few pens, including one that writes on glossy paper; i need a hole punch (staples has cool miniature ones that really WORK!) and a stapler (again, i like a small one...but it has to take REGULAR staples!); scissors, a couple of adhesives, maybe a few basic stamps and an inkpad, some label stickers, a couple of brads for attaching bulky items, and that's about it. i pack everything in a plastic schoolbox, protect my book by putting it in a large ziplock bag, and i am ready to go!!!
tomorrow i will tell you my strategies for working on the book *DURING* the trip...it only takes 15 to 20 minutes per night, and it is THE KEY to really finishing the book!!! ♥
OMG... Thankyou for an excellent tutorial..Have to remeber this next time I'm out on a trip without my scrapgoodies.. :-)
ReplyDeleteHugs, Linda
aha...love this post as I keep thinking that the next time I travel I'm going to bring my crafty stuff with me:) Thanks for this tut sista!!!
ReplyDeleteWhat? Plan? Do-ahead? Finish? I don't understand these words.
ReplyDeleteWhat a FANTABULOUS idea!! You are just beyond clever!!
ReplyDeleteAWESOME ideas Lauren! I have been wanting to make something like this for my mom, who travels a lot. Thanks!
ReplyDelete(-: Heidi
What a GREAT idea! I loved reading the tutorial too! I will definitely have to try this one! You are so creative, and lets face it we all need to know some shortcuts!
ReplyDeletewow! awesome idea, Lauren! I'll have to try this next time! it took me waaaaaaaay too long to finish my travel books... the prep part really is vital. never thought of taking the book with me! thanks for the tips!!!
ReplyDeleteOoh a tutorial via Lauren so cool! I love it! I love your travel books what a great idea. Can't wait to see your post today. :)
ReplyDeleteThis is such an awesome tutorial. Thank you.
ReplyDelete