Friday, September 21, 2012

dashing through the...

...snow? really?? on september 21st?!

ok, yeah, it seems unlikely, until i mention that contextually, we're talking about the latest prompt at ♥JINGLE BELLES♥ for which we are asking you to incorporate some of the wintery white stuff, whether that takes the form of snow flakes, snow balls, snow storms, snowmen (and/or snow-women!), snow-covered houses, or... well... anything you can think of which is snow-related!

i found this sweet little re-sized bit of sheet music in my holiday stash, leftover from a prompt the lovely marie bingaman came up with last year called "suzy snowflake", so i went with flakes! :)

(patterned paper, tags, chipboard pieces and pearl circles: basic grey; vintage style tag: christmas labels by the digital paper shop; pearl flourishes: want2scrap; felt and glitter snowflakes: recollections; blue journaling spots: k and co; other: vintage doilies, snowflake cut from an old xmas card, sheet music from t'internet, resized; inks: colorbox; adhesives: staples brand glue tape runner, 3m foam tape and doublestick tape)

i was completely inspired by the current sketch on the basic grey blog. yes, once again, it's a layout sketch. what can i say, i use all sketches interchangeably, and in fact i often prefer the layout ones because they tend to suit my "maximalist" style the best, lol! i know there are places in which only one type of project is solicited, and while of course i respect the rules and preferences of all the wonderful challenge-setters out there, i am occasionally stymied by that "segregation"; surely it's a compliment and a sign of an AWESOME and totally flexible sketch if people are inspired to do something CRAZY with it, no? (but again, i do my best to follow rules and completely understand that i might get disqualified!) 


i'm also linking this up in the vintage challenge at crimbo crackers, and for christmas is just around the corner challenge at just keep on creating. because christmas *IS* just around the corner, and by golly, i'm gonna be READY! (at least in terms of cards, lol!)

i'm embarrassed that i occasionally forget to do it (i did last week, sorry patrice!) but i generally submit my holiday cards with 52-card-pick-up on the old back porch. if you don't currently read that blog, you should! miss patrice is sooooooooo rockin' the clean and simple card aesthetic every single week! ♥

speaking of places i hope you'll visit, why not head over to ♥JINGLE BELLES♥ and see stephanie's gorgeous snowy masterpiece? it's worth the trip, i promise!!!

Thursday, September 20, 2012

inspired by... AUTUMN! ♥

by now i expect everyone knows that one of my all time favorite challenge sites is inspired by which of course is hosted by the lovely laurel seabrook. so you can probably guess how excited i was when that good lady asked if i'd like to guest design with her some week. "just tell me *WHEN*!" i said immediately; turns out, it's today!

so without further ado, here is the inspiration photo:


and here is my card, which is absolutely, completely, totally, 100% UNLIKE what i was planning to do:

(vintage: book paper for leaves (using cuttlebug dies); woven rattan background: the paper co; pumpkin clip art: from t'internet; patterned paper: authentique, scenic route, 7 gypsies; journaling card: basic grey; happy rub-on: my mind's eye; flower stickers: martha stewart; other: denim from an old pair of shorts (xyroned onto index stock); inks: colorbox; adhesives: staples brand glue tape runner, 3m foam tape, sewing machine)

you see, i had thought i'd make a "guy card" for my brother-in-law. i figured i'd start with a fabulous antique truck image and then build up from there, working in some of the textures from the photo-- metal, wood, etc. great idea, right? yeah, i thought so too! with ALL THE VINTAGE stuff i have... wouldja believe... i could not find even *ONE* truck photo, drawing, or illustration??! NUTHIN'! so instead i went MEGA-literal with the colors, the pumpkins, and the general fall goodness. i really like how it came out, and it's perfect for my aunt marilyn's birthday in mid-october; but i'm still feeling a bit vexed at bein' thwarted, lol! :) :) :)

so what elements of that gorgeous photo are speaking to you right now? the colors? the textures? the pumpkins?? why not start with one... or all of those... but with the idea in mind that you're willing to follow wherever the inspiration takes you?!

another great place to begin is over at inspired by, where you can see laurel's project and read all the details for linking up your own! ♥ 

Wednesday, September 19, 2012

happy ITLAPD, me hearties!!!

international talk like a pirate day, that is. this is actually the tenth OFFICIAL anniversary of my favorite spurious holiday, thus we should celebrate all the more he-ARRR-tily, landlubbers!!! grog for EVERYONE! ok, yeah, it's ARRR-guably a bit early for that, isn't it? howsabout just a double helping of piratical lols, then?! shiver me timbers!!!


if you'd prefer a film, scallawags, may i suggest the pirates: band of misfits, produced by the estimable ARRRR-dman animation (home of wallace and gromit, as well as shaun the sheep!) and as swashbucklingly funny of a movie as i have seen in quite some time!

if you find yourself with a big decision to make today, here's a bit of help with that, just print it out and add a spinner, or tack it to the wall and fling broadswords at it until you get an answer! 


finally, what better time than ITLAPD for a bit more ARRRR-tjournaling, me ole scurvy dogs?! here be some pages i made, inspired by the most recent daily pape-ARRRR prompts:

i've been obsessed with circles all summer. this time i added a zillion punched circles to the background, which is covered with a green page from which circle shapes have been removed! (and yeah, a little quote from the dalai lama never did anyone any harm, either!)

since i don't have a garden or even any non-cacti houseplants, i decided to use some artificial leaves from a decorative garland. thus, i didn't get much detail such as the veins and stems which look so verrrrry cool in tammy's example; so i filled in with the sewing machine! :)

for this one we could combine ANY two of the previous daily paper prompts. i went with "random paper collage" and "zentangling". the result is WEIRD... but i like it!

i used some photos of texture and also some actually textured materials. i cannot say i am thrilled with the composition, but what can i say, it was like 11pm and i was flagging. it was fun to make, though!

speaking of fun, go grab a couple of colors of paint, a foam brush, and a few paint-resistant circle-shaped objects! it's ok, i'll wait!!! 

...now just go a little nuts on some heavy duty paper and tell me you don't feel better! (you can't, because you WILL!)

if you don't have paints or time for the one above, g'head and do this, instead. my favorite is the zebra pattern, though the clouds are also fun.

and now back to your regularly scheduled wenches and rums, d-ARRRRRRR-lings!!! ♥♥♥

Tuesday, September 18, 2012

you're not the (em)boss of me!!!

this week's challenge at shopping our stash will be a breeze for EVERYONE... except me. and frankly, it was only a bit of a stumper in my case because sometimes i am such a ninny! :) the (very simple and straightforward) brief is to create a card or project which incorporates embossing-- either the dry or heat kind. easy peasy, yes?! as it turns out i did both: i've scored a double outline around my smaller blue panel; and heat embossed my sentiment. why it took me ages of thinking and trying and messing things up for no good reason i just COULD NOT TELL YOU... but at least i got there in the end!

(patterned paper: american crafts, scenic route, sei; cardstock: core'dinations; bird and flower stickers: martha stewart crafts; seam binding: pixie dust paperie; rubber stamp: hero arts; embossing ink and powder: psx; scoring tool: scor-it; adhesives: staples brand glue tape runner, 3m foam tape, gluedots; other: sewing machine)

i used this week's awesome retrosketch, it's #29, in fact:


i grabbed these utterly luscious colors from the current photo (#178) at cupcake inspirations which is kind of making me crave a cupcake... or an umbrella drink... or both, lol! (ok, yes, admittedly it's a bit early for either of those here on the east coast, but one cannot ignore THE MUSE, can one??!)


speaking of things it's silly to resist... go and have a peek at all of the lovely DT cards at SOS, i promise it is ALWAYS worth the trip!!! ♥

Saturday, September 15, 2012

it's a (neapolitan) banner day!

it's not often i make a project entirely from one paper line, but the dear lizzy "neapolitan" 6x6 paper pad has been burning a hole in my creative pocket for a couple of weeks now; and there is no denying that using a pre-coordinated set of patterns really speeds up the process of making something where you want maximum variety while still having one cohesive design. like, say... a name banner for a certain adorable one year old?! (please forgive the terrible photo, there is no where in my home that has BOTH five foot of empty, plain wall space AND great lighting!)

(vintage: seam binding; patterned paper: american crafts; wooden alphas: pink paislee; lg butterfly die: quickutz; butterfly punches: martha stewart; border punch: blue hills studio; pearls: kaiser; flowers and brads: making memories; ink: colorbox; white paint pen: sharpie; adhesives: staples brand glue tape runner, glue dots, hot glue, sewing machine)

the very sweet and appealing miss charli is the first grandchild of our dear friends kim and dave. to me it seems like only fifteen minutes ago since her daddy was this age, but this afternoon we celebrated her first birthday as well as her auntie's engagement, so clearly i am behind the times. this is what happens when you are old enough to be a "great aunt" i guess, lol!  :) :) :)


here are some closeups in which you can see the details of the banner a bit better.  


due to time constraints i went with the one set of papers, one type of embellishment (butterflies), one kind of flower; and i tied everything together with white to make it look fresh and young and cute!


i am only just BARELY squeaking in under the wire at a fun new challenge site devised by my lovely SOS colleague miss carla; this one is called anything but a card... care to guess what kind of projects they are looking for over there?!


this fortnight the theme was "anything goes" and the deadline is midnight, so you'll really have to hustle, but the new one will begin in the morning, and then you'll have two whole weeks to plot and plane!

i'm also jumping in on city crafter's absolutely awesome polka dot palooza challenge this week, though i confess this is actually NOT the project i had in mind for that, and i'm still hoping to sneak in another before monday night, fingers crossed!

happy weekend, darlings!
♥♥♥

Friday, September 14, 2012

the postman always stamps twice!

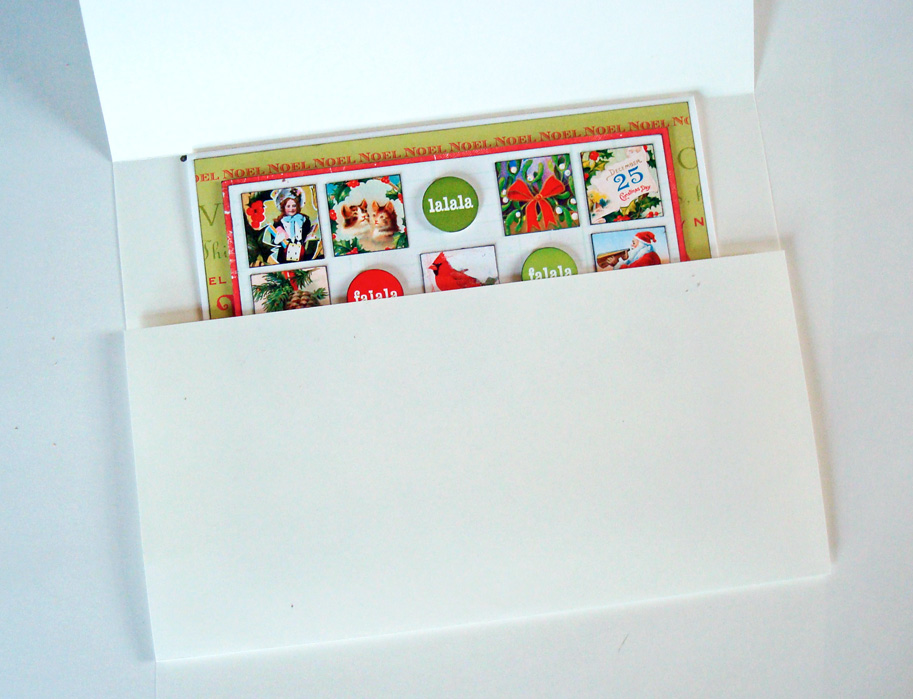
not that you have to *STAMP* to get in on the action at ♥JINGLE BELLES♥ this week; just make a holiday card featuring postage (real or faux) or postal images; OR make a holiday postcard; OR make a card with a coordinating envelope. this time, i went with option three:

(holiday inchies: artchix studios; patterned paper: dcwv, studio calico, crate paper, basic grey; stickers: creative imaginations; tape: recollections; rub-on: fancy pants; ink: colorbox; adhesives: staples brand glue tape runner, 3m foam tape)

i used this AMAZINGLY serendipitous sketch-- #175 from unscripted sketches; could there *BE* anything more perfect for using inchies??! i don't think so! :)


my original plan was to snip the inchie images from their sheet using my "postage stamp" decorative scissors, but it turned out the scale was just a bit too large and the resultant squares did NOT look like postage stamps, so i decided instead to use the third challenge option and decorate an envelope to match my design, which was totally fun, i need to do that a lot more often! 


something you definitely do NOT have to do for the challenge is make an envelope from scratch! but (for reasons that are far to complicated and laureny to explain!) that actually IS what i did, and if you'd like to see the process step-by-step (??!) it's in the post just below this one!

or you could just hop over to ♥JINGLE BELLES♥ and link up your own postal-related holiday card! this prompt is open until next wednesday evening, so you have plenty of time... and there's a fairly cool prize, so you have a great reason! ♥

make your own CUSTOM envelopes... without a template!

despite my best efforts, i occasionally make cards that are not a standard size. i either tuck them into a gift bag or mail them in an oversized envelope-- and to me both of those solutions are perfectly fine-- but for some reason, this week i found myself wondering how hard it would be to MAKE a custom-sized, coordinated envelope, and the answer turned out to be, "not hard at all!" here's how:

what you'll need:
a piece of paper that is at least 1" greater than twice the height of your card, and 2" wider than the width of your card; scissors and/or trimmer; ruler; pencil; dry adhesive-- a tape runner is ideal for this!; optional coordinating patterned paper for lining, if desired.

 1. mark
the points just outside all four corners of your card on the paper that will serve as the outside of your envelope (i've done big dots so you can see them, but you can do it lightly, so it won't show).

 2. score and fold
straight, parallel lines between the two marks at the top, and between the two marks at the bottom; trim any excess paper if necessary--note that you need the top and bottom folds to overlap by about an inch, and you'll need about an inch extra at each side to create your pocket.

(optional step: if you'd like your envelope to have a coordinated liner, trim a piece of patterned paper to exactly the width of your card and the same length as the distance from the bottom fold to 1/2" before the end of the top flap--see photo below for a better illustration of this; adhere to your base paper before continuing)

 3. snip and fold
the overlapping edge bits at each side of your center panel, these are the base of the "pocket" which will hold your card; angle the cuts very slightly inwards, to keep them out of the way of the fold.

 4. trim the excess from top and bottom panels 
again you'll want to create a slight angle; as the bottom panel will become the pocket itself, while the top will be the envelope's flap. again, for illustrational purposes i've marked thick pencil lines: you can see that they both taper very slightly inwards so that the outer edges are about 1/16th of an inch narrower than the attached edges. this is just so your envelope will be square and not have any "extra" overhanging paper.

5. CAREFULLY glue ONLY the left and right edges...
...of the bottom panel to the little folded bits on each side; you don't want any extra adhesive, otherwise you'll be gluing the pocket shut. (which will not be helpful!) :)

6. slide in your card and ADMIRE your work!
after all, you've not only created the perfect envelope for THIS card, you've learned how to make a custom-sized, coordinated mailer for ANY card... without templates, or even any measuring... just a few folds!!!

♥GO, you!!!♥