Friday, June 29, 2018

stars and stripes

in honor of next week's fourth of july holiday, we're celebrating stars and/or stripes at ♥JINGLE BELLES♥ but not forever... just the next fortnight or so! and they don't have to be red, white or blue, either; you can use any palette you like. here's what i made:


i've combined a few colorful papers for this one. the stripes and the journal card are both older echo park papers. the trees and the santa sticker are slightly newer, and from doodlebug. the green scrap and the cardstock star punch out are both so old, i'm not even sure who made them, but i guess i shouldn't moan too much about having saved them because they work pretty well here. i used the current sketch saturday to guide my layout:


stephanie has gone above and beyond and made her card patriotic, as well as xmassy, and also a bit intergalactic! none of which you need to do... but you really should hop over to ♥JINGLE BELLES♥ and see it, darlings!

Wednesday, June 27, 2018

Fun with ATC's!

I don't know about you, but I make more greeting cards than anything else. And let's face it, they are by far the most practical paper-crafting project, aren't they? But sometimes I need to shake things up, and another format I really love is the Artist Trading Card. Like these that I'm showing off on the EO blog today:


The "official" size for ATC's is 2.5 x 3.5" which is exactly the size of a standard playing card... which is what I use as a base to build my designs. I covered my cards with patterned paper trimmed to size and then got to work on the FUN part: adding the little brad scenes and punny sayings! My first card features the new adorable and realistic Jungle Mix Brads, which miiiiiiiiiiight be my favorite item from the May 2018 Release.


My next card has nothing from the new release, but the Typewriter and Hand Brad sets are still faves of mine, and they inspired me to type all of the sentiments on one of my real vintage typewriters. Plus, it's hard to beat typewriters in love, don't you think? Because if you attach a pair of any brads and add a Heart Brad you've got instant cuteness off the charts, imo!


Our Summer Tree Brads are beautifully realistic deciduous trees in two different shapes (a bit like an ash and an oak tree, I'd say) and they go really well with the Pine Tree Brads from last year. I am secretly hoping that we'll see Autumn Tree Brads at some point, with beautifully colored foliage... just sayin'...


Finally, the Wooden Hanger BradsJeans and Tee Shirts and Dress Brads are also from the newest release and they work wonderfully in all sorts of ways, together or separate. The Jeans and Tee Shirts come with lighter and darker jeans, plus five colors of shirt in each packet; the dresses are a mix of four beautiful pastel shades, plus black.


I hope you'll be inspired to try the Artist Trading Card format with some of *YOUR* favorite Eyelet Outlet Brads! ♥

Tuesday, June 26, 2018

hooray for the red and/or white and/or blue

we're coming up on both the fourth of july and canada day, so we've got a bit of a color challenge for ya at shopping our stash: use red, white and blue... separately or together... choose one, two, or all three! i chose all three, but,i decided not to go at all patriotic; honestly i wasn't sure if i could make that work, but i'm actually pretty happy with the result:

dimensional florals: prima, petaloo, recollections; assorted brads of unknown origin; heart is made from thin denim xyroned onto sturdy cardstock, heart template traced and cut out, machine stitching around edges is more for decoration than anything else, but yes, it keeps those edges FLAT forever!; background collage is torn bits of trading stamps and text paper over bright white sheet music; drywall tape and vintage red doily from my stash; adhesives: scotch/3m gluestick, elmers brand gluetape, beacon 3 in 1 adhesive (for the bulkier florals) and the aforementioned xyron machine + sewing machine

i've recently re-fallen in love with dimensional flowers, i *think* because i started following prima marketing on instagram and they post these absolutely luscious projects that are loaded with lumpy bumpy florals. and i still have LOTS of those, so it seems like a good idea to use them up. obviously the finished cards are not what you'd call "postal friendly" so i will either put them in a package with gifts or hand directly to the recipient. but i have lots of occasions where i already do one or the other of those, so it's really not a problem. i've left this card sentiment-free because i can see the potential for it working as a few different occasions, and it's nice to have options, right?

speaking of options, there is all kinds of inspiration awaiting you on the SOS blog. why not hop over there and enjoy some right now, darlings? ♥

Monday, June 25, 2018

this is the week that was

at least, these are all the index cards i made for ICAD last week. some are funky, some are fab, but all of them were *fun* which is the main thing!

day 19
on this evening, i realized that altho i had used one of my beloved tiny cars from the book "illustrated motorcars of the world" on my ICAD cover, i hadn't yet used one inside the book. obviously unacceptable.

day 20
some years i pick a theme or skill to focus on, some years one seems to pick me. or at least... one evolves without conscious thought on my part. this year the recurring thing is that i'm apparently slightly obsessed with making handcut patterns, and then sewing on them. often these little fads just peter out, occasionally they turn into something really cool that later becomes valuable. either way, it's a big part of the point of ICAD for me, so i don't even try to fight it.

day 21
it's hard to tell from the photo, but the light pink areas on this card are actually a plain pink index card peeking thru BEHIND the slashes i cut from the purple and dark pink swooshy colorburst-painted divider card that's on top. because again with the patterns... using both the positive and negative space...
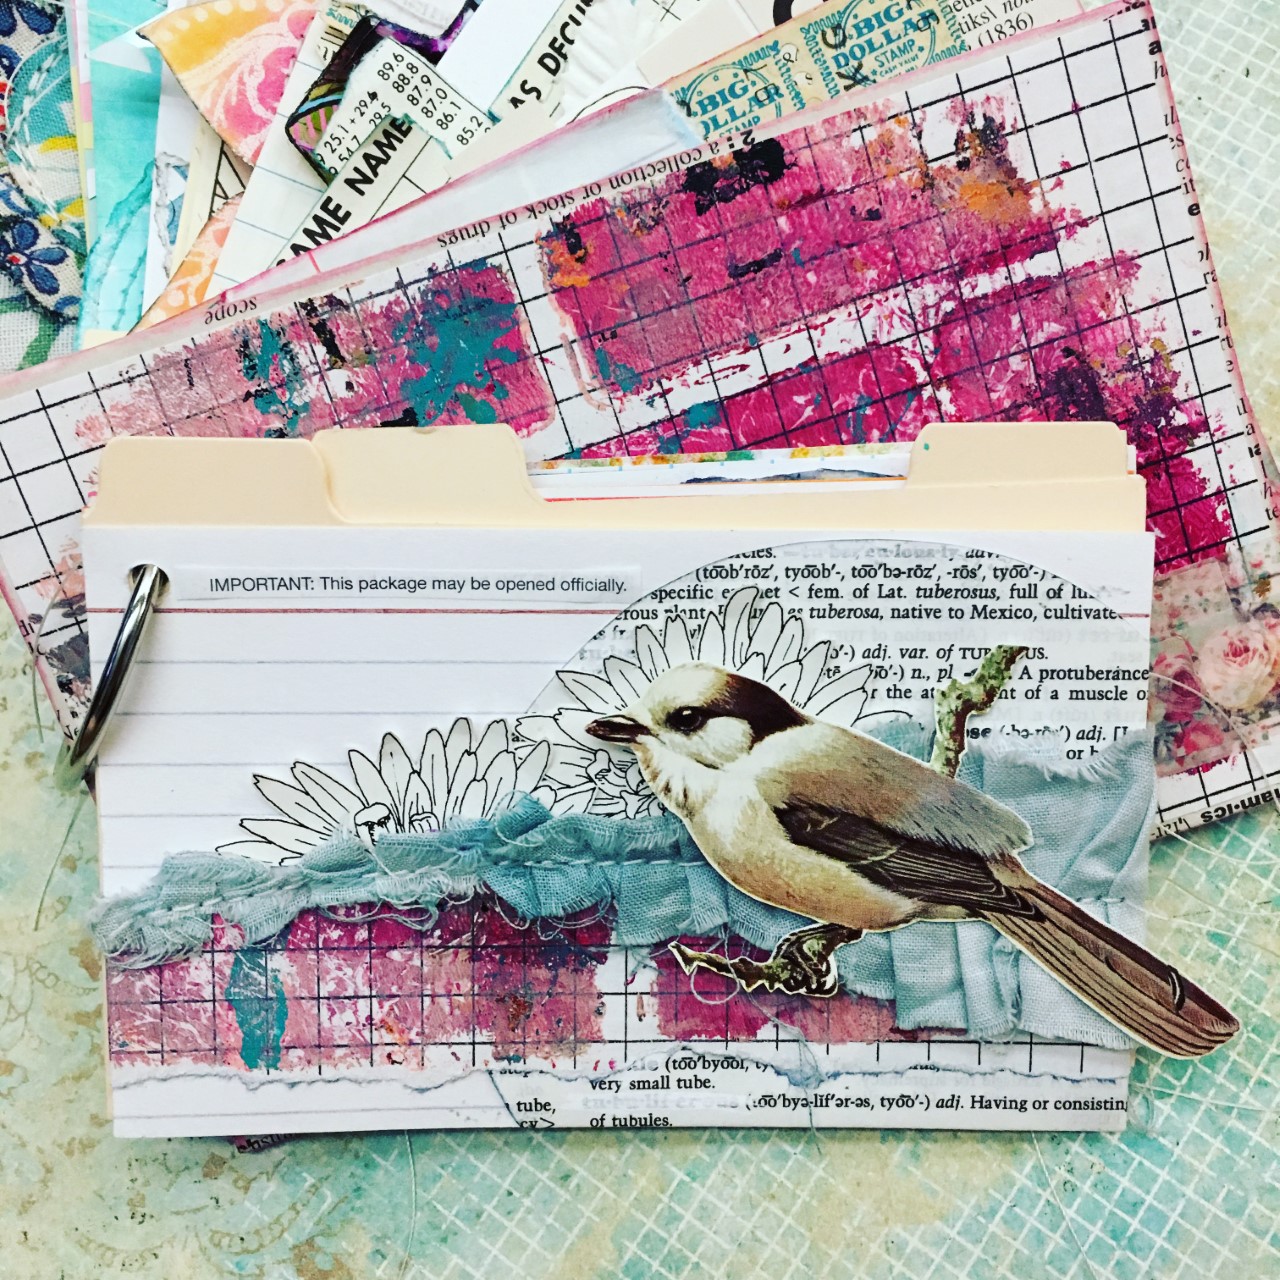
day 22: sky
i really did intend to make something based on the day's "sky" prompt, thus i started with the bird and a strip torn from some blue-ish, grey-ish gel printed fabric. the end product isn't especially sky-centric, however... ah well...

day 23: 14-staple collage
years ago, during ICAD, tammy g had written a list of inspirational ideas, one of which was "stapled collage". i interpreted that-- for some reason-- to be a collage where all the bits are held together with ONE STAPLE. which is harder than it sounds, actually. and i became utterly obsessed. then tammy and a couple of ICAD-ettes decided to have a go, and it just sort of went back and forth like that. every year since then, at some point during ICAD, someone raises the subject again, and we all giggle and have a go. finally getting to the point with regard to THIS card: the other day, tammy posted a really neat, freeform, rainbow collage of paper scraps, which was held together with 14 staples, partly bc she wanted to see if it would work, and partly, as she said when she tagged me, to make me laugh. which it totally did. but of course i also saw it as a bit of a throwdown, lol.
challenge accepted!!!!!!

day 24
not a stapled collage, just a regular one. truth be told, i chose most of my elements by color for this one. most of my collages start by me flipping through a random pile of stuff, and choosing some things that appeal to me right then. as i choose, i often notice a theme emerging: the same color, or maybe a bunch of typefaces, or possibly similar shapes or... well... something; and then my choices become less random and more a question of what would go well with the other things. it's a bit like doing a jigsaw puzzle. except you've lost the lid to the box, so you don't actually know what the finished picture looks like.
(proving once more that i'm better at making collages than at explaining how, lol.)

day 25
brings us up to TODAY, mandala monday, june 25, 2018. this might be my favorite mandala i've ever made, because it looks like the picture that was in my head, and incorporates a grungy mixed media(ish) background, a real life/photo element, and some hand drawn doodles, all TOGETHER. somewhat in the style of my collage and journal idol, jenndalyn, but still my own thing.

♥♥♥
i hope you're having a pretty good day, but if not, there are still four more chances this week... and then a weekend to recharge! 
♥♥♥

Friday, June 22, 2018

yes, i'm in a bit of "a phase"

can you stand to see one more chevron patterned masterpiece? this one is all in shades of white, because we're still "dreaming of a white christmas" at ♥JINGLE BELLES♥ and you still have time to join the fun, which we hope you will.

patterned paper scraps, as best i can remember: basic grey, dcwv, glitz design, lily bee, october afternoon, echopark, making memories, pink paislee; snowflake stack: silver glitter diecut and fabric poinsettia from michaels, white glitter diecut using a tim holtz snowflake die and best creation white glitter paper, ancient metal snowflake from making memories, fancy pearl brad from eyelet outlet; adhesives: xyron adhesive machine, sewing machine

i mentioned the other day that this summer i've found the process of making my own patterns really fun and addictive and this particular herringbone style seems to be my favorite, at the moment. i showed a little more detail on the process in my SOS post from tuesday, if you're interested in making something similar. it's definitely a fabulous way to use up all those little offcuts and scraps that tend to accumulate when we're making cards.

be sure to hop over to ♥JINGLE BELLES♥ and see stephanie's beautiful card this week, then start planning what you'll make for this fun challenge!

Thursday, June 21, 2018

and now for something completely different...

...we interrupt your regular schedule of cards and ICADs to bring you a tiny knitted sweater:


because we are thrilled to welcome our very first grand-nephew, young hudson hagar, born to our eldest nephew and his wife a couple of weeks ago. of course a guy's very first "welcome to the world" present requires something a bit special in the way of wrapping, so i used eyelet outlet washi tape and baby animal brads to dress up a plain white box and some store bought ribbon. i designed the box to coordinate with the baby card i made for hudson a couple of months ago.


for my fellow knitters out there i should probably mention that this excellent, top-down, no-seams pattern is a free ravelry download called "baby sophisticate" by linden down; i used one supersized skein of barcelona big yarn by loops and threads in a colorway called lapis lazuli. ♥

Wednesday, June 20, 2018

Newsflash: Cuteness of Sock Monkeys Definitively Confirmed!

Ok, it might not actually be news that all sock monkeys are cute and Eyelet Outlet Birthday Sock Monkey Brads are especially so, but I'm not sure it's ever been on television until now. See:


I was lucky enough to win a flash prize from The Stamps of Life for my EO Coffee Stamp cards in the latest Coffee Loving Cardmakers' Blog Hop, and one of the items I chose was the TV2Stamps set and coordinating dies. Apart from just how cool it is generally, I thought the tv set would be a great size for making little scenes with my brads, and I stand by that decision. I made a little cluster of birthday brads... in this case the Birthday Sock Monkey, a Cupcake and a Candle Brad... but really the possibilities are endless.


In case you need more *FLASHES* of inspiration, remember that the Eyelet Outlet Blog, Facebook page and Instagram feed have daily doses of inspiration from my awesome fellow designers! ♥

Tuesday, June 19, 2018

she's a craftin' machine

do you love the title of this week's challenge at shopping our stash? i do... altho i confess that every time i read it, i get the jackson five's infectious 1970's single, "dancin' machine" stuck in my head for all eternity. so i apologize if i just got it stuck in your head, too. but what's the brief this week? we want you to use one of the many "craftin' machines" we all love so much: diecutter (mechanical or electronic), sewing machine, xyron, etc; to make your creation. oh, and be sure to tell us what you used if it isn't obvious, k? i used my xyron, and in fact, i cannot imagine having attempted this project without it. but first let me show you what i made:

craftin' machine: xyron 9" adhesive machine now known as xyron creative station; wooden letters: handmade modern line from target; patterned paper scraps: echo park, authentique, fancy pants, k and co, prima, creative imaginations, anna griffith, photoplay, foofala, glitz, pion designs and... there might be a few more, but i think that's most of them!; adhesives: the aforementioned xyron, some beacon 3 in 1 adhesive for the letters + scor-tape to affix the panels to the card

if you saw this index card last week you'll know that i was already playing around with this idea on a much smaller scale. today's card is an upgraded, slightly fancier version of the same chevron or herringbone effect on the index card, though this time i've used patterned paper scraps in shades of tan and brown for a more coordinated look. but before i even started thinking about the design, i made the most important part, which was the base. i ran a 5 x 7" piece of plain white cardstock through my xyron machine, which put a thin, dry layer of adhesive from edge to edge. then i cracked the paper backing so i'd be able to easily remove it, and trimmed the panel down to 4.75 x 6.75". this is a little trick i learned a few years ago, to apply the adhesive FIRST and then trim down your paper, otherwise there is always a little bit of stickiness around the edges of the paper, which i don't like. ok, so i have a panel of cardstock that's the right size and sticky. now what?


this is when you start creating the pattern. if you want a true herringbone, you need to cut all of your paper scraps to exactly the same width and length, and start at the center of your paper. i was going for a slightly more casual look, which coincidentally required A LOT less measuring, lol, so i just cut my strips to random widths. the one crucial factor is to make sure they're all cut quite straight, and that the short edges at top and bottom are perpendicular to the length of the strip. if they aren't, you'll have little gaps of background paper that show through. i used my guillotine chopper to get nice straight, square cuts, and i was good to go. i placed one strip at a diagonal towards the left side of my paper. then i placed a second strip at right angles to the first. then i just alternated back and forth until my entire panel was covered in strips.


then i used the handy guillotine once more to neatly trim off all the excess at the edges. finally, i made a very simple sentiment panel. i had actually intended to add a second "craftin' machine" into the mix here by using my sizzix to diecut a fancy label shape, but i honestly felt like it overpowered the design of the herringbones, so i wound up just affixing my natural wood letters to a strip of patterned paper and matting with the same deep brown as my folded A7 card.


there's lots more inspiration from those amazing "craftin' machines" known as the SOS design team. why not check out the lovely creations they've made just for you! ♥

Monday, June 18, 2018

happy mandala monday

do you have time for a few more index cards? (...let's pretend you 've said yes to that, lol...) awesome, here they are now!


day 14: flamingo
i've been doing some of the optional prompts, but usually not on their official day. in this case, a big part of my inspiration was making something with that cool, somewhat hoarded, vintage flamingo seal thingie... more specifically, making something i would get to KEEP!


day 15: cobblestones
for some reason i've very into making patterns this year, from torn, cut, diecut or punched papers. these "cobblestones" are made from a gel print featuring rainbow shades of colorburst that i tore into little pebble-y shapes and stitched upon, quite crazily, where the grout would be.


day 16: sea green
or rather, THE SEA (sorta) and it is green.
(more torn and stitched pattern action... ocean waves this time...)


day 17a
another pattern, this time punched and inlaid circles of various sizes. and then... surprise... stitching! 


day 17b
after i finished the card above, i had several pastel index cards with multiple circles punched in them, and i started shuffling them around, in various layer combinations. i think i almost like the collage of negative space circles more than the original idea. i'm pretty sure this is a concept i'll be revisiting.


day 18
and thus we come to one more mandala monday. this one is composed of fabric layers from a coordinating set of flower sack prints that my friend anna gave me. i think i should've alternated plain and printed fabric layers so the mandala shapes would stand out more, but i was having so much fun with the pretty prints! 

♥♥♥
i hope you're having a really good monday so far, and that it will improve with age!

Friday, June 15, 2018

we're dreaming...

...of a white christmas this fortnight at ♥JINGLE BELLES♥ so we're inviting you to come along and make cards that are (can you guess?!) predominately white!

patterned paper: photoplay, fancy pants; florals: prima, idea-ology; leaves: ken oliver crafts; snowflakes consist of colorburst and metallic embossing paste on watercolor paper, diecut with tim holtz/sizzix XL layered snowflakes die; brads: eyelet outlet; tape: little b; ink: colorbox; adhesives: elmers brand gluetape, 3m foam tape, beacon 3 in 1 adhesive, sewing machine

if you saw this index card last week, you might remember my saying that i thought the idea of torn and layered bits of collaged paper might work pretty well in a card context. i stand by that idea, lol! this time i've used pieces of all the same patterned paper, torn into loose square and rectangle shapes, with a little bit of light blue ink on the edges to make the layers stand out. on top, i've added loads of lovely dimensional florals, a few colorburst + modelling paste snowflakes and a nice big chipboard sentiment. this is definitely one that will get mailed with a package, or better yet, handed to its recipient in december!

meanwhile stephanie has a gorgeous (mostly) white card to show you, why not hop over to ♥JINGLE BELLES♥ and see that right now, darlings?

Thursday, June 14, 2018

4 ICADs and a chipmunk impersonating a meerkat

yep, i've got a couple more tiny bits of index card goodness to show you but first i'll answer the question i know you're asking yourself right now, "did she say 'a chipmunk impersonating a meerkat'?!" yes. yes, i did.


and now, some art:

day 10
another one staple collage. but this one's in french, bien sur!

day 11
mandala monday is still mandala monday, ICAD or not. this one consists of layers of leftover colorburst and gelato crayon essperiments that i stacked and cut and stacked and cut. then i sewed around the center a couple of times because this many layers of thick paper never really wants to stay attached, how ever much adhesive you use.

day 12
one of the (100% optional!) prompts from last week was zebra, and for some reason, a few days later, the idea came to me that i could possibly make a sort of cool rendition of a zebra type pattern with torn bits of gel print. this is one of those cards that was incredibly fun and satisfying to make, but i'm not sure it's all that interesting to look at. on the plus side, it was A LOT easier than trying to gel print on an actual zebra... bc they realllllllly don't like that...

day 13: chevron (yes, again)
i mentioned that the prompts are optional and can be used however one wants, and this year i seem to be proving that by using some more than once, others not at all, and none of them on their actual day. in this case, i revisited the idea of chevrons, having seen a card of tammy's that had a similarly scrappy, almost herringbone-like pattern on it that i really loved. i predict you'll be seeing this idea again...  possibly in card context... possibly also more than once!!! ;)

♥♥♥
remember it's never too late to start a daily art practice, there's no need to catch up or keep up. do what you can to prioritize 15 minutes or so a day, but don't make yourself crazy. if you have 31 or 41 tiny pieces of art and a new habit at the end of july, that still TOTALLY counts, i promise. meanwhile, ICAD founder and hostess tammy garcia has some awesome tips to approaching this fun challenge!

Wednesday, June 13, 2018

I'm Your Biggest Fan!

Father's Day is this coming Sunday, but there's still time to whip up a quick card or two featuring Eyelet Outlet Fan Stamps!

 
My favorite thing about this stamp set is that it's double duty and works perfectly with both the #1 Foam Hand Brads and also with the vintage-style fans from the Telephone and Fan Brads set.


I went sporty with my first card, pairing the sentiment "Have a FAN-tastic Day" with a Foam Hand and giant oversized letters I made using the super-fun Sports Tape.


I had already chosen a different paper for my second card when I stumbled upon this Echo Park "Vintage Fans" paper at my favorite papercrafting shop, Paper Anthology. The irony is that I was attracted to the *other* side of the paper which has a cool woodgrain pattern! Having seen the fans, however, needless to say it only took me about 15 seconds to swap out my original choice. This time I've added the Fan Brad right to the label shape which holds the sentiment, "I'm Your Biggest Fan".


Of course, these ideas aren't only for Father's Day, they'd be equally good for most any occasion, like Dad's birthday or any other milestone. For that matter, if you swap out "DAD" for a first name, or swap the letters for stars, hearts or a stamped image, the possibilities are nearly endless! I hope you'll be inspired to improvise... I think the Fan Stamps will blow you away, lol!

Tuesday, June 12, 2018

orange you glad...

...we've got a color challenge this week at shopping our stash, and it's a beautifully BOLD one at that, see:


as soon as i saw these colors together they reminded me of a bunch of ancient diecut cardstock flowers from an MME collection yeaaaaaaaaaaaaars ago, the remains of which i found recently and had put on the "crafty garage sale" pile because i felt like i had pretty much outgrown them. but they really did have every single one of the colors, and since the point of our challenge is to find those really old items and figure out a way to USE THEM, i felt i had a moral duty, lol. 


my biggest problems were that the flowers were a bit too big, for one thing --made more for scrapbooking than cards, probably-- and also a bit bland. but essentially, i still kind of *liked* them or they'd've been in the "get rid" pile much earlier. as i was considering what to do with them, it occured to me that they had shapes that were not entirely unlike mandalas. so i solved the size problem by placing the larger ones out at the edges of my A7 cardfront, and the blandness problem by adding some doodles. i also adapted them a bit more by combining centers from one flower with petals from another and stacking a few layers together for a bit of height variation. and here's what i came up with:

cardstock diecuts: my mind's eye, altered with colorbox chalk-inked edges, plus doodles using faber castell's pitt artist pens and posca paint pens; circle punches: ek success and fiskars; patterned paper: creative imaginations, sei; adhesives: elmers brand gluetape, 3m foam tape

do i even have to mention that the rest of the flowers have come off the garage sale pile and have been reunited with the rest of the embellishments?! meanwhile there's plenty more color palette inspiration awaiting you at SOS... why not hop over and enjoy some of that right now, darlings?! ♥

Saturday, June 9, 2018

more icad?

yep... almost a week's worth! and here they are now:

day 5
so far this has been a VERY collage-intensive ICAD year. there's just something about torn vintage paper, machine stitching and index cards...

day 6
yep. a very collage-intensive ICAD year. i might've mentioned that, lol?

day 7
the prompt on this day was "haunted house" so i started with a vintage key... and then went back to the torn and inked papers collaged together. this one's a little different, though, because i can see this being a style that could cross-over into cardmaking.

day 8
*NOT* a collage!!!!!!!!!!!! :) :) :)
this time i splashed drops of alcohol ink onto a clear plastic index card divider thingie; then after it dried, i turned it over and added sharpie and paint pen doodles on the other side. i like the idea better than the results, possibly because i made this in the grips of the worst neck headache EVER and all i can see is how badly my head hurt right then. i think there are seeds of usable technique here, tho...

day 9
today's prompt is "chevron" so i made a little template and trimmed the shapes from a panel of swooshy rainbow colorburst watercolor. (reason #147 why i NEVER throw colorburst "rejects" away, lol... i always know i can use them for SOMETHING!)

♥♥♥
if you're intrigued by the index card a day project, it's NOT too late to start! 
click the link to visit the ICAD base page at daisy yellow art.

what can you do on an index card?

~try out new techniques or supplies~
(like alcohol inks or colorburst)

~practice old favorites, like coloring with copics or colored pencils~
(the daily marker 30 day coloring challenge is taking place right now, btw, you could combine it with ICAD by stamping and coloring on index cards while you practice shading or blending!)\

~do something you've never done before~
(because hey... it's an index card... it's ok to "wreck" a few!!!)

there's no need to catch up or keep up...
 just start where you are and go on for as long as it's fun!
♥♥♥

Friday, June 8, 2018

put a RING on it

a metaphorical ring, that is. on your holiday card for the "christmas belles" prompt at ♥JINGLE BELLES♥ which doesn't end til next wednesday, so you've still got time to join us!

jingle belles die by memory box used on best creation gold glitter paper; patterned paper: kaisercraft, photoplay; cardstock diecuts: october afternoon; snowflake stickers: doodlebug; alphas: basic grey; tiny flowers: tim holtz/idea-ology; vintage trim from my stash; adhesives: elmers brand gluetape, 3m foam tape, sewing machine

another collage-y style card with lots of tiny embellies: a glitter diecut tree, tag and deer, two snowy patterned papers, snowflake stickers, teeny tiny white flowers, my all time favorite memory box xmas die for those glorious glittery jingle bells, a little vintage trimming and that's it. surprisingly enough, this is quite flat, as well, so i think i might've just made my 3rd or 4th card for the year that can be mailed with one ordinary first class stamp. wahey!

hop on over to ♥JINGLE BELLES♥ to see stephanie's card and check out the "christmas bells" gallery while you're there, darlings!

Wednesday, June 6, 2018

We go Together Like... (Pick One)

One of my favorite Eyelet Outlet Clear Stamp sets has definitely got to be the Donut Stamps, and as much as I love the donut-related stamps in that set, for me the most useful stamp might just be the one that says, "We Go Together Like..." because there are just SO MANY ways to use it and so many pairs of Eyelet Outlet brads that make it work! Here are a few right now:


One of my favorites of the New May 2018 Brad Sets are the Jeans and Tee Shirt Brads. In each pack you get six pairs of denim blue trousers and six shirts of assorted colors, so they are super versatile!


The Chicken and Waffle Brads are also new, and again, they are just so fun you want to use them over and over. Although I feel I should probably warn you that, if you're anything like me, the Chicken and Waffle Brads may cause cravings for actual chicken and/or waffles, so please crave responsibly! :)


Neither the Coffee nor Donut Brads are new, but they never stop being AWESOME, imo! You'll have noticed that I've essentially made the same 3.5x5" mini card for each of these designs, using a fun reproduction library card and polka dot patterned paper in coordinating colors.


I've used the same two tapes: Chevron Washi and one of the black and white Pattern Skinny Tapes on top of torn bits of dictionary paper that relate to the brads. In this case, I've used a Chicken Brad and a Rooster Brad on top of the definition for "Hen".


And finally I've combined some bacon and an egg from our Breakfast Brads (the packets also have slices of toast!) on top of the definitions for various egg-related words.


Of course this idea would work for pretty much ANY combination of brads you can imagine, so I hope you'll be inspired to make your own versions! ♥