Tuesday, August 30, 2016

SOS 267: learn something new

it's always a good idea to keep adding new tricks to our papercrafting repertoire, and this week at shopping our stash we're doing just that by trying out a new technique but using some of our older supplies at the same time. best of both worlds, right? here's my card:

a gazzillion scraps of cardstock in colorful rainbow shades: core'dinations; white kromekote cardstock: the paper cut; solid color paper flowers, heart enamels and enamel dots in lots and lots of super-fab new colors: eyelet outlet; adhesives: elmers brand gluetape, 3m foam tape

i know the inlaid diecutting technique is not new to anyone else, but this is my first time doing it, so of course i picked a die with 90,000,000 pieces and decided they should all be different colors! seriously, i don't know what i'm thinking when i embark upon these little scenarios, lol. on the plus side, i did have tons of scraps of ancient core'dinations cardstock in rainbow shades and it was great to make a dent in those. plus, i do think the finished product looks pretty flippin' cool, so there's that. another reason to bust out the rainbow shades is that i got a lovely care package of brand new eyelet outlet goodies in the mail the other day, and it just happened to be loaded with awesome enamel embellies in all different shapes and shades, so i was dying to bust those out, ASAP!


need some ideas as to which technique to try or how to do it GLORIOUSLY well? then head on over to SOS where my design team darlings are rockin' it... you know... like they do every single week! ♥♥♥

Sunday, August 28, 2016

Lots of Layers

There's nothing more impressive to me than really well-done miminalist design. By which I mean someone else's minimalist design, obviously, because of course, as we know, I'm pretty bad at CAS, lol! Luckily, sometimes it's fun to go a little crazy and really pile on the layers... and that's what I'm doing on the Eyelet Outlet Blog today! For this card I started with a vintage dictionary page and added layers of stenciling, stamping and doodling. The focal point is a Solid Color Paper Flower, to which I've added a little ink and even more doodling. Since the flower packets contain three sizes, they look even better when you layer them; and a Pink Flower Jewel makes the perfect center.


To anchor the flower and direct the eye to it even more quickly, I decided to add a diecut flourish made from Glitter Black Washi. Since Glitter Washi comes in a bunch of gorgeous, sparkly shades, and some patterned varieties, as well, it's great for making all sorts of accents. For this flourish, I covered a scrap of medium weight cardstock with neat strips of tape, then diecut as usual.


One of my stenciled patterns had some little circles that were exactly the same size as the smallest Black Enamel Dots in the packet, so of course I had to add a few of those. Inked edges and a folded glossy black cardbase later, my maximalist masterpiece was complete.


I hope you'll be inspired to experiment with a few extra layers in your next card creation, darlings! ♥

Friday, August 26, 2016

hark the herald angels sing

fridays are good, aren't they? end of the week... start of the weekend... brand new ♥JINGLE BELLES♥ prompt... what's not to love, eh? this fortnight we give you "hard the herald angels sing" for which we'd like to see music conveyed in some way. for example, my card has some chipboard letters made from vintage sheet music. see?


the collage on my somewhat elderly my mind's eye 6x6 patterned paper (found during the great garage sale clearout) has a bit of sheet music in it too. the layery poinsettias were leftover from an "xmas in july... and august" class i taught at paper anthology. so basically all i did this week was gather up the bits and glue them to a couple of layers of "solid" basic grey papers. easy, peasy!

miss stephanie has also created a music-related card for your enjoyment. why not hop over to ♥JINGLE BELLES♥ and be inspired by that right now?

Tuesday, August 23, 2016

stand up and be counted

we're crafting by the numbers this week at shopping our stash, so we'd like to see projects which feature numerals. here's what i made:

scrap of numerals paper: very VERY elderly ki memories, gosh i miss them... scraps of cartabella, doodlebug and recollections papers used for piecing, glitz design border punched with a recollections punch; brads: october afternoon, doodlebug, sei; flowers: making memories, prima; cardstock elements: simple stories; teeny tiny epoxy stickers by a variety of companies so old i have no idea whence they came; kromekote cardstock: the paper cut; ink: ranger archival (for stamping), colorbox chalk (for edging); adhesives: elmer's brand gluetape, 3m foam tape, gluedots  

this past saturday was the papercrafting garage sale at my lss, paper anthology, so i actually spent most of last week sorting thru my stash. this netted me a bit of trash, a nice pile to sell, and also quite a few re-discoveries of things i'd forgotten i had but, once i saw them again, i still liked. so clearly i piled MOST OF THEM on this card, lol. :) i did find a lot of *little* bits: tiny stickers, epoxy buttons, mini brads, etc. and i remembered how fun it was to combine a lot (or in this case A LOT) of little things into a grouping. so i did. i've been loving the challenges on the retro rubber challenge blog lately, and this week (#45) they have a very cool sketch:

 RRCB 45

part of the retro rubber challenge requirements is to use stamps which are at least a year old; but you also have to tell which ones they are and their approximate age. mine are the winged heart from pink paislee's "love struck" set, which i definitely remember using on cards before we moved to this house, so it's pre-2013 at least; and also the hero arts candles which has a price sticker from kate's paperie-- who haven't sold stamps in at least 4 years, alas-- so i think i'm covered on both counts. i've paper-pieced and fussy cut both of those, so they'd blend really well in the overall collage.


there are loads more number-based projects to see over at SOS... why not count on those for inspiration, darlings?!

Saturday, August 20, 2016

Paris, Je T'aime

I'm up on the Eyelet Outlet Blog today with a question: How many of you have been to Paris? Sadly, I haven't... yet. But it's one of my travel dreams. In the meantime, I settle for making cards with a Parisian theme. Luckily I have plenty of Eiffel Tower Brads to help me.


I love that the packets contain both shiny silver Eiffel Towers and matte copper brown ones. The latter are great when you want to evoke more of an earthy or vintage feeling; I chose one for this card, since the premade tag from Kelly Purkey's "Mon Ami" collection was in shades of brown.


Any time my cards have a skyline or an outdoor setting I love to add Sun and Cloud Brads, they make a grouping of elements feel more like a little landscape or scene. Mini Butterfly Brads come in assorted packs with four different colors, I chose dark orange because they emphasized the red of the sentiment. To incorporate the tag into my overall card design I added some clouds punched from a vintage Paris guidebook on top of French sheet music to which I added a strip of Flowers with Cute Bug Washi for extra color.


Et voila, my card... and my post... are complete! Au revoir, mes amis! ♥♥♥

Friday, August 19, 2016

better off red

we're still celebrating the first color in the spectrum at ♥JINGLE BELLES♥ and you still have plenty of time to join in, which we hope you will! here's my card:

patterned paper: doodlebug, making memories, pebbles, echo park; white kromekote cardstock: the paper kut; chipboard frame and "be merry" sticker: simple stories; other stickers: doodlebug; gems: recollections; corner rounder: we r memory keepers; adhesives: elmers brand gluetape, 3m foamtape, sewing machine 

the last couple of years crafty steals has had a "christmas in july" event featuring a bunch of different holiday products at verrrrrry reasonable prices, and thus the last couple of years at the beginning of august i've had a bit of an xmas supply binge. this card mixes a few of my new goodies with a bit of older stash, i love a good "all ages" fusion design, lol.

something else i love is a good sketch saturday layout, and i send hearty thanks to those good folks for the shout out on my santa card from last week. i've used the current sketch, #425, which ends this afternoon, but it's so good that you really could make a card from it that quickly:


meanwhile stephanie is, as always, quite well red, and her latest card is over at ♥JINGLE BELLES♥ awaiting your admiration! ciao, darlings!

Thursday, August 18, 2016

all flamingos, all the time

some people might argue that i've been making and posting a few too many flamingo cards lately. they're wrong, of course, but i do sympathize. what can i say? i like birds, generally. i like bright colors, especially pink. i like a tropical setting. flamingos tick all of the boxes. plus they have those awesome, long, bendy legs that look like they were invented by one of the more avant garde designers at ikea. i mean, really, what's not to love? 

patterned paper: pink paislee, my mind's eye, echo park, doodlebug; flamingo stickers: sonia j design via studio calico; leaf stamps from the "tiger tiger" set by sheena douglass for crafter's companion, stamped in viridian and leaf green archival inks; watercolor circle painted with ultramarine, turquoise and pthalo green color burst pigment powders by ken oliver crafts; heart stickers: sandylion; alphabet stickers: doodlebug; kromekote cardstock: the paper kut; ink for edging: blackbird chalk ink by colorbox; adhesives: elmers brand gluetape, 3m foam tape, sewing machine

this time, though, it's not my fault, the current theme over at curtain call inspiration challenge is "FLAMINGO" so obviously i had to play!


there's another totally AWESOME sketch over at atlantic hearts sketch challenge this week (#173), and that inspired a lot of the elements i used for this card.


i stamped the large glossy white cardstock circle with two different tropical leaf stamps using two shades of green archival ink, then outlined them kinda loosely to give them a little more visual weight. the small circle is punched from watercolor paper painted with a few different blendy shades of color burst in blue and green. the birds, pineapple and flowers are all from the same sticker sheet, which was a bit of a splurge but i was helpless to resist such epic level cuteness. i hemmed and hawed about a sentiment because technically, the only flamingos in hawaii are at the zoo*, but in the end i went with "aloha" anyway, just because i wanted to. (so there, lol!) i used two sets of cardstock alphabet stickers in the same font so that my pink letters would pop against their black shadows. 


and now i wish you a fond flamingo farewell and a very happy thursday, darlings! ♥

*there are also a few in the exotic bird habitat at hilton hawaiian village in waikiki. because even waterfowl appreciate luxurious accomodations with modern amenities at reasonable prices. 

Tuesday, August 16, 2016

did i really just make this up?

woohoo, it's tuesday and time for a brand new challenge at shopping our stash, this week we give you, "what's the good word" for which we'd like to see word dies in use on your projects! i'm kind of proud of my card, and i think i might've invented a technique, but first here's my card and then i'll tell you about it:

happy birthday border die: lawn fawn; yellow paper: sei; cloud paper: from an echo park page kit packaging; polaroid: dear lizzy/american crafts; text paper: prima; sunshine banner and scalloped border: echo park; cloud punches: fiskars; daisy: martha stewart; kromekote cardstock: the paper cut; adhesives: elmer's brand gluetape; scotch gluestick; 3m foam tape

ok, so, do you see the background paper with all the white script against the yellow background? well, those are all cuts using lawn fawn's "happy birthday border" die over and over (and over... and over...) on scraps of glossy kromekote cardstock, which i lined up neatly on the yellow paper and affixed with gluestick. when i asked my craftbestie stephanie if she'd ever seen anyone else do this she said NO... the reason being that no one else was crazy enough to fuss with this many tiny bits of script! :) but really, it wasn't as fiddly as i thought it might be. the fact that the border phrase is nearly 6" long means that each cut covers quiiiiiiiite a bit of real estate. and whereas some people might feel compelled to measure and mark and things, i settled for just eyeballing the spaces between the phrases vertically; as well as the distance between the tops of the t's and the bottoms of the y's for height. it definitely definitely helps to glue on ALL the complete phrases first and get the spacing fixed nicely before going back to add the partial cuts that make up the edges. when i had the whole background filled in, i trimmed the edges, mounted the panel to my folded card and used it just like any other patterned paper!


this is one of those cards that totally reinforces my tendency to save ALL the scraps and leftovers from every project. and to tell the truth, i'm never quite sure if i should be proud of that or not. but in this case, every element except the background was from the scrap bag: one daisy saved from a pack of stickers, two texty clouds punched for another project, the small scale square of cloud paper from the front of a page kit, the "sunshine" pennant snipped from a sheet of greetings, etc, etc; even the scooter polaroid had been pre-trimmed from a full sheet of paper and then not used at the time. so while the creation of the background admittedly took longer than usual, the collage of elements came together really quickly, which sort of balances it out.


looking for more ideas on using diecut words? the SOS design team has lots... check them out! ♥

Friday, August 12, 2016

Road Trip!

It's my day on the Eyelet Outlet Blog, where I've made a confession only papercrafters will understand: I recently bought an entire 12x12 sheet of PhotoPlay "Happy Glamper" stickers entirely so that my adorable Eyelet Outlet Flamingo Flatback Resin pal would have a super-cute camper van in which to embark on exciting flamingo adventures. And what's more, I stand by that decision!


Ok, yeah, that's a little bit of an exaggeration, because I really like the whole sheet, and I know I'll use them, but seriously, my first thought was, "That camper is EXACTLY the right size for an EO Flamingo!!!" lol.


With a central image as fun as this, you really don't need much else to finish off a card. I added a Heart Pearl to the camper van's door, a couple of stamped palm trees, and a few patterned paper clouds; then grounded the little scene on a strip of Road Washi Tape.


I've been loooooooving the sketches at Atlantic Hearts Sketch Challenge, so I'm jumping in over there again this week on Sketch #172:


I can never resist a pun, so I stamped a fun sentiment and used a couple of tiny red pearls from a Pearl Strip as punctuation.


And now, it's time for me to hit the road... let's FLAMINGO! ♥♥♥

rudolph the RED-nosed reindeer

this fortnight's prompt at ♥JINGLE BELLES♥ is called "rudolph the red-nosed reindeer" and we'd like to see holiday cards that are predominantly red. does that mean you can't use any other colors? certainly not. but your card should be, if not MOSTLY red, at least definitely, decidedly and noticeably red. other than that you can do anything you like! sound like fun? awesome! let's go:

ancient chipboard tag: mme; sentiment sticker: basic grey; patterned papers: october afternoon, dcwv, mme; crocheted trim: basic grey; red cardstock: core'dinations; adhesives: elmers brand gluetape, 3m foam tape, sewing machine

you can see that my card isn't ALL red; there's some off white, a bit of blue and a soupcon of sepia. but there's a lot of red, and i like it. i used this week's sketch saturday layout, which is #424 for those of you scoring at home:


stephanie has also made a glorious card that's mostly red... why not go and see it right now at ♥JINGLE BELLES♥ you can thank me later, darlings... :)

Tuesday, August 9, 2016

card sharks!!!

awesome challenge at shopping our stash this week, we want to see projects involving playing cards, whether it be ACTUAL cards, or stamps, stickers or patterned paper with playing card images. lots of ways to go with this. my project is a bit of a wild card... how laureny is that, lol?


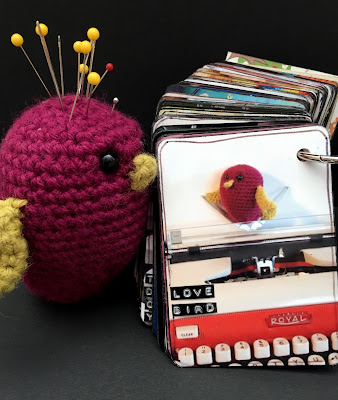
if you've been reading my blog for a bit, you know that i love to knit and crochet, and i especially love making little amigurumi dolls: i've made dogs, dinosaurs, sharks, various types of food, dave the minion (with a minion cupcake) and even a few tiny grim reapers! i've probably made three dozen or so of these little guys over the years, and since i always give them away as gifts, the only one i actually own is the one in the photo above, the very first i ever made, in a class with my bff at lion brand yarn studio in 2009! this guy sits next to my sewing machine and performs valuable services as both mascot and pincushion! a few years ago i made myself a little playing-card minibook with photos of each of the amigurumis i had made. partly as a fond way of remembering them, but it also serves a practical function, since i use the back of each card to record details of the pattern and yarn, as well as who "adopted" each creature. but somehow i'd gotten way behind in updating my book, so i thought this would be a great time to catch up.


this minibook really is built upon an actual deck of elderly and incomplete playing cards. i often make atcs with a playing card base, for the structure. for my ami book, i format and print the pictures just a tiny bit larger than necessary, so that the image will cover the entire face of the card. on plain paper i print out a little "adoption form" i made in wordpad... it has spaces to write the name, date, pattern and recipient of each amigurumi. i run the entire sheet of both the photos and the adoption forms through my xyron machine, adhere them to the front and back of the playing cards, respectively, and then trim them up with scissors.


when each card is complete, i ink the edges with black archival, punch holes with my cropodile, and add a little caption with my dymo label maker. then i add the cards to the book, which is bound only with a bookring, so that it's easy to keep adding more cards, any time i want to!


is it just me, or does my not-so-feathered friend look a bit nostalgic when faced with a photo of his newborn self??! :)


there's loads more inspiration from our card-carrying SOS design team members! check it out and start planning what you will make! ♥

Friday, August 5, 2016

christmas, cubed!

we're still celebrating "we three kings" at ♥JINGLE BELLES♥ for which we'd love to see holiday cards that have three of... well... something! this week i went with three blingy ornaments. pink ones. o'course. :)

leftover pink baubles cut from scraps of patterned paper and adorned with glitter paste, embossing, bling, outlining and... well, a little bit of everything, really; patterned paper: pebbles, bo bunny; glossy black cardstock: ranger; gems: want2scrap; glitter paste: viva decor; pearls: eyelet outlet; scraps of silver cardstock: the paper co; adhesives: elmers brand gluetape, 3m foam tape 

i'm not sure i've ever made a christmas card that was all pink and black. not black as an accent, or a neutral element, but black as the main color. there's more black than pink, even... which is sayin' somethin' lol. but i like it. the design and layout came together really quickly because the baubles were leftovers from previous projects AND... i had an awesome sketch from atlantic hearts sketch challenge, to whom i say, "thanks very much" for the shoutout on my "aloha flamingo" card:


be sure to hop over to ♥JINGLE BELLES♥ to see stephanie's gorgeous card and check out the "http://jinglebellesrock.blogspot.com/2016/07/we-three-kings.html
" readers' gallery.

Wednesday, August 3, 2016

Monster Movie Night!

It's my day on the Eyelet Outlet Blog again, and I'm taking my recently acquired an envelope maker for a spin. The gift-card size is especially cool, because you can make a card and envelope that not only MATCH, but coordinate with the theme of the gift card; which, in this case, is for a movie theater. And who better to act as spokesmodels for movie night than our very own Eyelet Outlet Monster Brads! (Please note: the only thing scary about these guys is how cuuuuuuuuuuuuuuuute they are; but they think they're terrifying, so be a sport and go along with it for the length of the post, ok? Thanks.)


Double-sided paper is great for envelopes, but in this case, the reverse was plain, so I "lined" the inside of the envelope with Admit One Ticket Washi, which I applied before constructing the envelope. (If you don't have an envelope maker, this website has FREE templates for many different sizes, including giftcard.)


I wrapped another strip around the outside to give two of the adorable... (ahem!) ...I mean ferocious monsters a place to stand. Movie actors need dialog, obviously, for which I used my vintage typewriter; and they're STARS, so I diecut a few from plain cardstock with Glitter Black Washi.


These guys are *ALWAYS* ready for a closeup, lol!


The card coordinates with the envelope, naturally, but also features a few strips of Road Washi Tape, as well as some Popcorn and Ticket Brads.


I find the Purple Monsters are especially adorable... errrrrrr, I mean fierce
And very frightening! ♥


I hope you'll be inspired to make your own envelopes, or to decorate pre-made versions with super-fun Eyelet Outlet goodies!

Tuesday, August 2, 2016

SOS263: silhouettes

this week's challenge at shopping our stash is pretty self-explanatory, i think; we want to see projects that feature silhouetted images. fun, right? here's what i made:

woodgrain silhoutte sticker: amy tangerine/american crafts; patterned paper: pink paislee, doodlebug, glitz design; border stickers: crate paper; florals: prima; brad: mme; epoxy/rubber stickers: recollections; sticky pearls: eyelet outlet; adhesives: elmers brand gluetape, 3m foam tape, gluedots, sewing machine
i've had the woodgrain patterned silhouette sticker for ages, so i'm pretty excited to finally use it on a card. something else i was very excited about over the weekend was that my "we three kings" card was the winner of challenge #422 at sketch saturday. so i thought i'd celebrate-- and thank them-- by playing along again this week. since it was the 5th saturday in the month we could pick any sketch in their considerable (and awesome!) archive. so i went with #328:


check out all the fabulous dt projects at SOS for more inspiration and then be sure to link up your own gorgeous silhouette-based card before next monday night! ♥