Friday, April 27, 2018

the gift(wrap) that keeps on giving

we're still celebrating earth day at ♥JINGLE BELLES♥ by creating cards with recycled, repurposed or upcycled elements, and you still have time to join the fun! here's what i made this week:

recycled elements: red pine giftwrap and midcentury modern critters fussycut from a different giftwrap, both saved from xmas 2017; patterned paper: photoplay, blue fern studio + white glitter paper by best creation; sentiment sticker: making memories; glossy white cardstock: paper accents; ink: prima; adhesives: elmers brand gluetape, 3m foam tape, xyron permanent adhesive, sewing machine

those sweet critters are obviously the stars of the show, which is why i saved the piece of giftwrap they were on from one of my holiday packages last xmas. the kraft and red paper with the pine boughs was also giftwrap. see?


in both cases i had saved the pieces fairly neatly, having trimmed a smooth section of each to a size smaller than 12x12 so i could store them in my holiday paper carrier thingie. when i sat down to make my card i applied a piece of plain white cardstock that i'd run through my xyron machine to the back of each to make them a little sturdier. then I trimmed the branches to fit the background of my A7 card and fussy cut the critters!


i used the current sketch saturday --albeit rotated ninety degrees-- to guide the layout of my elements.


more inspiration at ♥JINGLE BELLES♥ in the form of this week's card from stephanie and the fab readers' gallery

Wednesday, April 25, 2018

A Banner Day

It's always a banner day when I get to make some "just because" cards with my Eyelet Outlet goodies!


One of my friends sent me a photo of some amazing stitched circle garland last week, and it made me start thinking about different types of bunting and banners... and the fact that they would probably look even cooler on cards... with some EO brads on them, o'course!


My first card features typical triangular pennant-shaped flags, which go really nicely with our Banner Brads. I made them by neatly applying several strips of Feather Washi on a piece of plain white cardstock... (I *love it* when tapes can be lined up horizontally to make a bigger pattern; it doesn't work on EVERY tape; but I can never resist testing each one to see if it will!) ...then trimming them down into neat triangles. By the way, the Banner Brads come in Brights and Pastels, but it turns out my favorite way to use them is to mix both sets and combine ALL the colors! :)


For my second card, I broke out some of my older, smaller punches to make shaped garlands I could adorn with Emotion Brads and with Hearts. I added the banners to both cards in the same way: I lightly tacked the paper shapes to the card panels with minimal adhesive, then sewed across all of the shapes to both fasten them. (At the same time this adds the detail of the string that holds the banners together.) Then I set the brads neatly in their places on top of the sewn banners. Finally, at the very end, I affixed the decorated panels to 6" square white cards, and sewed neatly around the edges. The last step is optional, of course, but it adds a little extra texture AND makes sure the panels stay really flat, without being able to see the reverse side of the brad inside the card.


I have a few more ideas for garlands... and new ways to use them... so this might be a bit of a "recurring feature" lol; stay tuned! ♥

Tuesday, April 24, 2018

you're MER-mazing!

we're celebrating all things "mythical and magical" this week at shopping our stash, so we want to see cards with fairies, yeti, unicorns, witches, wizards, dragons and yes, even mermaids, like this one:

mermaid stamp: lawn fawn via paper anthology; colored with tombow markers and prismacolor pencils for shading, a little bit of white gel pen for the scales; rosey posey embossing folder: taylored expressions; backgrounds made with colorburst wax resist method using chartreuse, pthalo green, ultramarine, wisteria, indigo, prussian blue and a tiny bit of peony; sun die: stampin' up; "coral" die is actually from a spellbinders foliage set; alphabet and other background stamps by wendy vecchi, stampers anonymous; sandcastle and seashell brads: eyelet outlet; watercolor paper: strathmore; russian text paper from an old, falling apart book; adhesives: elmers brand gluetape, 3m foam tape, sewing machine

ok, so as you can see, i've stamped and colored again! that's like twice this year already, and it's only the end of april, lol!!! but this lawn fawn mermaid from my friend elisabeth's stamp stash was obviously too cute to resist. as usual, it took me like an hour to color a one inch mermaid. but since i'm secretly super-proud of her hair, we'll call it good, k? this card doesn't look super stashy until you realize that all four of the background papers are experiments from when i was working on samples for the colorburst wax resist class at the end of february, so i've done quiiiiiite a bit of crafty recycling! i've also FINALLY used the adorable small sun die that stephanie gave me for my birthday last year AND i've snuck in a couple of eyelet outlet brads since they're the perfect scale for my tiny seascape.


there's loads more mythical and magical mayhem awaiting you at SOS, why not fly, teleport or materialize yourself over there and enjoy some of that right now, darlings? ♥

Friday, April 20, 2018

peace on earth day

if you've played along with us at ♥JINGLE BELLES♥ in other years, you'll probably know that thanks to kathe deck, whose brilliant idea it was in 2011, we do a reuse/recycle/upcycle challenge every year right around earth day, and since it's that time again, guess what the brief is this fortnight? yep, the amazingly fun earth day special! here's what i made:


one of my favorite things about this challenge is figuring out which recycled things each person has used. because a lot of the time, the cards are so amazing, you'd never guess they are made from "non traditional" ingredients, so to speak! we've seen everything from diecuts made of flattened-out soda cans, plastic salad containers converted into shrinky-dink-like elements, scraps of carefully saved giftwrap, illustrations from a catalog, pictures off a particularly pretty tissue box... well, as you can imagine, there's a whole list of great ideas! this time i went with two of my favorite recycling targets: a bit of pretty papercraft packaging and one of the store-bought holiday cards i received last year:


i'll admit that using the amazingly pretty cardfront really felt like cheating, lol! because let's face it, it doesn't need much, does it? i added some fabric poinsettias to the middle of the printed one and attached them with a jingle bell brad. i adorned some of the printed holly berries with sparkly eyelet outlet gems. then i matted the trimmed down panel onto a piece of gold glitter paper, followed by a mat cut from the packaging. et voila. i called it DONE.


stephanie, of course, has something amazing to show you as well, so why not hop over to ♥JINGLE BELLES♥ and check that out whilst thinking about what *YOU* can pull out of the recycling bin or wastepaper basket to make your own earth day masterpiece!

Wednesday, April 18, 2018

Sunshine and Watercolor

It never ceases to amaze me how inspiration is everywhere! Last week I spotted a $2 stamp and embossing folder combo at a big box crafting store and realized that the cuuuute rainbow stamp was *EXACTLY* the right size to combine with our Eyelet Outlet Sun and Cloud Brads. So obviously I had to buy it, lol, right?!


You may have noticed that I often show a couple of similar projects in the same post, so I'll share one of my secrets with you: when I'm having trouble deciding between two ways to go, I'll start working on both ideas at the same time. In this case, my indecision was whether to paint the embossed rainbow panels with bright, full-strength shades of ColorBurst pigment powders, or to use diluted pastel versions. Often, when I'm in the process, one of the ideas will not work out, so I abandon it and keep going with the other. This time, I liked them both; so I was able to make two different cards.


To get the fun "white lines" effect on both cards, I used the rainbow embossing folder to texturize a panel of watercolor paper in the usual way, but before painting it, I rubbed across the raised bits with an ordinary white candle from Ikea to give it a very light coating of wax. That acts as a resist, so when you paint the watercolor on, it beads up on the raised parts... you can actually paint away quite messily and still get a really fun effect. For the dark version, I used full strength ColorBurst shades and let them air dry completely. For the pastels, I diluted the pigment with a little extra water, and then blotted the wet color with a tissue before it dried. In both cases, I completed the background/sky first and filled in the rainbows second. This seems counterintuitive, but it was a game-changer for me!


The vivid colors of the darker rainbows were a great match for this beautiful multicolor Striped Washi Tape, which I've flanked with a fun stripey pattern from the Rainbow Skinny Set on top of some notebook paper backed with plain white cardstock. I attached the Sun and Cloud Brads to my stamped and colored rainbow before cutting it out... thus I was able to leave a little extra cardstock behind the brads for support! This card is 4.75 x 6.25, to accommodate a slightly larger heart shape and "dilute" the darker colors with a little extra white space.


The pastel rainbows were soft enough to be a background for a typical A2 card, so this time I used a smaller heart shape from my leftover notebook paper, and added my Dymo Label sentiment right on top.

I hope I've brought a little bit of sunshine into your day... in the form of Sun and Cloud Brads! Be sure to stop by the Eyelet Outlet Blog for brand new design team projects EVERY day of the week! ♥

Tuesday, April 17, 2018

best fishes

guy cards are harder to make then girl cards. fact. and maybe not quite as much fun... if you happen to love loads of flowers and bling and stuff on your cards. so it's really helpful when your favorite challenge blog, such as shopping our stash, comes along with a brief called, "yo! dude!" that asks you to make a masculine card, right? yep, i thought so too! here's what i made:

fish illustrations from an old, falling apart, garage sale book; vintage trading stamps from my stash; paper: creative imaginations (graph), lil davis (lt blue), filler from a picture frame (greenish) + a not very interesting gel print on deli paper (dk blue); alphas: pink paislee; greyish shimmery cardstock: core'dinations; adhesives: elmers brand gluetape, 3m foam tape, sewing machine

i cannot even count the number of cards i've made with the sentiment, "best fishes" but i know it's got to be a fairly high number at this point. i've probably made at least fifteen just for my brother. (and i'm still not tired of the genre, either; so "sorry" or "you're welcome", lol!) this time i chose a couple of larger protagonists, who happen to have been amongst the illustrations in an awesome old book i found called "wondrous world of fishes" which totally lives up to its name. rather than trim them down, i decided to make an A7 card.


my background is bits of torn paper stuck on to an ancient bit of graphed patterned paper. i've got a scrap of pale blue vellum, a glossy ombre panel that was filler in a picture frame, part of a blue-ish/greenish/greyish gel print, and a few vintage trading stamps that did not come off their pages cleanly... but still seemed too cool to toss out. my sentiment is composed of older, glittery, vinyl alphabet stickers that were the PERFECT size and shape. alas, i can't find more like them, and i'm about out of vowels now, so this might be one of the last cards to feature their sparkly goodness. unless i learn polish or something.


there's A LOT more inspiration to be found at shopping our stash. why not hop over and feast your guy-card-loving eyes on some of that right now? ♥

Friday, April 13, 2018

♥creamsicle christmas♥*

we are headed into the second week of our dreamy inspiration photo challenge at ♥JINGLE BELLES♥ so you still have plenty of time to join the fun! here's the pic again:


and here's what i made this time:

patterned paper: basic grey, studio calico, lilybee design, echo park; washi tapes: freckled fawn, october afternoon, studio calico, hambly; white glitter paper: best creation; ink: colorbox; adhesives: elmers brand gluetape, 3m foam tape, sewing machine

i mentioned last week that for anyone who's not a fan of the bright orange-- or perhaps just doesn't have much in the way of orange supplies-- there are a couple of ways to go: you can ignore the colors completely, and focus on selected elements like the tree, the fireplace, the presents, etc; OR you can just tone them waaaaaaaaaaay down. in actual fact, this card is closer, proportionally, to how much bright color is in that room compared with how much white + neutral there is. again, i've got nothing in the way of "holiday" supplies, except for that awesome memory box die, "marvelous pine". i do have a bunch of different whites-- including a whitish woodgrain and some white glitter paper for a bit of sparkle it's hard to see in the picture. my pops of vivid color come from washi tape, and i've put the entire panel onto a much softer orange background.

don't forget to hop over to ♥JINGLE BELLES♥ and check out stephanie's second card; not to mention the amazing work that's already in our fab readers' gallery!

*someone on facebook last week pointed out that that the colors are kind of sherbet-ish... and i had to agree... yet another reason to love this inspo pic, eh? :)

Wednesday, April 11, 2018

Gift Wrapping Is My Bag, Baby!

I may have mentioned that before. But I never get tired of making extra-fancy presents for my friends and family. Especially (...but not limited to...) the kiddos. It's amazing how quick and easy it is to make a plain boring giftbag from the big box store into something infinitely more colorful and fun... with Eyelet Outlet Washi Tape! So there just might be a couple of bags on the EO Blog today that look a little bit like this:


You've seen me make washi tape into patterned paper before, just by applying tape in neat strips on plain white cardstock. And that's what I did this time to make the star bag, but instead of choosing one pattern of tape, I made a washi rainbow! I used a homemade star template from my computer to trace the star and cut it out with scissors. Then I matted the whole thing onto a scrap of glossy black cardstock and cut it out again. For the heart bag I used a store-bought stencil for the shape, and this time I applied the tape in a sort of plaid pattern, alternating between placing the tapes horizontally and vertically, so it would be more interesting. I matted that one on a coordinating shade of purple. I machine-stitched around the edges of both shapes to add a little extra texture.


I affixed both shapes to their bags using a few pieces of foam tape. But first I wanted to add a little more color to the bags. The nice thing about washi tape is that it comes in lonnnnnnnnnnng rolls... so you never have to worry about how wide or tall your project is. I marked an even point on the right and left sides of the front and back of each bag. Then I applied my tapes carefully, one at a time, in long strips that went alllllllllllllllll the way around the bag! By starting inside the fold at the side of each bag (and working neatly) I was able to hide the place where each strip of tape overlaps at the end of its run. I love how it looks seamless, and I can tell you that when non-papercrafters see something like this, they have NO IDEA how you've done it! (So when you make your own version, if you want to tell them it was *MAGIC* your secret will be safe with me!) ;)


On the star bag, I used: Red Dot Tape, Blue Stars and a couple of Skinny Print Tapes for variety; the star itself has: Heart Washi, Orange Stars, Crayon Tape, Blue Stars, Purple Checked, Skinny Yellow Dots, Skinny Green Stripes and Confetti Tape.


On the heart I added a stack of Paper Flowers with an Enamel Dot center, and these tapes: Pink Checked, Purple Zigzag, Pink Dots, Skinny Pink Dots and Skinny Pink Checks plus Heart Tape; with Wide Star Washi and Skinny Glitter Tape on the bag. But really... both of these designs would work with literally ANY combination you'd like to use! You could work in a specific color group--either the recipient's favorite combination, or to commemorate a school or team. Or use the entire rainbow--either randomly or in the ROYGBIV spectrum. You could even combine tapes thematically, for an occasion like a birthday or holiday. The only limit to the variation is your own imagination!


Need even more great ideas for using Eyelet Outlet Washi Tape, Brads or Bling? Follow us on Facebook and Instagram to see all the latest makes from our amazing design team! ♥

Tuesday, April 10, 2018

aloha and mahalo

we're "headed to the beach" this week at shopping our stash, and for me, that always means making something a bit hawaii-centric. so i did:

beachy paper and sticker: echo park, paradise beach; glitter paper: best creation; brown patterned paper: basic grey; thickers: american crafts; lei sticker: from the dollar store??; adhesives: elmers brand gluetape, 3m foam tape, sewing machine

this time i've used some specifically beach-themed papers from echo park from a couple of years ago, paired with ancient yellow chipboard thickers (it's not a coincidence they are SEWN on there, lol!) and a dimensional lei sticker so old i'm actually not sure where it came from. it looks pretty good here, however, so sometimes hoarding pays off, eh? :)

there's loads more beachy inspiration awaiting you at SOS. why not hop over and enjoy some of that right now, darlings?

Friday, April 6, 2018

♥ORANGE♥ you glad it's christmas?

this fortnight at ♥JINGLE BELLES♥ we have a really fun and funky inspiration photo which i absolutely love! ...but... i confess i'm a little worried that when you first see it, you'll think the same thing i thought when i first saw it, which was, "omg! i've got NOTHING in my xmas stash that's even close to those colors!" but pleeeeease stay with me here, because it turns out i was able to make a couple of really cool cards anyway, and i bet you can too! because remember you can take your inspiration from ANY aspect of the photo which appeals to you. you don't have to use everything! ok, here's the pic:


yes, it's got quite a bit of orange, and no, you probably don't have any xmas paper with orange in it. but truly, you won't need any, i promise! because although the pops of orange might be the first thing you see, really, the majority of the items in this photo are not orange... they're white! but let's ignore the colors, and start thinking about the elements, instead: there's a fireplace, with stockings hung up! there's a tree, with baubles! there are beautifully wrapped gifts! i'm guessing you've stamps or dies which would work for one or all of those scenarios, don't you? remember: you don't need to recreate the picture! so you could easily rock the colors without the elements, or vice versa! for that matter who says you can only use xmas products to make xmas cards? not me, and in fact, hardly anything in either of my cards is seasonal-- so there! see:

snowflake dies: tim holtz/sizzix; tapes: october afternoon, prima, love my tapes, little b, hambly, freckled fawn; journal card: crate paper; gems and enamels: eyelet outlet; glitter paper: best creation; adhesives: elmers brand gluetape, 3m foam tape, sewing machine

the first thing i thought about when i saw this photo was that i have loads of (non-holiday) washi tape in pretty much every shade shown, so i decided to make a sort of lattice background with the colors and let my centerpiece be a cluster of white and silver snowflakes. then i found this cool crate paper journal card that had nearly the exact same teal as the accent pillow in the foreground-- score! so i scaled back my snowflakes to a slightly smaller size to fit around the journal card, et voila! since there are three of them, and the brief this week on the simon says stamp monday challenge blog is "a trio of something" i'm linking up there.

as always happens when i start playing with washi tape, i wound up with more panels than i needed, so i thought i'd try one more card. i made a white tree-- inspired by the one in the photo-- for the center of this one. i added a little bit of the natural wood color of those ottomans in, as well.

xmas tree die: sizzix; tapes: october afternoon, prima, love my tapes, little b, hambly, freckled fawn;  gems and enamels: eyelet outlet; scraps of patterned paper: basic grey; wood veneer paper: altenew; doily scraps from my stash; adhesives: elmers brand gluetape, 3m foam tape, sewing machine

i hope i've given you a few ideas to get you started on this fun challenge but if you need a little more inspiration, hop over to ♥JINGLE BELLES♥ and see what stephanie has made! then put on your thinking cap and come play!!! 

Wednesday, April 4, 2018

Cards That Feature... Cards?

By which I mean greeting cards that feature Eyelet Outlet Playing Card Brads. Like these that are on the EO Blog today:


As I was looking through my stash of EO goodies, I suddenly realized that I'd never made anything using these awesome Playing Card Brads that came out last fall. So clearly, it had to be done! I knew immediately that I wanted to use the cards all together, as if I was holding them in my hand. So I needed a tiny bit of "behind the scenes" magic. Instead of attaching each brad to the cards separately, I set them all onto a little scrap of cardstock, then cut off the excess cardstock. This way the whole hand of cards --a rather impressive royal straight-- can be moved around and added to the finished card wherever I want to put it!


For the first version I made a horizonal A2 card, and handcut the feature word, "wild" (using Impact font formatted slightly over two inches tall) in the sentiment "Go Wild on Your Birthday" from a stack composed of Heart Washi Tape and several black and white patterns of Skinny Tape, including Pawn Washi, to set off the colors in the Playing Card Brads.


For my second card, I used a similar arrangement of tapes and papers. This time I diecut the word "hand" and made the rest of the sentiment, "Let Me Know If You Need a Hand" using my trusty Dymo labelmaker. I went with a vertical A2 to fit the slightly smaller size of the letters.


Need a little extra inspiration with your papercrafting? Playing Card Brads are always ready to lend a hand!

Tuesday, April 3, 2018

what's black and white and teal all over?

my card for this week's "black and white plus ONE other color" challenge at shopping our stash, o'course! see?!

patterned paper created using a heidi swapp silk screen and carbon black paint on top of russian book paper; white rub-ons: basic grey; floral: prima; ribbon: making memories; seambinding: paper anthology; glossy black cardstock and ink for edging: ranger; brad of unknown origin; adhesives: elmers brand gluetape, 3m foam tape, sewing machine  

this card is SERIOUSLY stash-centric, though i'm not sure how obvious that is. the black and white floral print (on a piece of russian book paper) is something i made fairly recently, but applied on top are the leftovers from 3 different packs of basic grey rub-on transfers. the layered floral is quite an old prima one, on which i've swapped out the center for a brad that's soooooo elderly i do not even know where it came from. the scrunchy seambinding is pretty new, but the black and white ribbon is from a making memories set... which gives you a clue to its age, lol!


just to prove that inspiration is *EVERYWHERE* i chose most of the accoutrements for my card based on the design of a pretty t-shirt that belongs to my friend barb chung, who came for a visit last week. i had intended to use that pretty ultramarine blue as my "plus one", but then i found the oversized teal flower with the layers and the feathers and just could not resist adjusting the tone slightly!


since this week was a fifth saturday, we could choose any layout from the sketch saturday archive and i went with week #281, though as you can see, i flipped the sketch horizontally and played with the proportions:


there's plenty more inspiration available from the SOS team, as always! why not enjoy some of that right now, darlings?! ♥

Sunday, April 1, 2018

gel printing wrap up!

it's hard for me to express how amazingly quickly the whole entire month of march FLEW past!!! probably because i used every spare moment --and a few that technically weren't spare because i was actually supposed to be doing something else entirely, lol-- gel printing. here now, the last lot of those essperiments!

day 24: leaves
on this day i pretty frankly cheated. because birgit koopsen posted this amazing video of how to do transfer prints from books and magazines on the gel plate... (you really should go watch the video, even if you don't have much interest in gel printing!) ...and after i saw it, that's all i wanted to do. the technique doesn't always work. you need to have just the right combo of ink (in the illustration) and paint (on your plate); and frankly i'm still not that great at predicting when that will happen. i had a blast playing with the idea though. and i know i'm going to do it again and again.
(there are some leaves that you can very nearly almost see in the green print and the purple one!)

day 25: foam stamps
we were meant to use homemade foam stamps. which i realize are easy to make... if you have craft foam. i thought i had some. but apparently not. luckily, there are some really nice pre-made foam stamps out there, like this hollyhocks one from donna downey.

day 26: from the hardware store
there are some INCREDIBLE prints for this prompt in the #31daysofgelprinting hashtag on instagram. seriously, some of the most creative ones of the whole month! i just kind of froze, lol. then i remembered that home depot is a bit like a hardware store, right? (just go with me, kthx?) and that i had some big paint chip folders and drywall tape from home depot. so i'm calling that good.

day 27: cardboard
i stripped the top layer off some corrugated cardboard to make a couple of texture tools: one flat, the other rolled up and taped together. i also printed ON cardboard which i really like the look of.

day 28: comb
i used a ridgey texture tool to mix quinacridone magenta and hansa yellow. i was expecting a sort of pinky-orange and got... FLAMES, lol! 

day 29: egg carton
i think i might have to write in to wegman's and complain that their egg cartons leave a much less interesting imprint than those of other egg cartons throughout the world. because of all the samples i've seen for this prompt, mine are my least favorite, lol. 
(they were admittedly lots of fun to make, however!)

day 30: water soluble crayons
ironically, i was at the ink pad on wednesday standing next to a pack of dina wakley's scribble sticks feeling *VERY* tempted. but i resisted the purchase because i have plenty of gelato crayons, which i thought were pretty close to the same consistency. they aren't. but i managed to make them work (sorta!) with the gel plate by lightly spritzing my triangular mini plate with water, then coloring the plate with a gelato, then stamping the triangle through an admittedly awesome stencil that my friend josh pointed out looks a bit like the interior of a colorfully redecorated TARDIS! ♥♥♥

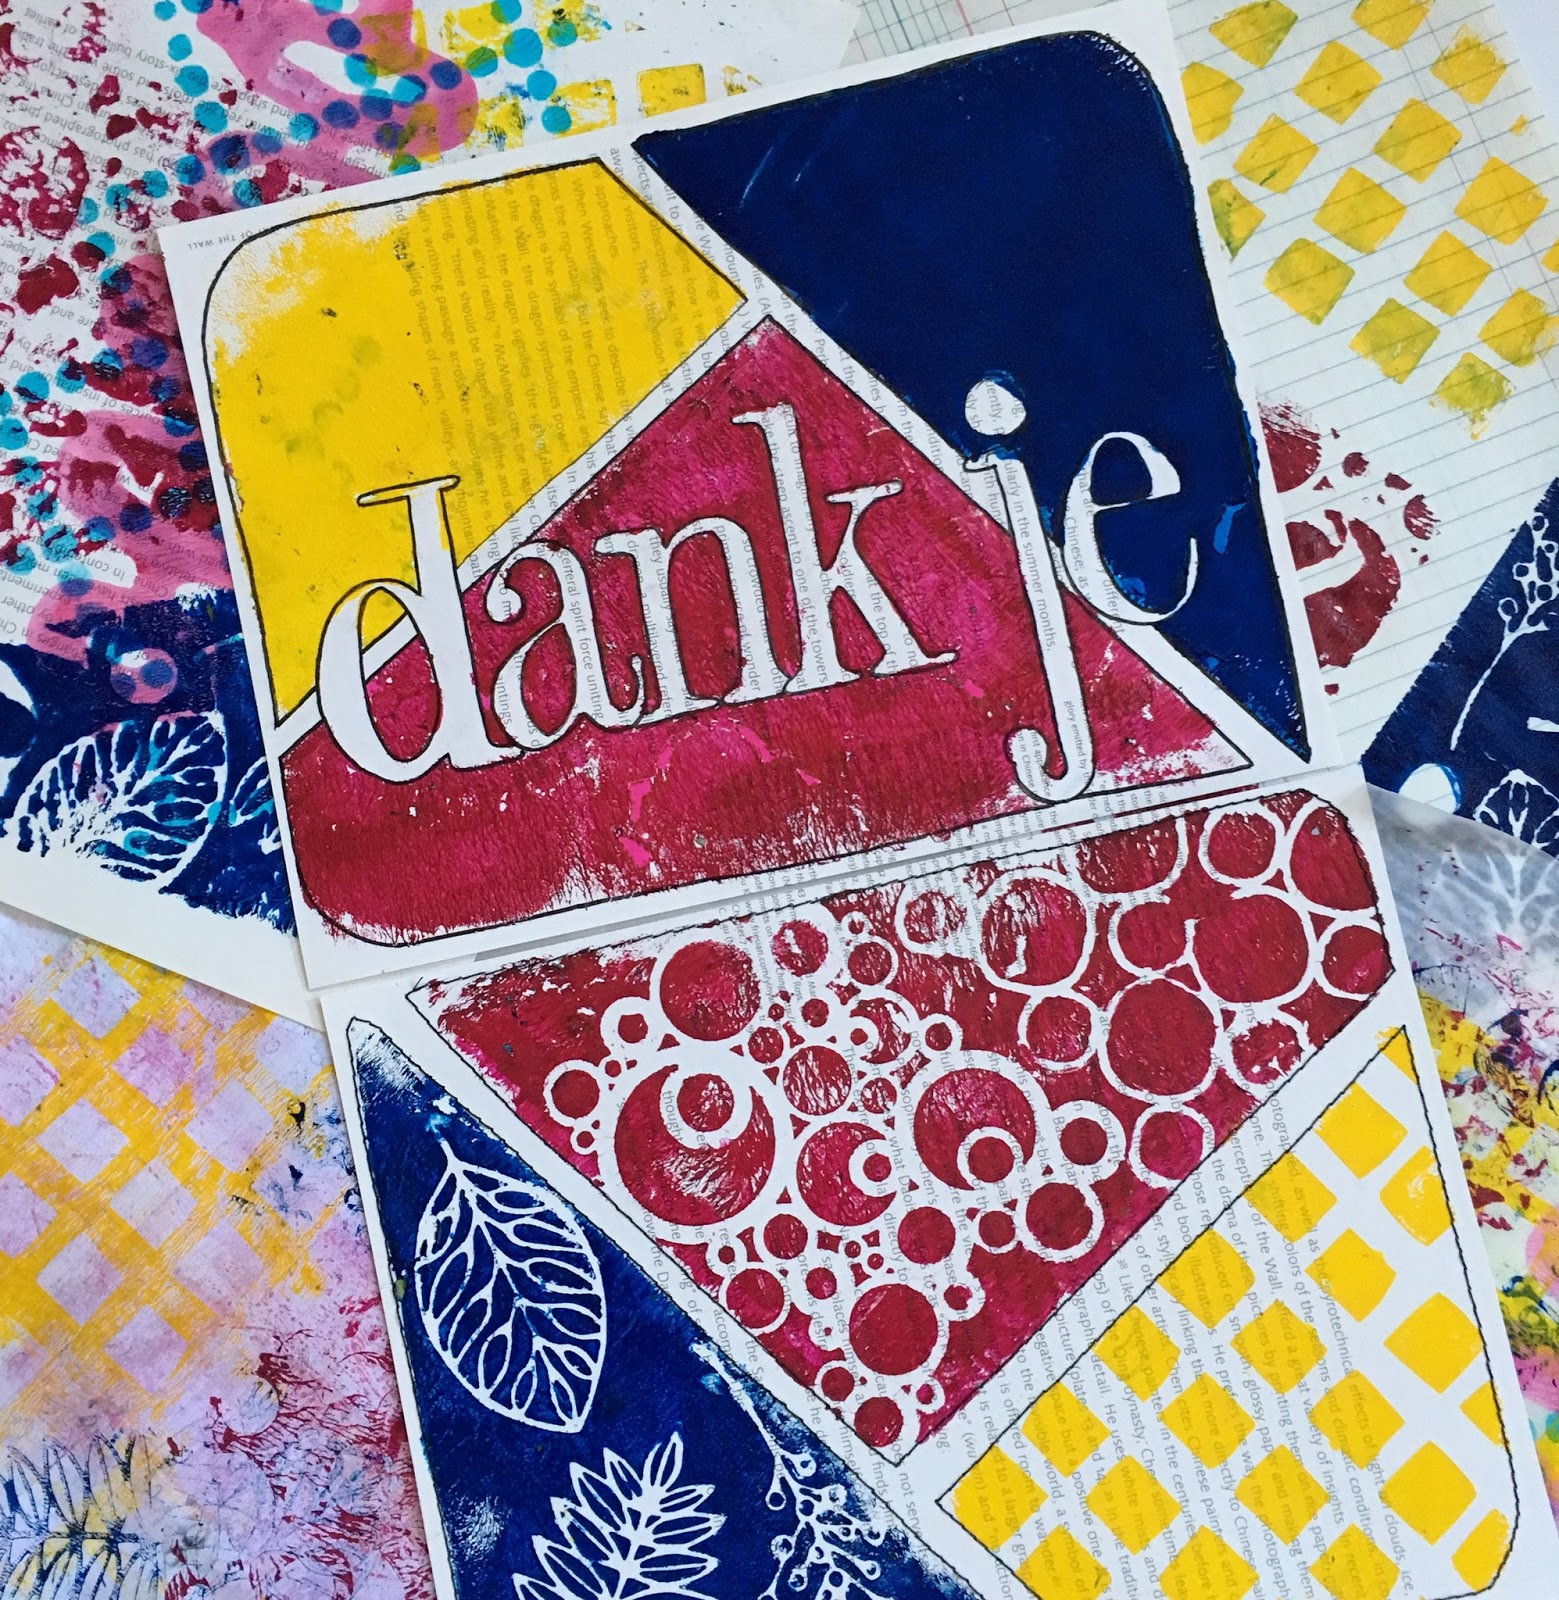
day 31: primary colors
shocking true confession: despite a growing collection of heavy body acrylic paints, it turns out i don't actually own a true RED. so quinacridone magenta once again kindly stands in and does (i think) quite a creditable job anchoring my mondrian-inspired color blocks. you may have guessed that "dank je" means "thank you" in dutch, which is the first language of birgit koopsen who so kindly hosted this entire month of gel printing awesomeness!

and there you go, the month is DONE! at the suggestion of someone from the very cool gelatin printing enthusiasts' group on facebook i made a flip-through flipagram of the altered book which holds all of my prints for the month. you can see it on facebook or instagram! meanwhile, the 31 days of gel printing label gets you all of the blogposts conveniently grouped together, should you need them. (possibly a great cure for insomnia, lol!)

♥♥♥
wishing everyone who's reading this a very happy:
easter
passover
april fool's day
sunday
(please select all that apply!)
♥♥♥