Saturday, April 30, 2022

Floral Doodles? (Yes, Please!)

On Thursday, I posted my first card featuring Doodle Town, one of three new stamp sets from Wendy Vecchi this Ranger Release Week. Today I'm showing off super-luscious Floral Doodles, and tomorrow I'll be back with Doodle Celebration. I'm quite smitten with all three sets, but Floral Doodles features doodle-y blooms that are Hibiscus- and Plumeria-like, which immediately makes me think of Hawaii, which immediately makes any day even better!


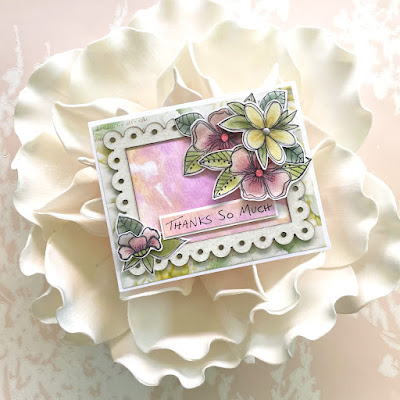
Inspired by some of Wendy Vecchi's previous cards on Instagram, I stamped all of the flowers and leaves in Black Archival Ink onto Dina Wakley Stickyback Canvas Tape, then colored them using Detail Blending Tools and WV Signature Archivals in Pink Peony, Tea Rose, Sunflower, Prickly Pear, Leaf Green and English Ivy. I added a few highlights and shadows with colored pencils, and put Eyelet Outlet Pink Jewel Bling and a White Mini Round Brad into the centers of the three largest blooms.


When I made my Inky Birthday Bash Card, for this Ranger Blog Post, I created several inky backgrounds on various paper types, before settling on the boldest, glossiest one for that particular card. But... I saved the "rejected" panels for later use; and the soft pink/yellow/orange tones of this one went perfectly with my Floral Doodles. I placed it inside the scallop-y chipboard frame from Wendy's Bases and Frames Chippies set, affixed the blooms to the corners, and matted the whole thing on a panel made by covering a piece of plain white cardstock with neat strips of the widest yellowy-green tape from Wendy Vecchi's Washi Tape Assortment 1. I stamped "Thanks So Much" onto an offcut of the watercolor paper background, matted it, and adhered it to the center with Ranger Adhesive Foam Tape.


Be sure to check out the Ranger Ink and Wendy Vecchi Instagram feeds for loads more inspiration!

Friday, April 29, 2022

Skating Away

We're still celebrating Winter Fun at Jingle Belles and you're still invited to join us! This week I was sorting through my holiday dies, and as soon as I came to these gorgeous Tim Holtz Ice Skates from Sizzix I knew exactly what I wanted to make. I spend a little too much time at the chiropractor to be an avid ice skater at this point in my life, but as a kid and teen I did enjoy skating. I definitely never owned a pair of purple paisley skates, but the great thing about cardmaking is that you're only limited by your imagination and your paper stash, and in my case, BOTH are considerable!


The purple paisley paper and both background layers are from Blue Fern Studio's "Eclectic Charm" collection, which I absolutely adored a year or two ago. The silver metallic cardstock on the skate blades and as a super-skinny mat between layers of pattern is Idea-ology; and the Evergreen Branches are Tim Holtz's Holiday Greens Thinlits in both regular and mini size. The sparkly Gold Enamel Stars are from Eyelet Outlet and the skate laces are DMC floss #3834.

Head over to Jingle Belles to see Stephanie's inspiring card, then start thinking about how you'd portray some "Winter Fun" in card form!

Thursday, April 28, 2022

NEW Wendy Vecchi Doodle Stamps!

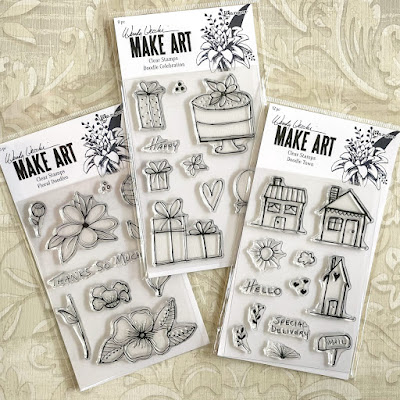
It's Ranger Release Week and there are soooo many fabulous new products from Tim Holtz, Dina Wakley, Dyan Reaveley and Simon Hurley, but maybe my very verrrrry favorite of the new things are these three stamp sets from Wendy Vecchi's MAKE ART line: Doodle Town, Doodle Celebration and Floral Doodles.*


By now I think everyone knows how much I love both flowers and cake, so when it was time to make my first card, of course I started with... Doodle Town!!! I mean c'mon... who could possibly resist those adorable houses?!


My first idea was to stamp and color them in a traditional way, but having seen both Wendy Vecchi and Dina Wakley use Dina's awesome Typed Ledgers in some amazing creations, of course I had to have some in my last Ranger order. And if anything, they're even cooler than I imagined; they come in BIG sheets with a fab variety of fonts, quotes and paper shades. I stamped all three of the Doodle Town houses on multiple ledger sheets in Jet Black Archival, fussycut (and cut... and cut, lol...) then layered about a dozen of them onto Ranger Adhesive Foam Tape before adding the sunshine, some clouds and one of the sentiments from the set.


I cannot tell a lie, even if it's a bit immodest... I *LOVE* how this came out! I'd love to talk more, but I still have two more stamp sets to bust out, stay tuned for more Doodle Goodness!!! ♥

*they come as a Doodle Bundle, too! :)

Wednesday, April 27, 2022

HOPPY Birthday

Nothing makes for a more RIBBET-ing birthday card than Eyelet Outlet Frog Brads. As if the frogs themselves weren't already cute enough, the sets also come with cattails, plus purple and yellow waterlilies. So you basically have all the ingredients for an entire scene... (and inspiration for an appropriately punny sentiment!) ...in just ONE little pack of brads! 


You could make a wonderful card with just an inky background and some Wide Sky Washi Tape, but in this case, I stamped the pond edge from Sunny Studio's Country Scenes set, colored it with Tombow Dual Brush pens to match the brads, and added a sweet little Mini Butterfly, which is on sale. I hope you'll agree this card is TOAD-ily awesome!

Tuesday, April 26, 2022

SOS: Extra Special

This fortnight at Shopping Our Stash the challenge is called, "What a Difference You've Made in My Life" and the brief is to make a card for someone extra-special. With Mother's Day just around the corner, that might immediately spring to mind for you, as it did for me, but you can choose ANYONE in your life, just let us know who it is in your post!


Something which has slightly changed my Mother's Day cardmaking duties in the few years, is that my mom has also become an avid cardmaker! Which is really cool but... it does kind of add a little extra pressure because now she KNOWS how things are made, lol! She's also a very keen and expert gardener, so I thought a floral theme would be cool. To encompass the "Stash" requirement for SOS, I've chosen a favorite Hero Arts Tulip die from a few years ago that I haven't used in a bit. I diecut a bunch of flowers and leaves from heavy-duty watercolor paper, then used a waterbrush and a few shades of pink and green Tombow Dual Brush Pens to add layers of (sort of) realistic color.


Other ingredients, old and new: Hero Arts' super-cool Victorian Greenhouse die, which I bought in February of 2020 and somehow NEVER used until now (?!); Penny Black's "Bloom" die; an ancient Tim Holtz Movers and Shapers butterfly die; a scrap of vintage doily; some leftover Prima papers from the Pretty Pale collection; and a brand new frame element from some amazing Stamperia paper which just arrived at Paper Anthology

I hope you'll head over to Shopping Our Stash to see the amazing design team cards and then be inspired to make something extra-special to link up with us this time!

Monday, April 25, 2022

It's a Candy Mandala Monday?

Ok, technically there is NO actual candy in this post, but I did use my beloved set of Bright Zig Dot Markers, which always remind me of those candy dots, which came stuck to a narrow sheet of cash-register-like paper, that we had as children in the 1970's. For the record, I don't think I particularly enjoyed eating those candies... (they were basically just sugar and food coloring and didn't have much in the way of flavor) ...but they were so fun and pretty I always enjoyed having them anyway! I hope your week is off to a sweeeeeeeeeeeeet start!


Friday, April 22, 2022

Winter Fun!

This fortnight at Jingle Belles, we're making cards that feature ways to have FUN during the winter time. You might enjoy skiing, ice skating or sledding … or you might be more about sitting inside watching the snowfall from your favorite chair while drinking hot cocoa and reading a book. Whatever says winter fun for you, include it on your card & tell us why you enjoy it. 

Something Lovely Husband Jeff and I especially enjoy in December is driving around to see the Christmas lights and decorations. I've tried to encapsulate that in card form, using Lawn Fawn's adorable Car Critters and Christmas Add-On stamps from Paper Anthology, set in a simple patterned paper landscape, including snow and mats from LF's Sprinkle and Shine as well as their Let it Shine lines. I punched loads of colorful trees from scraps and computer-generated the perfect sentiment.


What constitutes Winter Fun for you? Think about it, make a card, and come link up with us at Jingle BellesI'm entering also this card in the Lawn Fawnatics' current challenge to Create a Scene!

Wednesday, April 20, 2022

BIG Initials!

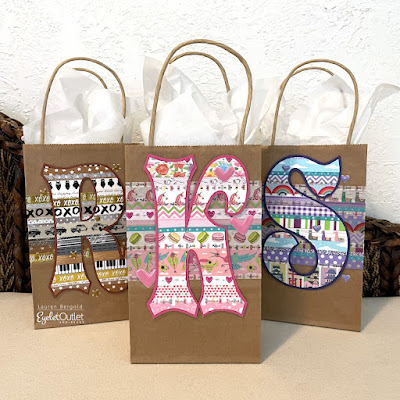
One of the easiest ways that I (Lauren) have found to quickly customize a plain store-bought gift bag is with giant initials, covered in Eyelet Outlet Washi Tape of which... fortunately... I happen to have quite a bit! I've also got some fun Enamel Hearts and Stars, which I've scattered around the bags for even more texture and interest.


It seems counter-intuitive to start with the tape rather than the initial, but in fact, that's sort of what I did. I did size and print my initials on plain white cardstock first, but... I didn't cut them out. Instead, I took my 4x6" outline letters (the font is called Storybook) and stapled them to 5x7" pieces of cardstock covered in neat strips of washi. Then, I cut them out!


Between my three initials, I've used about three dozen different tape styles, and I'll name and link a bunch of those in a minute, but really... this idea will work with ANY combination of tapes you like! You can organize them by color, as I have here; or by theme, or in rainbow order, or create patterns with the tape or... well, this is quite a flexible method and thus perfect for making the initials as unique as their recipients! I adhered my finished initials to some solid cardstock to create a skinny outline, then added some of the same tapes to each bag to complete the design.


And now here's a fairly thorough list of the tapes I used, from top to bottom, for each letter!

Letter K: Flower Washi, Pink Foiled Rose, Skinny Calendar Tape, Unicorn Washi, Zigzag, Pink CheckedMacaron, more Skinny Calendar (the set has three different styles), wide Funky Bird Tape, Heart Tape from the Valentine set, Tiny Hearts, the third of the Skinny Calendar Tapes and Pink + White Dots.

Letter R: Star Tape, Owl Washi, Script Tape, Skinny XO Foil Tape, XO Washi which is sadly out of print, Foiled Silver Dots, Antique Car Tape, Tire Tracks, Road Tape, Wood Washi, Music Keyboard Tape and a repeat of XO, Script and Stars.

Letter S: Cloud Washi, Skinny Tape, Purple Zigzag, Rainbow Tape, Purple Checked, Skinny Calendar Tape, Purple Gingham Check and Purple/Green Stripe Tape have, alas, gone; Llama Washi, More Clouds, Foiled Flower Tape and finally Purple Dots and Japanese Tape are also out of print, but... You can see the entire (huuuuuuuuuuuuuuuge!) selection of Eyelet Outlet Washi, just by clicking this link!
has quiiiiiite a bit of
EO Tape!!!

Monday, April 18, 2022

It's an Inky Birthday Bash

I'm so happy to be back on the Ranger Blog with a brand new, super-colorful project featuring Wendy Vecchi's MAKE ART Birthday Bash Stamp, Die and Stencil Set and Chippies embellishments. See how I made this vibrant inky background with Wendy's signature series Archival Inks in analogous shades of pink, yellow and orange; topped off with my all-time favorite cake... Red Velvet! On the Ranger Blog today... just click this link!


Step 1: Gather your supplies, including Wendy Vecchi MAKE ART Birthday Bash Stamp, Die and Stencil Set; Wendy Vecchi MAKE ART Bases and Frames Chippies; plus assorted Archival Inks in analogous shades of pink, yellow and orange; rubbing alcohol and white Yupo Cardstock; plus your favorite coloring media.


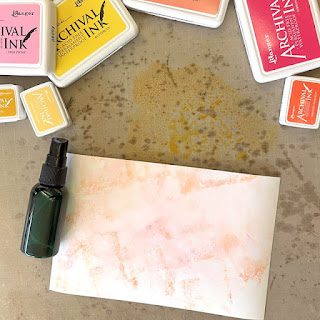
Step 2: Working on a Ranger Silicone Mat or other non-absorbent surface, "smoosh" one shade of Wendy Vecchi Archival Ink onto the mat by turning the ink pad upside down and randomly applying a bit of color directly to the work surface. Lightly mist the area with Isopropyl Alcohol (91% is ideal but 70% also works fine) then place your cardstock face down on the mat and "grab" some of the color. It's best to apply shades individually, to avoid staining your ink pads. To use multiple colors at a time, dispense a few drops from several Archival Reinkers, remembering that the pigment is much more concentrated, and you might want a bit more alcohol to dilute it.


Step 3: Wipe the mat, apply another color, mist with alcohol, and dip your paper into the diluted ink. Change directions with the paper a few times for better coverage. Repeat this step as many times as you'd like, or until the entire paper is covered. This card features shades of yellow (Buttercup and Chrome) and orange (Tea Rose and Bright Tangelo) at the edges, with a patch of pink (Pink Peony and Vibrant Fuchsia) towards the center. 


Step 4: Using the two solid stars in Wendy's Birthday Bash set, stamp them randomly, over and over, in Magenta Hue Archival, concentrating on the diagonal area of pink towards the center of the paper.


Step 5: Using the confetti stencil from the Birthday Bash set, apply Sunflower Archival, starting towards the center of the inky panel and working outwards. Move the stencil several times and change position as needed to achieve a pleasing arrangement of confetti.


Step 6: Stamp the Cake, Candle and "Make a Wish" sentiment in Potting Soil Archival. Color the cake and candle with markers and/or pencils in a style that represents your favorite type of cake (the sample is Red Velvet, with Cream Cheese Frosting) and diecut or fussy-cut. Stamp the two solid stars multiple times in Vibrant Fuchsia, and use the coordinating dies to cut them out. Mount the images and sentiment on foam adhesive and set aside.


Step 7: On a scrap of Wendy Vecchi Perfect Cardstock, apply Pink Peony Archival Ink through the striped portion of the coordinating stencil in the Birthday Bash set. Add darker stripes with a fine-tipped pink pen, if desired. Trim the strip to 5.5 x 1" and adhere to a skinny mat of Magenta cardstock.


Step 8: Using a Ranger Domed Ink Blending Foam, apply Sunflower Archival to the Heart from Wendy Vecchi's MAKE ART Chippies Bases and Frames set. Trace the heart on a piece of coordinating Sunflower cardstock and cut out. Adhere the cardstock heart to the Chippie, slightly offset, using  Perfect Card Adhesive.


Step 9: Assemble the card: Trim the inky panel to 5" square and ink the edges lightly with Magenta Hue. Add a few scattered dots and doodles with a white paint pen, if desired. Affix the stripey stenciled strip to the base with Perfect Card Adhesive, approximately 1.5" from the bottom of the panel. Add the Chippie Heart to the strip using double stick tape and add the cake, candle, sentiment and stars in a cluster. Affix the finished panel to a 5.5" square card and machine stitch around the edges, if desired. 


Step 10: Decorate an envelope to match, using the stamps in the Birthday Bash set and coordinating colors. This way you'll be ready to mail the finished card to your favorite Birthday Girl or Guy!

Sunglasses Not Included

It's a Rambunctiously Rainbow Mandala Monday thanks to big messy smooshes of watercolor goodness from some of my most vivid Tombow Dual Brush Pens. I hope your week is off to a bright and cheerful start! ♥

Saturday, April 16, 2022

Whole Lotl Love

Nothing says "Happy Spring" quite as well as a bunch of rainbow axolotls, am I right? Ok maybe not, but I've just made a bunch of rainbow axolotls and I'm totally smitten with them, lol, so let's just pretend that makes sense. Before you ask, YES, axolotls (I've linked to Wikipedia to save you Googling) are a real species of aquatic salamander; they really do have those crazy triple gills around their face, and they really can be found in interestingly bright colors, including PINK! Having said that, this sweet Baby Axolotl pattern from Minigurumi is very stylized and kawaii... in a good way!  

My friend Gina, who is an aquarium lover and has had pet axolotls in the past, found this teeeeeeeny version on Minigurumi's Instagram and I decided to surprise her with one. Mine's pretty small... about 1.25" tall... but not nearly as small as the ones on IG (amigurumi size is based on what combination of yarn and hook you use; I tend not to go much smaller than a C hook for reasons of sanity and eyesight) but he (or she?) is pretty flippin' cute! I had so much fun making the first one that I decided to experiment with other colors and yarn/hook combos and made a little family of them for another friend and her kiddos. These range from about 2.25" (pink) to 3.5" (yellow). The most challenging part is attaching their tiny little one-stitch feet, but luckily after completing the second one, I had a brainwave about putting them on BEFORE closing up the body, and that made a huge difference! 


I hope you've had a LOTL fun seeing my tiny wooly pals! :)

Friday, April 15, 2022

Yeti or Not...

...it's time for the second week of our Jingle Belles Earth Day challenge, for which we're re-cycling, re-using or upcycling items to use on our cards. This week I've dipped into my little hoard of saved wrapping paper to make a fun and colorful Yeti Gallery Wall! I don't think I've ever done TWO yeti cards in a row, but that's what happened, so I'm rollin' with it!


As it turns out, this is the easiest card I've made all year, because after I cut out the framed yetis* and arranged them on some Doodlebug heart paper, I added a mat and a sentiment strip, and called it good! I'm kind of thinking about cutting out the rest of the yetis and making a few more cards just like this one! I hope you'll visit Jingle Belles to see Stephanie's card before starting your own eco-friendly masterpiece!

*Since this was very thin giftwrap, I adhered it to a Xyroned sheet of cardstock before cutting anything out.

Wednesday, April 13, 2022

Easter Egg Hunt

Here's a card that's captured, in action, a couple of the Easter Bunny's helpers (aka Eyelet Outlet Rabbit Brads) hiding the Egg Brads for Sunday's upcoming festivities! They've got a lovely day for it too, thanks to some beautiful extra-wide Sky Tape, a Sun and Cloud Brad and a background made from Flower Washi.


For weeks that don't end in a holiday, you could swap the bunnies and eggs for Flower and Leaf Brads; or leave off the grass and make a beach scene with Sandcastle and Shell Brads!

Tuesday, April 12, 2022

SOS468: Sketch Challenge

Do you love sketch challenges as much as I do? I hope so, because we've got a fabulous one this fortnight at Shopping Our Stash and it looks a bit like this:

Ok, technically, it looks EXACTLY like that, lol! And I found it so inspiring, I made not one, but two sketch cards:

Back in the day, my favorite paper company was Basic Grey; and I have to confess that I still LOVE them! My well-hoarded collection of papers is dwindling, but I really enjoy using them, so I've raided my stash of Skate Shoppe and Lollipop Shoppe for this pair of fun and colorful cards.


These are made specially for a brother and sister whose birthdays happen to both be in April, to whom I generally mail small gifts, so I quite like it that the cards are unique but similar. I also like that I had some of the circle-patterned paper left in both colorways, since those circles echo the circles of the sketch so well.

Be sure to visit SOS to see all the design team cards and then start planning what older and much-beloved items you will re-discover to use on your own sketchy masterpiece!

Monday, April 11, 2022

Scribble Sticks!

It's a softly colorful Mandala Monday made with Dina Wakley MEdia Scribble Sticks in my Dina Blue Edition Journal


Like most mixed media adventures, this was composed in a few sessions, to allow drying time (and occasionally thinking time, lol) between steps. I drew and colored the basic shapes with wet Scribble Sticks (from Set Three, which has the cool metallic shades) on one of the bright white super-heavy watercolor paper pages in the journal (there are also blue denim and creamy colored burlap pages). After it was completely dry, I added assorted stencil patterns (including Tim Holtz's Bubble and Flourish Patterns) in coordinating Distress Oxide Inks and outlined with a .01 Letter It Fineliner. To finish up, I added a few additional details with colored pens and a tiny bit of handstitching around the central circle.

If you've never used Scribble Sticks, I highly recommend watching a Dina Wakley video or two to see how they work and get a few ideas. Actually, I highly recommend Dina's videos to everyone because she is just such a joy to watch when she's creating! In fact, here's a great demo that shows the Blue Journal's variety of page styles and ways to use them.

Friday, April 8, 2022

It's Almost Earth Day...

...which means it's time for one of our favorite events of the entire Jingle Belles year: the great Recycling Challenge! Yes, we want you to grab those holiday cards you've received and saved; the pretty catalog page you couldn't bear to throw away; the scraps of giftwrap you opened carefully so you could reuse and incorporate them into your next card! Or maybe you'll be even more intrepid and make your own chipboard embellishments from a cereal box, create a shaker card with a salad-container window, or... well, here's the beauty of this event... we never quite know WHAT will inspire our fellow Jingle Belles to recycle, upcycle or reuse various items, but we know the ideas will be clever, creative and beautiful! My friend Betty happened to encounter this adorable yeti on a tissue box and was kind enough to think of me and save the box! 


First order of business was obviously to cover up the logo, which I did by cutting two additional sections of curvy, snowy foreground from the side panels and layering them over top. Then, since there are few things sadder than a lonely yeti, I stamped and colored a Lawn Fawn friend for the big guy, as well as an appropriate sentiment. I added a skinny mat of glittery aqua cardstock and then a bigger one of an ancient Studio Calico geometric snowflake patterned paper that serendipitously matches incredibly well (gotta love it when that happens, right?!) and finally, what arctic landscape is complete without some Eyelet Outlet Snowflake Sequins? Being based around the dimensions of the tissue box, the finished card is wider than an A6, but not as tall as an A7, so it'll get mailed in an envelope which is slightly too big for it, but I'm cool with that.


Be sure to cruise over to Jingle Belles to see what Stephanie has made to inspire you, then start looking around your house for some (potential) trash which could become cardmaking treasure!

Wednesday, April 6, 2022

Everybunny's HOPPY!

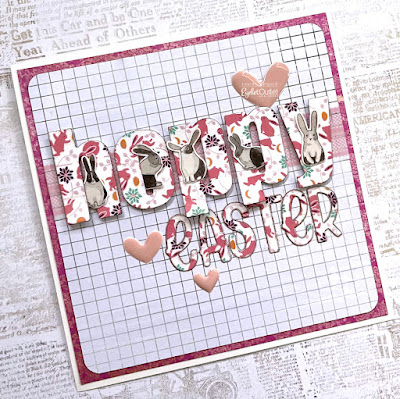
Oddly enough, this Eyelet Outlet Easter card has NO brads on it... HOW is that even possible? Well of course I (Lauren) love our Brown Rabbit Brads and our Pastel Rabbit Brads, but there are also quite a few awesome Bunny Tapes and Rabbit Washi styles, and I've used two of them here:

I applied both styles of tape in neat strips onto plain white cardstock. Then I used two alphabet die sets (Altenew's Bold Alphas and Lawn Fawn's Henry's ABCs) to cut out the sentiment from the colorful Bunny Tape. I fussy cut five sweet little dudes from Wide Rabbit Washi to peep out from the letters of "Hoppy" and added a few pink Heart Enamel accents. I layered the whole design over a couple of strips of Pink Check Tape and called it a day.


Be sure to visit the EO Blog often for more Easter card ideas by the amazing design team! ♥

Monday, April 4, 2022

ALL the Colors!

It's a flashy, splashy Mandala Monday with LOTS of spritzed and smooshed watercolor, from my Tombow Dual Brush Pens, plus a bit of White Dina Wakley Gloss Spray on top. IRL it has a magical shimmer which my phone photo utterly fails to capture; but trust me, it's kinda cool!

The lines are super simple, and frankly stretch the bounds of what is or is not a mandala, but I'm ok with that! And on the plus side, thanks to my Helix Circle Maker, it's as close to 100% symmetrical as I am likely to get in this lifetime. 

Sunday, April 3, 2022

TN Update

My friend and fellow SOS Alum, Mary Juska (aka Mimi, She's Crafty) is one of the most talented stamp carvers I've ever seen. I am constantly admiring her carves on her Instagram account, @MillwoodStudioArt and last week she sent me some of her winged designs stamped on library cards. I'd love to tell you I'm making them into gorgeous cards to send my friends, but mostly I plan to hoard them and use them for art journaling. To that end, I made this quick collagey-page: 


Here's a closeup, just because. I added torn vintage paper to the background, as well as a strip of White Lace Tape, which I dabbed with Spun Sugar Distress Ink (since the tape is made of very thin, slightly shiny plastic, the ink "sticks" to the paper behind, without tinting the tape). But really the stamps are the stars:


As long as my Traveler's Notebook was in photography mode, I snapped a pic of the March page in my 2022 Monthly Insert. I like being able to look back on all my papercrafting projects for the month.

It is quite a dull grey and rainy Sunday here in central NJ, so I think I will go and make something COLORFUL!!! ♥

Friday, April 1, 2022

Forever Plaid

We're still celebrating PLAID at Jingle Belles and you're still invited to join the fun! This week I broke out my ColorBurst pigment powders and brushes of various size to paint a fun, slightly wonky plaid* design of my very own in shades of pink, red and yellow. Then I traced a set of oversized metallic letters to make a HUGE custom sentiment and layered it over several layers of patterned paper including a super-cool My Mind's Eye plaid from a year or two ago. This might not be the busiest card I've ever made, but it's probably pretty close, lol!

Hand-painted plaid might be more effort than you'd do for a holiday card; but on the other hand, it is one of my favorite things to do with watercolors or markers! If you're intrigued by the idea, I hope you'll try it some time. This flip-style video on my Instagram account from a few years ago shows the basic steps, which are, briefly: 

1. Paint or draw parallel stripes of one color across your paper. 

2. Change direction and paint stripes of a different width, perpendicular to the first set. 

3. Alternate these steps until you have a plaid design you like. 

4. Add outlines, dots, faux stitches, real stitches or anything else that takes your fancy. Hand painted plaids make awesome backgrounds or wonderfully unique diecuts! 


Of course there are also LOTS of beautiful stamps, stencils, ribbons, washi tapes and patterned papers which are already plaid, and that'll give you a head start on making a card to link up with us at Jingle Belles. Be sure to hop over and see Stephanie's card for this week, as well.