

Sunday, September 29, 2019
So Nice They named It Twice!
New York, New York, that is! Home of The Ink Pad where you will find many treasures, including a whole line of exclusive stamps and stencils designed by Michelle Ward. The Downtown NYC Map Stencil is one of my favorites and I've used it on this card, the entirety of which you can see in my Stencil Sunday feature on the Ink Pad Blog today! ♥

Friday, September 27, 2019
have a happy, happy, happy, happy hanukkahhhhhh!
we're celebrating our friends who observe the non-christmas winter holidays this fortnight at ♥JINGLE BELLES♥! which means we want to see cards which celebrate hanukkah, solstice, hogmanay, kwanzaa, new year OR... you can make a completely non-denominational WINTER-themed card.
i went with hanukkah, as you can see. luckily i had an awesome new-to-me hero arts happy hanukkah stamp set that was absolutely perfect for the job; though i have made plenty of hanukkah cards through the years which just used blue and silver patterned paper, with candles made from strips of patterned paper or washi tape! my dreamy background layer is a leftover panel sprinkled with various blue shades of colorburst and spritzed; the multicolored layer further back is an alcohol ink essperiment that did not come out as i intended, but was too pretty to throw away, lol. btw, eyelet outlet tear drop bling makes outstanding menorah flames... just sayin'...
stephanie has an equally cool non-xmas card to inspire you, plus there miiiiiight just be a little hanukkah-related prize on offer this time. you should probably hop over to ♥JINGLE BELLES♥ and check... just in case!
ps: just in case you love adam sandler's hanukkah song just as much as i do, here is a direct link! ;)
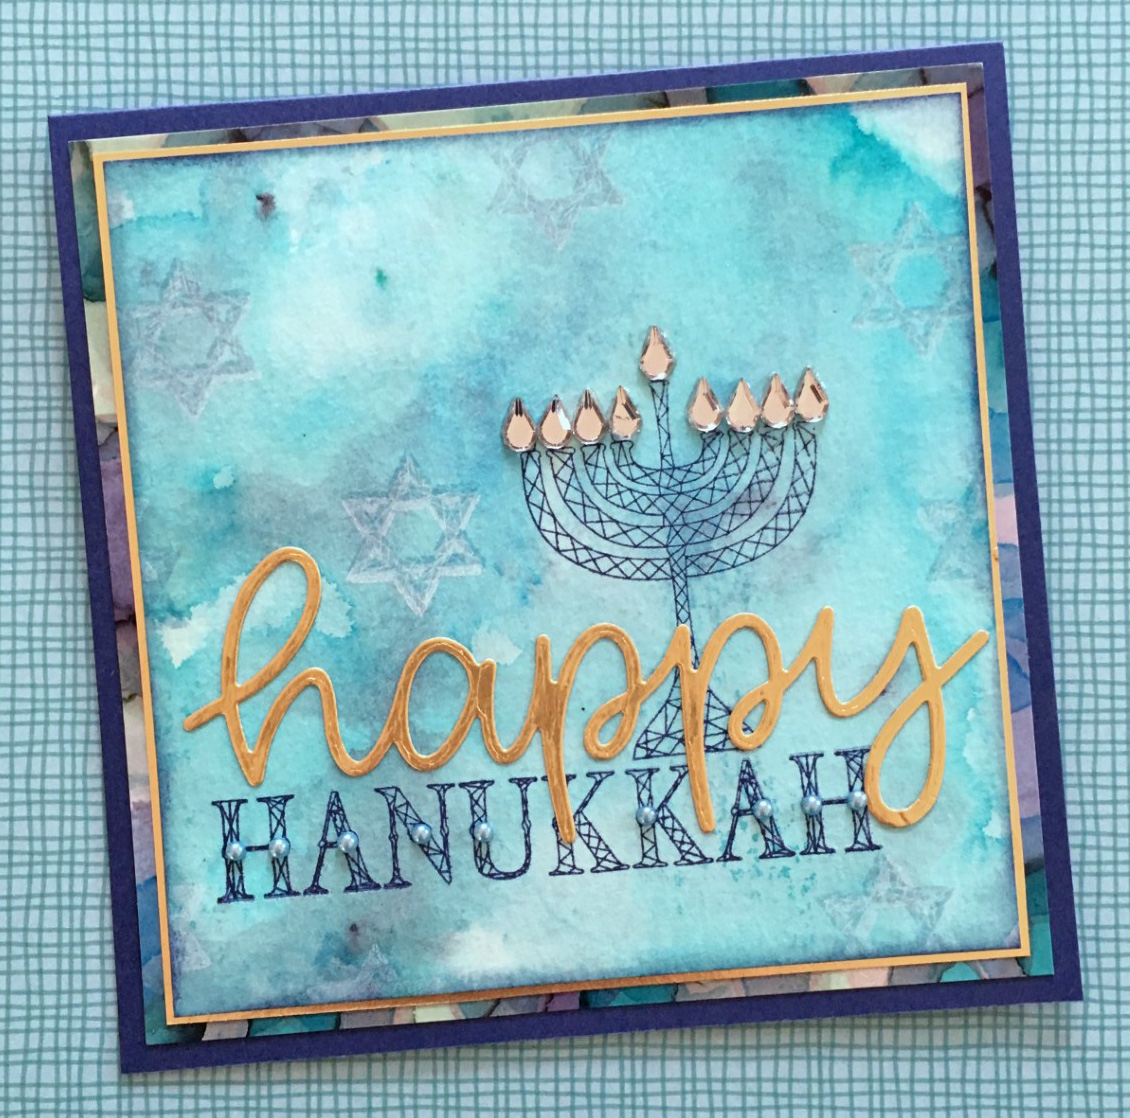 |
| hanukkah stamps: hero arts stamped in cobalt and blue sky archival ink; happy die: sunny studio; pale blue background paper made with ColorBurst pigment powders by ken oliver crafts on strathmore watercolor paper; lower layer multicolor paper made with ranger alcohol inks on glossy yupo paper; gold metallic cardstock: idea-ology; blue cardstock: bazzill; tear drop gems and tiny blue pearls: eyelet outlet; adhesives: elmers brand gluetape, sookwang scor-tape |
i went with hanukkah, as you can see. luckily i had an awesome new-to-me hero arts happy hanukkah stamp set that was absolutely perfect for the job; though i have made plenty of hanukkah cards through the years which just used blue and silver patterned paper, with candles made from strips of patterned paper or washi tape! my dreamy background layer is a leftover panel sprinkled with various blue shades of colorburst and spritzed; the multicolored layer further back is an alcohol ink essperiment that did not come out as i intended, but was too pretty to throw away, lol. btw, eyelet outlet tear drop bling makes outstanding menorah flames... just sayin'...
stephanie has an equally cool non-xmas card to inspire you, plus there miiiiiight just be a little hanukkah-related prize on offer this time. you should probably hop over to ♥JINGLE BELLES♥ and check... just in case!
ps: just in case you love adam sandler's hanukkah song just as much as i do, here is a direct link! ;)
Wednesday, September 25, 2019
It's Fall, Y'all!
I'm not sure how it's possible, but my calendar indicates that we're into the LAST week of September somehow? This seems like a good time for some fall cards, especially since the new Scarecrow Brads have just made their debut in the Eyelet Outlet Store!

Here's a shocking true confession: I don't actually like scarecrows!!! But these Scarecrow Brads are so adorable, they've even won me over! Something else I realized as I sat down to make my first card... I had never used the Tractor Brads that came out in the spring release. So this seemed like a good time to remedy that. I like the way the Pumpkin Brad looks super huge when it's placed on the trailer. Just goes to show you what a good job those scarecrows did over the summer! I found some plaid patterned paper with exactly the right colors and diecut the word "FALL" from cardstock I had covered with this awesome Sparkle Copper Tape.

My second card features handcut letters from scraps of that plaid paper. But of course you could use stickers, diecuts or computer-generated text. The oversized text gave me so much extra room I was able to include all the brads from the first card PLUS a trio of Sunflower Brads! Oh and you'll notice that there are two color variations in the Tractor Brads!

My third card shows off the Sunflower Brads again, as well as another pumpkin, two varieties of Paper Flowers and some fun Hardwood Floor Tape; not to mention letters diecut from Script Washi.

Tuesday, September 24, 2019
(sorry about the earworm)
this fortnight at shopping our stash we proudly present "The Embossible Dream" for which we'd like to see... (do i even have to spell it out?) ...projects which feature heat embossing, pressure embossing or embossing paste. i unearthed a bunch of sadly neglected embossing folders for this one and got to work:
i had a couple of really colorful and *pretty* card ideas involving embossing folders, wax resist and colorburst! but when it came down to it, the thing i needed to make on this particular night was a gift bag for nephew matthew's 12th birthday, so i downshifted into masculine mode instead. i adhered very thin, very sticky silver metallic tape from the hardware store (it's like duct tape, but made specially for high temps) to two layers of scrap cardstock, cut it into my letter shapes, then embossed, using a different folder for each letter. this was quite easy to do, but nearly impossible to photograph well, so please forgive the only ok pics, lol.


 |
| plain brown gift bag from the big box store; silver metallic hvac tape from the home supply store; embossing folders: cuttle bug, darice, taylored expressions, sizzix; patterned paper: graphic45; wide washi: eyelet outlet; ink on edges of metallic letters: a copic marker; plain white cardstock: staples; adhesives: elmers brand tape runner, 3m foam tape, sookwang scor-tape |
i had a couple of really colorful and *pretty* card ideas involving embossing folders, wax resist and colorburst! but when it came down to it, the thing i needed to make on this particular night was a gift bag for nephew matthew's 12th birthday, so i downshifted into masculine mode instead. i adhered very thin, very sticky silver metallic tape from the hardware store (it's like duct tape, but made specially for high temps) to two layers of scrap cardstock, cut it into my letter shapes, then embossed, using a different folder for each letter. this was quite easy to do, but nearly impossible to photograph well, so please forgive the only ok pics, lol.

i actually had all of my letters cut out and stuck on the strip of torn patterned paper i affixed to my plain kraft bag, when i realized that their metallic/reflective surface made them blend in a bit too well to my understated background. so i went back and UNSTUCK each letter, affixed it to another layer of plain white cardstock and cut around, so they were matted and showed up better. this took longer than all the other steps combined, but was worth it in the end.

there are lots more "embossible dreams" awaiting you courtesy of the design team darlings at SOS. i hope you'll head over there and enjoy the inspiration!♥
Sunday, September 22, 2019
It's... Stencil Sunday!
Over on The Ink Pad Blog, that is. Where I've used Michelle Ward's Hash Pattern Stencil, an Xacto knife and an extremely old map of New York to make... actually, I'm not going to tell you, so you'll have to hop over, lol! But here's a bit of a hint...


Saturday, September 21, 2019
hold the peanut butter
because it's ALL GELLI around here, during the third week of 30 days of gel printing with birgit koopsen via instagram!


day 14: texture
birgit showed a really cool technique to make your own texture blocks using a variety of foam and cardboard shapes. coincidentally my aunt had just given me half a box of self adhesive foam letters in truly ugly neon colors, which i came very close to tossing away. as it turned out, they made the perfect tool for this!

day 15: fall
i used the "color within color" technique where you're essentially lifting off some paint thru the stencil, then replacing it with a different color, so it looks sort of like stained glass. this one is a testament to how different a print looks when you add just a teeny bit of pen doodles on top.


day 16: yarn
(mandala monday)
yarn (like lace) is a surprisingly good mask! above are my yarn-centric prints, and below is the mandala i made by using circle and heart punches on the dry prints and building the shapes into a mandala.


day 17: texture plates
the name refers to some very cool specialty tools, which are a bit like rubber stamps, but unmounted and made specifically for gel printing. alas, i don't have any, lol. so i tried some embossed foam sheets (which kinda worked) a flat plate for building lego's on (worked really well) and my little hand made foam letter tool thingie (worked pretty well). i was also testing some chalk-like acrylic paints which are sort of cool, though they dry quite a bit faster than ordinary ones.
(due to time constraints and a surprise party we threw for my mom this week, i skipped over day 18: vegetables and day 19: complementary colors; hope to double back and get to those next week; but honestly i'm slightly shocked to have kept up as well as this anyway!)

day 20: felt tip pens
another technique i would never have tried if i wasn't participating in this challenge and checking out birgit's post most days! basically, you just color on the plate with kid markers... in this case i had laid down a background of pigment ink and colored thru a stencil. this is easy and fun, but don't attempt anything super formal because you definitely see the pen marks on the plate.
Friday, September 20, 2019
give peace a chance
over at ♥JINGLE BELLES♥ we're still making cards that feature the peace sign OR the word peace OR with a peaceful scene. i've got two out of three. see?
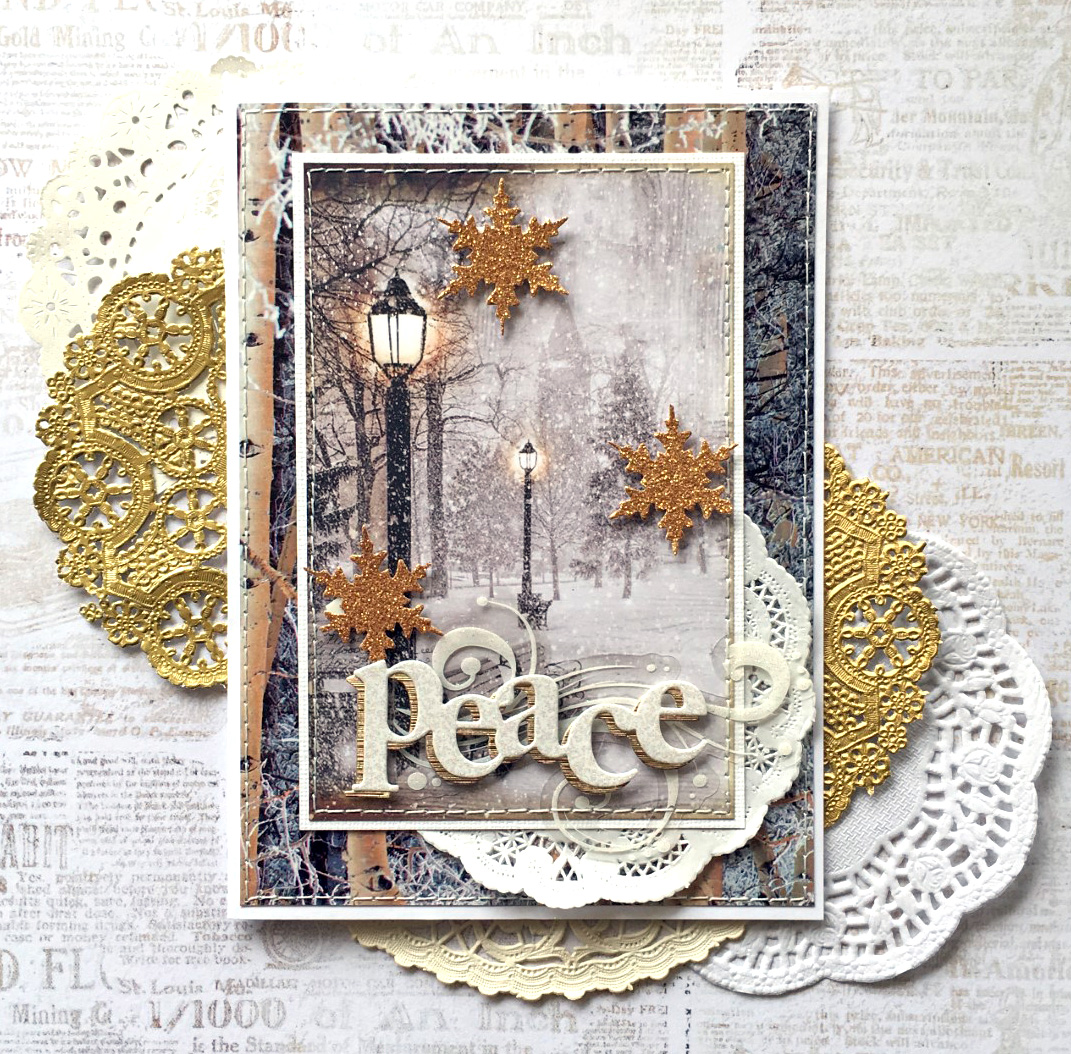 |
| patterned paper: ciao bella, plus the birch trees photo which is from a catalog last december!; peace die: spellbinders; snowflake punch: paper source; glitter paper: best creation; white cardstock: staples; adhesives: elmers brand gluetape, xyron, 3m foam tape, sewing machine |
the peaceful scene i've used as a focal point is a beautiful journal card from the "snow and the city" collection by an italian paper company called ciao bella, which i got at my lss paper anthology last december. the background panel- with the birch trees- is, believe it or not, the cover from a holiday catalog! all i needed to add to make those two lovely pieces of paper into a card was a couple of skinny white mats, a diecut sentiment, part of a doily and three glittery copper snowflakes. et voila, la paix!
hop on over to ♥JINGLE BELLES♥ and see stephanie's beautiful card and link up your very own!
Wednesday, September 18, 2019
It's a CARD-inal!!! :)
The new Fall 2019 brads, bling and tapes are making their way into the Eyelet Outlet Store, and one of my favorite new brads are the Profile Cardinals which are beautiful on their own but even nicer with the original Cardinal Brads. See?

I am a really big fan of the EO Paper Flowers, and the green ones have a special place in my heart because the petals make such beautiful leaves when you cut them apart! I used one small and one medium flower to augment my diecut branches.

I had so much fun making the first card that I decided to do a landscape version featuring the Bluebird and Robin Brads, just so they wouldn't feel left out!

I hope you'll have a chance to get outside today and see some birds in real life, but if not, the EO Store is here for you! ♥
Sunday, September 15, 2019
Stencil Sunday: On the Town
This fancy vintage lady and I hope you'll join us on The Ink Pad Blog where we're wishing The Ink Pad a very Happy 21st STAMP-iversary this Stencil Sunday! ♥

Saturday, September 14, 2019
gelli, gelli, gelli!
it's time for this week's round up of gelli printing goodness and ...in a few cases... frustration, actually. it was sort of a mixed week, lol!


day 7: trace
did you know you could use alcohol ink markers on the gel plate? nor did i! they work really well tho. posca paint pens work pretty well too, though they are more likely to stick to the plate. for this prompt we placed a magazine or coloring book image UNDER the gelli plate and traced around it with a copic or posca, then pulled the print with paint. i'll definitely come back to this one!

day 8: pastels or chalk
i'm lonnnnnnging to try this technique with pan pastels, but alas, all i had were some ancient chalks and the method still worked pretty well. i confess i did add some pen details at the end just because my colors were so very soft...

day 9: stencils
a bit of a cheat here, but it was mandala monday, so instead of making new prints i took some older ones (which were made with stencils) and assembled a mandala from punched circles and hearts.

day 10: pigment inks
if i was only going to choose ONE favorite technique for the week, i think this would be it! so much so that i'm going to just tell you to watch the birgit koopsen video because it shows you exactly how to do it -- you don't even need PAINT!
(ps: i didn't have texture plates like the ones birgit used in the vid, so i made my own by using embossing folders on scraps of sturdy cardstock!)

day 11: multiple layers
after several triumphant days of trying a new thing and having it turn out brilliantly, when i got to this one it just. did. not. want. to. work. the brief was to add design elements to the plate in several layers and then lift the whole thing in one swoop at the end. this just didn't happen for me. i made some absolutely beautiful plates that either didn't release at all or got too covered up with paint or... well, something. i was bizarrely comforted to hear (via instagram comments) that apparently a lot of folk struggled with this one. and i think i miiiiiight have an inkling of how to change my results now...

day 12: repeat patterns
ok, so, back to the pigment inks for instant gratification lol! i applied ink to my small diamond plate, "lifted" some ink with a beautiful ken oliver flower mandala, then stamped the diamonds repeatedly to make a harlequin pattern.

day 13: mixed media
another one where i loved my compositions but failed repeatedly to actually lift them successfully off the plate. i think the problem might be that i'm using too heavy body of paint. i'm going to try this (and the multi layer prompt!) again with thinner, less pigmented craft paint and see how it goes!
Friday, September 13, 2019
peace on earth
it's time for a brand new theme at ♥JINGLE BELLES♥ and this time we're giving PEACE a chance. by which we mean: we'd love to see holiday cards which feature the word peace OR the peace sign OR maybe even just a peaceful scene? lots of ways to go with this!
one of the prompts in "30 days of gel printing" this week was pigment inks. since i had never used pigment inks with my gel plate, i went looking for a video and found this absolute treasure from birgit koopsen. and i'm completely hooked. so when i realized i had the PERFECT stamp set from avery elle, and all i really needed was an interesting but flat background, i went to town! all i needed to add was a little little color and shading to make my letters stand out a bit more, plus a beautiful stacked snowflake held on with an eyelet outlet snowflake brad.
stephanie has also made a beautiful and peace-full card to inspire you. why not hop over to ♥JINGLE BELLES♥ and see that right now!
 |
| background made using my favorite things inks and gelli arts gel plate (plus embossed scrap cardstock to "lift" some of the ink from the plate)... watch birgit koopsen's video for the full technique; sentiment stamps: avery elle... colored in and shadowed with tombow dual brush pens in aqua blue and grey, respectively, plus a few white dots with a fine tipped posca pen; tattered snowflake die: tim holtz/sizzix; snowflake brad: eyelet outlet; dark blue cardstock: bazzill; white cardstock: staples; adhesives: elmers brand gluetape |
one of the prompts in "30 days of gel printing" this week was pigment inks. since i had never used pigment inks with my gel plate, i went looking for a video and found this absolute treasure from birgit koopsen. and i'm completely hooked. so when i realized i had the PERFECT stamp set from avery elle, and all i really needed was an interesting but flat background, i went to town! all i needed to add was a little little color and shading to make my letters stand out a bit more, plus a beautiful stacked snowflake held on with an eyelet outlet snowflake brad.
stephanie has also made a beautiful and peace-full card to inspire you. why not hop over to ♥JINGLE BELLES♥ and see that right now!
Wednesday, September 11, 2019
School Days, School Days
It's that time of year, when the kiddos --and the teachers!-- in our lives are headed back to school. So I rounded up some of my favorite Eyelet Outlet goodies, including our fab new School Bus Brads, and made a couple of cards to cheer them on!

My first card was a happy accident. I had these fun Bella Boulevard chalk-board style papers, and I went looking in my washi stash for a school-themed tape to pair with them. It turns out I had quiiiiiite a few choices, lol. It was hard to decide, so I used ALL OF THEM! Heart Tape, Book Tape, Road Tape, Math Tape, Skinny Stripes, Tape Measure Tape, Smiley Faces, Skinny Hearts, Crayon Tape and Skinny Plaid to be precise. Then I scattered matching brads around the card, including Emotion Brads, Star Brads, Bus Brads, and Book Brads.


And since that concludes my post for today, class is dismissed! ♥


My second card has a bit less going on, lol. I've got an Apple Brad, an Eye Glass Brad, a Bus Brad driving along on Road Tape of course, and the bunting which comes in the same set of Skinny Tape as the rainbow stripes on the last card.

And since that concludes my post for today, class is dismissed! ♥
Tuesday, September 10, 2019
it's the dog days of summer...
...this fortnight at shopping our stash, so we'd like to see projects with (waiiiiiit forrrrrrrr iiiiiiit) A DOG on them! easy, peasy right? unless it turns out you don't have even ONE dog stamp, sticker, journal card or diecut, lol. luckily i found this lovely illustration in an old, falling apart, children's book which lives in my collage stash!

 |
| image from a falling-to-bits 950's children's book; patterned paper: creative imaginations-- maybe-- but it's SUPER old and you'd never find it anyway, so let's just go with that; flowers, butterfly and awesome edge-distressing tool: prima marketing; leaves (actually a green paper flower petals that i cut apart): eyelet outlet; nested label dies: spellbinders nestabilities; ink on edges: antique linen distress |
as i usually do when working with fragile vintage paper, before i diecut the illustration, i backed it with a piece of plain white cardstock which i had run through my xyron adhesive machine. notice that i xyroned the CARDSTOCK and not the vintage paper, this is crucial. if you try to xyron or even use a taperunner on fragile paper, there is a much greater chance you will lift off a layer of the paper, instead of applying a layer of adhesive. (...ask me how i know...) when working with vintage, your best choice is to apply the adhesive to the OTHER paper, then gently set the vintage piece down on it. your second best choice is to use a good quality gluestick (the xl scotch create is my fave). you will want to work with a magazine or scrap paper under your image, so that you can run the stick right out over the edges and get really good, generous coverage. you can also just tack the image lightly in the center and machine stitch all the way around the edges. it's nice to have options, lol.

once i had a nice stable, sturdy focal image, i diecut and mounted it on foam tape over a scrap of patterned paper so ancient i do not know who made it. then i embellished with lots and lots of small prima flowers. et voila!
there's loads more canine creativity going on at SOS. why not head over and fetch some for yourself?
Sunday, September 8, 2019
What's Pink and Orange...
...and Fuchsia and Tea Rose and Saffron Yellow and so nice they named it twice? The "New York Sunset Skyline" card I made using Michelle Ward's NYC Skyline Stencil and Masks! It's my first "Stencil Sunday" post on The Ink Pad Blog and I'd love for you to hop over, see the whole card and hear a little bit about how I made it! ♥


Saturday, September 7, 2019
because i have SO MUCH free time, lol...
...thus i've decided to take part in birgit koopsen's "30 days of gel printing" challenge! ok, seriously: i don't really have time for this at the moment and doubt i will complete every single day. but... BK has such amazing ideas and as soon as you see them you kind of HAVE TO try them. and i've already learned a couple of slam dunk new techniques, such as this awesome "packing tape lift" from last night:


this may well be the only week in september that i do ALL the prompts, but even if i stopped right now, i'd feel like i learned more than enough to make it well worth my time! ♥

day 6: tape
even if you're not into gel printing, i highly recommend watching this 5 minute birgit koopsen video of the process because it's completely hypnotic! and i'm not just saying that because i'm too lazy to describe the technique in detail, although that is also true! :) to sum it up briefly: you compose sparingly on the plate, using paint, stamps, stencils, etc... let everything DRY... and then use a strip of clear packing tape to lift the design off the plate. absolutely brilliant and quite easy to do! i predict you will be seeing this again. a lot.
(i highly recommend birgit's videos generally, for that matter. there's no voice over, no extraneous detail, you just watch her demonstrate and any crucial facts you need to know show up as text on the screen.)

day 1: colors of your flag
i couldn't quite resist making stripes with my small brayer and using nested star dies to make my own cardstock masks.

day 2: mask
possibly my all time favorite stencil is michelle ward's nyc skyline stencil and masks set which is exclusive to the ink pad. you can tell how much i love it by how grubby all the parts of it are, because that is not a second print off to the left, that is the stencil and masks!!!

day 3: lace
i used real lace, you can see it at the bottom there! for best results i used a fair amount of paint on the plate, laid the lace down, and carefully pressed the paper into all the nooks and crannies to get the detail. i found thin deli paper to be best for this, since i could actually see that the was paint transfering before i lifted the paper.

day 4: water soluble crayons
this is something i need a lot more practice with. you have to dip the crayons in water to get them to make distinct marks. and it's quite easy to be too wet or too dry. i'm happy with my finished print, tho i confess that after the main design was dry, i outlined the various shapes and marks with a dry scribble stick to show the detail better. i think in future i'd use a contrasting color, as well!

day 5: no brayer
i used a plastic palette knife to spread and blend a few shades of paint, then lifted that gorgeous design via michelle ward's hex pattern stencil.
Friday, September 6, 2019
count on us!
at ♥JINGLE BELLES♥ we're still making cards that feature numerals OR one of the elements from the holiday favorite, "the twelve days of christmas"! here's a reminder of those twelve interesting gift items:

Twelve drummers drumming
Eleven pipers piping
Ten lords a leaping
Nine ladies dancing
Eight maids a milking
Seven swans a swimming
Six geese a laying
Five gold rings
Four calling birds
Three French hens
Two turtle doves
And a partridge in a pear tree
Ten lords a leaping
Nine ladies dancing
Eight maids a milking
Seven swans a swimming
Six geese a laying
Five gold rings
Four calling birds
Three French hens
Two turtle doves
And a partridge in a pear tree
i elected to go with numerals again, in the form of a fun date sticker and a super cute holiday bingo card:

i used lots of ancient bits and bobs on this colorful card: the jenni bowlin holiday bingo card is actually a digital/printable version; i have owned the kit for yeaaaaaars and still use it constantly. in addition, i've got patterned paper, stickers, a couple of borders, twine, round brads... it's all here, in nice flat, mailable form. gotta love that, right? i predict you're also going to love stephanie's card and i highly recommend a hop over to ♥JINGLE BELLES♥ to see that right now, darlings!
Wednesday, September 4, 2019
It's a Jungle Out There...
...but over on the Eyelet Outlet Blog I am WILD about zoo-themed journal cards paired with our Lion, Tiger and Zebra Brads, not to mention their adorable friends, the Elephant, Giraffe and Monkey Brads. Oh and there are some awesome coordinating tapes, too. See?

I've mentioned before how much I love journaling cards, they are really hard to beat for quick, beautiful designs. This particular set, from Photoplay's "We Bought a Zoo" collection is especially fun and perfect with both the original Jungle Mix Brads as well as the second Jungle-themed set. For my first card I cropped the journal card down a bit to remove a (very cute) monkey image so that I could add a Monkey Brad instead. I made a fun coordinating background by neatly lining up strips of Safari Tape on plain white cardstock to make my own custom patterned paper.

On the "Wild One" card, some handsome Elephant and Giraffe Brads are greeting a very regal Lion Brad. I made a mat from glorious Sparkle Copper Foil Tape and another bespoke patterned paper background using a beautiful Sunset Safari Tape that's so new it isn't quiiiiite in the store yet!

The "Wild Side" journal card was 4 x6" so I needed to trim it down a bit. I added a strip of Safari Tape across the bottom and added a mat made from beautiful Leopard-ish Animal Print Tape, then added a Monkey Brad, as well as a Zebra and a Lion.

Never forget: if you don't have time to MONKEY around, EO Jungle Brads and coordinating tapes make cardmaking a ROARING success... and I ain't LION! :) :) :)
Subscribe to:
Posts (Atom)