Thursday, November 30, 2017

little books in all shapes and sizes

i've just listed a bunch of handmade, spiral-bound blank books in my etsy shop, just enough stuff. they are all different sizes and shapes and have different types of paper inside. something for everybody... or at least, something for everybody who likes funky little books that incorporate vintage game boards, old boxes and illustrations, lol!


is 5 x 3.5", top bound, and has lined notebook paper inside

is about 4.75 x 7.5", has 15 sheets of strathmore cold press watercolor paper, and the covers are made from the box of a 1964 edition of the game "kismet".  

is so-called because there's a little bit of everything from cardstock, graph paper, tracing paper, kraft paper, vintage text and illustrations. it measures 6.25 x 4.5" and has covers from the super-cute box of a 1970's game called "rose petal place".
 
is just about 5" square, and has blank cardstock pages and covers made from game cards from a 1980's game called, "what's for dinner".

...miiiiiiight be my favorite, but don't tell the others, k? it's 3.25 x 3.5" and has super-fun collaged covers over blank cardstock pages. the gallant and adorable 1959 trabant sedan is the perfect companion for all of your adventures!

there are also paper packs, travel books, junk journal assortments and a few december journal kits left, so check out just enough stuff!

Wednesday, November 29, 2017

Merry and Bright (...times two...)

December first is fassssssssst approaching, which means it's time to get *SERIOUS* about making our holiday cards. Stephanie and I work on ours all year round, via Jingle Belles, but I nearly always find I need a few more right at the end, which is why I'm so glad to have a stash of Christmassy Eyelet Outlet goodies, like these awesome Holiday Light Brads I'm showing off in a couple of ways on the EO Blog today.


There are probably a gazzillion great ways to use these, but I'll confine myself to just two... for now. My first thought was a strand of Xmas lights, in a tumble, with a swirly cord. Since I had to do the machine stitching before I set the brads, I not only dry fit where I thought I'd want each bulb to go, I also drew, very lightly in pencil, the path I thought the swirl should take. 


After I was done the decorative sewing, I set the brads, attached my sticker sentiment with foam tape, and went back to attach the panel to my 6x6" card. I used white thread this time, instead of black, so the strand of lights would get more attention than the perimeter of the card. 


My second idea was to attach the Holiday Lights where they most naturally belonged: on evergreen branches! My first set were diecut from some realistic-looking pine-green cardstock. Which, oddly enough, turned out to be exactly the wrong color choice, since the bulbs didn't stand out nearly as much as I expected. So I went back and this time chose a pale green shade with a very faint abstract pattern, which looks NOTHING like an actual Christmas tree, but showed off the brads to much better advantage. 


Attaching the foliage to my A2 card, I applied adhesive only to the stems of the diecuts, leaving the pine needles a bit loose, so I could curl them up for more dimension. Because, of course, I knew that when I set the brads on top of the foliage, they would act as a second attachment for the diecuts. 


Now that the thoughts of brightly lit branches are in my head, I'm excited to go to the Christmas tree farm next Sunday! But first, maybe I'll make a few more cards... ♥

Tuesday, November 28, 2017

snow far, snow good

we are having "snow much fun" this week at shopping our stash; by which i mean we'd like to see cards with ♥SNOW♥ on them. since "on a card" is by far the best place for snow, imo, (being infinitely preferable to, "on the roads" or "in the forecast" for example) let's get to it, shall we?


i'm quite proud of my stash usage this week because pretty much every single item involved in both of these cards is older than my nephew matthew. who turned *10* in september! the snowman and snowflakes are the oldest, they are aaaaaaaaaaancient doodlebug stickers that i really like, but never quite knew how to use. i'm not sure i've done them proud, but i have used them up; and i've got two perfectly serviceable cards out of the venture, so i'm calling it good.


i've also used up some scraps of elderly KI memories paper and a DCWV sticker that turned out to be absolutely perfect to fill in the much too big gap of white glitter paper snow on the second card. things that are not old in this post are the aforesaid best creation white glitter paper of which i use 5 or 6 sheets every single year, mostly for snowy foregrounds... (why does no one else make a good, diecut-able, white glitter paper??!) ...and the set of trees-on-hills dies by penny black* that give instant perspective to any landscape.


why not toboggan, sled, or sleighride your way right on over to shopping our stash and see the amazing snow-centric creations by those wizards of blizzards, my SOS design team darlings?! ♥♥♥

*here's a hint about similar looking dies that come in a set: NUMBER them on the back if you don't want a depressing pile of "dang i cut the wrong one again" diecuts to accumulate in your workspace. ;)

Saturday, November 25, 2017

a biggish collection of tiny collages

if you hang out with me on instagram, you'll know that my latest freestyle art obsession has been making tiny (2x3") chipboard-mounted collages, usually in sets of two or four. i'm having fun playing in a completely new way with vintage paper, rubber stamps and tape; also it's a great way to use up some of the smaller illustrations that would get lost on a big project.


the first set i made was way back in may, and featured these tiny sewing pattern ladies. any new project that starts with sewing pattern ladies can hardly help but be awesome, am i right?


some of my collages start by choosing an illustration, cutting it out, and building around it. others make use of bits that were intended for something else but not used. this is an example of the latter, and arguably the flowers are too big... but i like how they grow right out of the frame.


these tiny fish nearly got tossed out, because they're not even half an inch tall. i can see that i'm going to become an even worse hoarder now, since even TINY things work really well for this.


all of these flowers were in one cluster in the little flower book where i found them. i'm not sure why i thought they should go on a background made from a map of metropolitan baltimore, but i stand by that decision...
 

at some point i realized that even quite a big flower could work on this size of canvas, or rather canvases


my obsession with the "illustrated motorcars of the world" book from this summer amped waaaaaaaaaaaay back up when i discovered the cars are EXACTLY the right size for tiny collages.


playing with scale again... and with dividing the flowers in interesting places. pretty sure you'll be seeing this technique again. (and again... and again...)

♥♥♥
hope that all my american friends had an awesome thanksgiving and that my international friends are having the very best weekend of november 2017! 

Friday, November 24, 2017

baby its *GOLD* outside!

we're actually embracing ALL the metals at ♥JINGLE BELLES♥ this fortnight, but whereas copper and silver are equally lovely on holiday cards, they don't work at all as puns, lol! and as it happens, i've gone for the gold this week; or rather the golds, plural, since there are five different metallics on my card! a fact i was verrrrrrry excited about, until i tried to get a decent photograph, and then let's just say NOT. SO. MUCH. so please excuse the funky angle of my pic, but honestly, life's too short you guys!!!

patterned papers: dcwv, autumn leaves, october afternoon + 2 gold embossed giftwraps that i xyroned onto cheap white cardstock to make them sturdy enough to diecut; glitter paper: american crafts POW (gold) and doodlebug (creamy white); tattered poinsettia die: tim holtz/sizzix; doily die: cheery lynn creations; glitter tape and pearl brads: eyelet outlet; adhesives: xyron, elmers brand gluetape, 3m foam tape, sewing machine

so let's count those glittery bits, shall we: the mat of my card (which is repeated as the top layer of the big poinsettia) is a grey and gold glossy paper from a wedding stack that i have honestly used for more xmas cards than anything else; in fact the two white-on-white flourishy papers are from the same source. (if you want tone-on-tone elegance in silver, white and gold... look for wedding stacks!) there's some eyelet outlet glitter gold tape dividing the two panels and some gold-mounted pearl brads to hold the flowers together. there are two different glitter papers... gorgeous gold and a creamy white that i've never quite known what to do with because it's really too yellow for snow, unless you want to make hilarious reindeer cards. (turns out it's awesome for poinsettia layers tho!) there are two gold giftwraps (because YES, i'll save the paper off my gifts if it's beautiful and/or sparkly!) that i backed with thin white cardstock to make them strong enough for diecutting. and i think that's it, altho the diecut doily is a sort of odd golden yellow that tones in rather nicely with all of the above, i thought.

i was completely inspired by the fab current sketch saturday layout (#490):


stephanie has her own gorgeous take on holiday heavy metal... why not hop over to ♥JINGLE BELLES♥ and check that out right this second?!

Wednesday, November 22, 2017

So Thankful

As we in the United States prepare for the Thanksgiving holiday tomorrow, I'm feeling especially grateful for family, friends, health, creativity, and for the Eyelet Outlet team, who are truly some of the nicest and most talented folks you could ever hope to meet!


It was impossible to resist making just one more Thanksgiving card with my favorite autumnal supplies, so I didn't even try not to, lol. This time I applied that awesome watercolor-y Wide Pumpkin Washi to plain white cardstock, added a band of Skinny Orange Tape to the top and bottom, then diecut my letters. I used an orange brush marker to ink the edges just slightly, and popped the letters up on thin strips of foam tape to get a little more dimension.


For my focal accent I stacked a Pumpkin Brad on top of a diecut pumpkin and attached a tiny yellow Mini Stitched Flower Brad and a Mini Leaf. By letting some of the brads overlap each other, it makes for a more cohesive cluster, which perfectly fills the center of a large white Paper Flower. One of my favorite "flower tricks" is to snip apart a few medium-sized green paper flower petals to use as leaves, and I love how they finish off the design.


To trim out the orange gingham patterned paper, I added Clear Bling Strips on top, and a skinny (skinny!) border of Glitter Gold Tape, set off by my favorite retro finishing touch: a border made with scallop patterned deco scissors!

Wishing the happiest of Thanksgiving Days to all of my American friends and a particularly awesome Thursday to the rest of the world! ♥♥♥

Tuesday, November 21, 2017

oh no it's the dreaded TIMED CHALLENGE, lol

this week at shopping our stash the challenge is to create a thank you card. but the twist (because you KNEW there HAD TO be a twist, right?!) is that you have to make it in 30 minutes!!! (and YES, you should set the timer!) i am not a fast crafter, you guys. but i did make a card in pretty close to the allotted time, and i do actually like what i made. so i'm calling this a win!

stickers: funny sticker world (critters), echo park (sun + grass), crate paper (pink scallop border), mme (alphas), michaels (tiny puffy hearts); patterned paper: my mind's eye (clouds) + echo park (polaroid); tapes: little b, love my tapes; adhesives: elmers brand gluetape, 3m foam tape

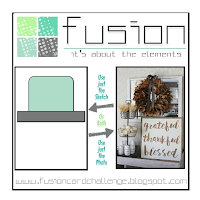
i have to admit that whereas i didn't exactly cheat... i definitely stacked the deck in my favor. i figured it'd be good to use all pre-made ingredients, so i concentrated on stickers and tape. i knew it would be a lot faster to do something i've done before than to think up an entirely new concept, so i gathered supplies to make a little scene inside a faux polaroid. i also felt it was absolutely essential to have a road map, so i grabbed the sketch half of the current fusion card challenge:


i confess that i thought about what i wanted to use in advance, and gathered most of my materials before i started the clock. i chose things that wouldn't involve very much fussy cutting and i didn't do any machine stitching. on the other hand, the lack of the latter is kind of bugging me, so there's a definite chance that i'll go back and at least stitch around the outside of the card before i actually mail this baby. ;)


hop over to SOS to see the amazing... and FAST... creations from the rest of my design team darlings! ♥

Saturday, November 18, 2017

junk journal junkies unite!

i had a complete and total blast at the first meeting of paper anthology's new junk journal junkies club last night! and somewhat to my surprise* i actually got quite a bit done!


in fact i made three signatures' worth of pages, bound them together and attached them into a cover** built on top of a 10x13" mailing envelope, which i had actually made the night before, at home.


the pages are a mix of older patterned paper (mostly light cardstock weight) and specialty papers like old notebook paper, semi-transparent graph paper, deli paper, sheet music, ledger paper... well, there's a little bit of everything, really. there are loads of torn edges because i'm still in a torn edge phase, and also i had elected not to lug my guillotine trimmer with me. some of the pages have been folded horizontally or vertically, to create little pockets that i secured with washi or decorative packing tape.


in terms of productivity, one of the things that realllllllly helped me was that i had spent a bit of time earlier this week thinking about what i wanted to work on, and gathering the specific supplies for that particular project. because honestly, sometimes having too many choices is as paralyzing to me as not having enough, lol.


this morning i added some beads to the floss i used to bind my book, then tied it shut with some luscious sari silk that my junk journal idol anna shared with me. btw, she has an awesome etsy shop... just sayin... as a matter of fact, i have an etsy shop, too, called just enough stuff and there are a couple of junque journal starter kits, similar to the ones you can purchase at paper anthology in kenvil, nj. where the next meeting of junk journal junkies will be held on december 15th!***

♥♥♥♥♥

*my ability to focus is either laser-like intensity or not at all, there is no middle ground with me, lol. so sometimes when there are loads of people and action and supplies, i get more interested in the social aspect of the group, and have a lot of fun without really accomplishing much. which is fine. but it's definitely a bonus to have a great time AND be productive, as well!

**i repurposed a gift wrap sleeve i made as a demonstration in august, in order to show all the steps in this blog post right here

***click over to the paper anthology website to email elisabeth and reserve your space OR call the store at (973) 927-1210. ♥

Friday, November 17, 2017

same strategy, different design

we're still making holiday thank you cards at ♥JINGLE BELLES♥ and i'm still kind of weaseling about a bit, not yet putting on a sentiment, jussssssssssssst in case:


i've made a pair of cards again, too. because frankly when you do the tape/quilt design (the process for which i showed in detail in this post from 2011!!!) it's kind of almost EASIER to make a few than it is to just make one, because you can mix and match the triangles after you cut them apart!


i've used a whole bunch of my favorite red and green eyelet outlet tapes, though i've tried not to be too xmassy, since these will likely be sent after the holiday. i've added paper flowers and some bling, as well, but i've kept them fairly flat to be postal-friendly!


stephanie also has a fab card to show off, why not hop over to ♥JINGLE BELLES♥ and check that out right now!

Wednesday, November 15, 2017

Less Work, More Cards

I don't think I know anyone who has too much time on their hands. Especially crafters. Especially around the holidays! So I'm always excited when I stumble upon a way to make a whole bunch of cool Christmas cards at one sitting. In this case the trick was to combine premade mini journaling cards with Eyelet Outlet Brads. And that's what I'm showing off on the EO Blog today.


My favorite thing about the pocket scrapbooking craze that hit a few years ago is the fact that nearly all the big paper companies started producing sheets made up of 12 or more little cards with sentiments and scaled-down designs right on them. These are such a boon for cardmakers as well as scrappers. This sheet from American crafts has three dozen 2x2" designs! Not only are they super cuuuuute, the scale is exactly right to add a lot of my favorite holiday styles of Eyelet Outlet brads. Before I cut into the paper, I sat down with my box of Christmas brads and laid out the ones I thought would look coolest. Then I snapped a quick photo with my phone, so I'd remember which ones to use where. Then I got to work separating the cards. Since this particular page was paper-weight, before I did anything else, I used my Xyron machine to cover an entire sheet of thin white cardstock with adhesive, and used it to back the page of cards. This made it a lot sturdier, and kept it from wrinkling when I set my brads.


My first two cards are classic A2's so I was able to fit four designs on each. On the first I added a Christmas Cookie to the plate on the card, a Snowflake to the center of the red flower, I gave the cute printed snowman an awesome new Sled Brad to ride, and my adorable Mitten Brads were just a teeeeeeny bit bigger than the pair in the original design-- even the strings line up perfectly. I mounted the embellished cards to a mat of rich red and trimmed out with a strip of  Red Dots Washi and a little classic baker's twine.


For my second card I chose a beautiful prussian blue cardstock and grabbed that Red Dots tape again, with some velvet flower trim on top. I went vertical this time, though, and rounded the outer corners of the mini cards for a different look. It was easy to add a Cardinal to the sprig of holly, a Poinsettia Brad atop that yummy cupcake, a Holiday Tree and Snowman in front of the little trees, plus a very handsome Moose Brad to the florals surrounding the Merry Christmas banner.


For my third card I went long! At 4x8" this one will fit (with a little room to spare) in a #10 envelope. Or, if I add it to the front of a wrapped present, or slip it into a gift bag, I won't need an envelope at all. This time I chose three mini cards with white backgrounds, and got a little more imaginative with my additions. The Cardinal seems very much at home next to the globe, doesn't he? A Heart Brad is the perfect addition to a sprig of mistletoe, and a Prancing Deer was exactly the right touch for the pretty banner. I made mats for each card... and accented my ribbon tie... with some Glitter Copper Tape for extra sparkle.


I chose four kraft designs for the last card, but plussed up a bit to a 5x6" card (which will fit beautifully in an A7 envelope) to give them a little more breathing room. I embellished the elves' existing Hat and Candy Cane with EO brads in those designs, added a Holly Brad to the sprig of holly, covered the printed tree on top of the car with a (perfectly sized!) Pine Tree Brad and nestled a Poinsettia Brad into that little spray of flowers. I added two strips of Pine Tree Washi, a little red ribbon and one more Snowflake Brad and called it good!


I'm guessing you have plenty journal cards in your paper collection, and many of them are exactly the right size to coordinate with your favorite EO Brads! What's that? You don't have enough brads?! Well, this is a great time to hit the Thanksgiving Sale at the Online Store, where all brads and bling are 20% off when you use the code "turkeytrot"! Hurry though, the sale ends this Friday, Nov 17th! ♥
Tuesday, November 14, 2017

let's go!

this week's challenge at shopping our stash is called "transportation" so we'd love to see projects that involve a conveyance of any kind: cars, trains, planes, boats, campers, hot air balloons, bicycles, or, if you're deeply in xmas card mode, how about a sleigh?! i have been slightly obsessed with making collages from a book i got last spring at a garage sale called, "illustrated motor cars of the world" so as soon as i saw this week's theme, i knew exactly what i wanted to make:

beautiful, two-toned, 1959 trabant from "illustrated motor cars of the world"; various bits of vintage text paper, map and charts from my stash; ledgery butterfly stickers: well hoarded studio calico from 4 or 5 years ago that i still love; rub-on transfers: october afternoon, pink paislee; rubber stamps: cherry pie (crackle) rubber stampede (foliage); washi tape: little b, love my tapes; spiral wire and binding machine: zutter bind-it-all; ink: ranger archival; adhesives: scotch brand gluestick, 3m foam tape

if you follow my instagram or catch the sketchbook round-up posts i do here periodically, you'll know that for the last couple of months i've been playing around with the combination of rubber stamps (and/or ancient rub-on transfers) washi tape and vintage paper collage... in my own messy/grungy style, o'course! and i feel like all of that practice is starting to pay off now.


this time my car collage is on the front cover of a little (3.25 x 3.5") spiral bound blank book i'm adding to my etsy shop, just enough stuff. i've been on a roll making little books, actually, so i'll have a few more to show off very soon! of course i had to add coordinating vintage paper for the inside cover, and take the overall design to the back of the book, as well.


meanwhile, you have until next monday night to link up a transportational project with us at shopping our stash. be sure to check out the DT examples for loads more inspiration! ♥

Sunday, November 12, 2017

miscellaneous round-up of miscellany

miscellany that needed rounding up, that is. miscellaneously. of course. by which you'll have guessed that once again i have a backlog of totally unrelated artsy things and decided to clump them all together. you're welcome, lol.


there's a new junk journal junkies club starting up at paper anthology. the first meeting is friday night (11/17) and if you're anywhere near kenvil, morris county, nj, i'd love for you to sign up and come along! (complete details are on the PA website!) this is one of the little journals i made when my friend anna (who is the queen of elegant junque journals!!!) was here a few weeks ago for a playdate!


i got a fab stash of alcohol inks at the papercrafting garage sale in september and made loads of fun experimental panels; some on yupo and some on regular glossy paper. this is one of the yupo ones. what an awesome surface to doodle on... yowza!


here's a flamingo sticker mandala i made in my sketchbook recently. yep, this is yet another weird little niche craft i keep coming back to. my sticker mandalas are not a patch on the ones i saw on honestly wtf last year --which in turn were inspired by a sticker artist called lauren venell-- but they are always a ton of fun to make!
 (i vehemently deny that i only make these to garner comments from my nieces on instagram, altho clearly that is a nice fringe benefit, lol!)


finally, here's a "cleanup collage" from my sketchbook. it's got scraps of torn vintage paper (some with modelling paste) ancient rub-on transfers that no longer transfer perfectly, a single diecut frame from the bag of scraps i bring home from paper anthology periodically to clean out, a rose i cut out for something else but didn't use, a lone diecut butterfly who didn't fit in the project for which he was intended, and loads of utterly random, grungy stamping. all of which i expect will convince you that when i say "clean up collage" i really do mean i've made a collage from all of the random stuff that was on my worktable, which i was too cheap to throw away and too lazy to put away!!! :) :) :)

♥♥♥
hope you are having an awesome weekend, and that you'll take some time to make something FUN just because you want to! 
♥♥♥

Saturday, November 11, 2017

bursting with color!

in other words, here are a few colorburst projects i've made lately:


an autumnal sketchbook collage that uses up the last couple of "demo leaves" from the leaf card class i taught in sept/oct at paper anthology. for the record: NO, i never, ever, get tired of colorburst-ed autumn leaves!


but then i never get tired of florals, either. 
these are verrrrry loose and combine cerulean with indigo...


...whereas these are a slightly more structured blend of fuchsia, peony and wisteria!
(not to be mysterious, but both the floral pieces are actually going to be ingredients in something i'm still working on...)


end-of-the-night doodles on an offcut of watercolor paper on which i had previously used up some rainbow shades of pre-mixed colorburst. i tend to accumulate quite a few of these loose ones, and they are really fun to doodle on. 


but then when they're "done", i tend to just put them in a box together, which always seems a little dull. at least my sketchbook pieces get to keep each other company. so last week it occurred to me to bind all the "extras" into their own little book, and doodle on them whenever the mood strikes me. 


behold, the little book of doodles!


don't the loose rainbow pages look happier already?

i cut a larger cloud painting in half, to use for the covers...
and then i doodled on the clouds, too! 


i feel like this is a project that i will be enjoying for a good long time. 
every time i see my little book of doodles, it makes me smile! 
♥♥♥