Saturday, December 31, 2016

bye bye, 2016!

inspired by all the great #BestNine and top ten posts i've been seeing, i thought it would be fun to flick through my own creative year and choose a few faves. instead of a proper top ten, i picked a favorite from each of the categories of stuff i make.

favorite mandala
this colorburst heart mandala card is composed of a bunch of layers i fussycut and piled on top of each other. it makes me want to get out my color burst and my scissors RIGHT NOW!

favorite eyelet outlet project
being on the eyelet outlet design team has definitely been one of the highlights of my year. this shell frame was one of the first things i made and it looks almost exactly like the idea that was in my head!

favorite paper anthology class
"ink over collage" was inspired by my first project of 2016, the GIANT mandala canvases, and i think it translated pretty well to art-journal size.

favorite "big" project
completing "time and distance" for the sketchbook project was one of the most challenging things i did this year. in the end, i think the book reflects my style and tells a story.

favorite ICAD
not the fanciest or most colorful, but having been stumped by the prompt, "compass" i was excited just to come up with something interesting!
 
favorite collage
midway through the year, tammy garcia reminded me of something we invented a few years ago: the one staple collage. so of course i had to revisit the idea.

favorite SOS card
for the diecuts challenge i had the crazy idea of making an entire background from diecut words. pretty sure i set an all-time record for fussiest use of gluestick.

favorite christmas card
thanks to jingle belles, i really did love making all of my 2016 cards... but vintage-inspired color burst ornaments with LOADS of bling are always going to rate pretty high on the lauren-o-meter!

favorite doodle
apart from anything else, the zentangle spider web for sisterhood of snarky stampers' "pink halloween" challenge was just way too much fun!

favorite crochet creation
egglebert humperdinck is the very first amigurumi-style creature i've ever invented and fabricated without a pattern.

favorite watercolor
this color burst hibiscus is one of the first things i watercolored with no undersketch and very little outlining, so it made me feel like i was starting to be a bit of a "real painter" lol!

favorite giftwrap
(yes, i'm counting giftwrap!!!!!!!)
gelli print butterflies on a sleeve of stitched vintage wall paper and chiffon, over torn maps. pretty much just your average every day giftwrap, lol!

yep. it was a busy year! i can't wait to see what's coming in 2017! happy happy new year, darlings! ♥

Wednesday, December 28, 2016

Thank You BEAR-y Much!

Hi guys, it's my day on the Eyelet Outlet Blog, where I'm showin' off a fun idea inspired by these adorable Eyelet Outlet Winter Animal Brads. I'm planning to use this as a thank you note for some cool holiday gifts I received, but it would work for any wintery occasion.


I love that each packet of Winter Animal Brads contains white bears, brown bears and super-cute penguins! For this card, I've made two of the white bears adornments for a pair of mittens I've constructed from a bit of plaid paper I hand-painted using some of my favorite ColorBurst shades: Pthalo Green, Terre Verte and Turquoise. I used a piece of clipart for the shape, and cut the two mittens back-to-back with scissors so that i'd have a right and left hand to use on my card. I added White Glitter Enamel Dots to the cuffs and a piece of yarn to bump up the texture factor.


A computer generated sentiment and a few white Heart Brads finish off the design. And now I'll just wish you a BEAR-y good day, darlings! ♥♥♥

Tuesday, December 27, 2016

still winter... still walkin'...

just a reminder that "winter wonderland", the current challenge at shopping our stash, will run for another week, so you've got plenty of time to link up wintery-- but non-holiday-- cards and projects!

plain white gift bag, wired ribbon and liquitex white modeling paste: michaels; cerulean, indigo and ultramarine color burst pigment powders: ken oliver crafts; silver glitter embossing paste: viva decor;silver gel pen: sakura; clear stickles and snowflake stencil: ranger; sticky back pearls and large pearl brad: eyelet outlet

i had a blast making this, you might even say i had SNOW MUCH FUN. on second thought, probably you wouldn't say that, and i shouldn't either, lol! anyway, i used cerulean blue colorburst to tint plain white embossing paste, which i applied through one of my favorite stencils. then i outlined around the flakes with a silver gel pen, added some sparkly glitter glue and embellished a big ribbon bow with a few diecut snowflakes cut from various blue color burst panels leftover from other projects. for the record, this is my FAVORITE place to see snow... sooooooo much more convenient than, say, on the roads outside my house!


hope you had an awesome holiday and that you're jumping back in to some crafty fun as things start to calm down again. hop over to SOS if you have a minute, we'd love for you to join us! ♥

Saturday, December 24, 2016

one more fancy package...

note to self: never try to photograph anything wrapped in silver foil paper.
seriously. life's too short. 

note to blog readers: apologies for the dreadful photo. 
(please see "note to self" above)


envelope punch board: we r memory keepers; patterned paper: elle's studio stars, basic grey white, plus scraps of: american crafts, lawn fawn, ideals magazine, pion, echo park and some glitter paper and colorburst backgrounds; dies: impression obsession, echo park, tim holtz/sizzix, spellbinders; tapes: october afternoon, martha stewart; pearls: eyelet outlet; ink: colorbox; adhesives: elmers brand gluetape, 3m foam tape, gluedots 

horrible background aside, i quite like this little envelope-punchboard creation. it's adorned with leftover diecuts: trees, deer and colorburst snowflas, to be exact. all of which are arranged according to this week's rather awesome atlantic hearts sketch:


hope you're ready for a great first night of hanukkah... OR a fabulous christmas eve... OR even just an especially marvelous saturday night! ♥♥♥


Friday, December 23, 2016

envelope envy?

yet another reason to *LOooOOoVE* the envelope punch board, is that you can construct, in approximately thirty seconds, a beautiful little pouch of EXACTLY the right size to hold some flat-but-awkwardly-shaped xmas goodies!

envelope punch board: we r memory keepers; patterned paper: pebbles, doodlebug, making memories, echo park, lawn fawn, elle's studio; stickers: pebbles; glitter thickers: american crafts; tapes: little b, martha stewart; ink: colorbox; adhesives: elmers brand gluetape, 3m foam tape

yet another reason to loooooooooooooooooove sketch saturday, is that once you have the perfect size and shape of envelopes, you will know EXACTLY where to place stickers and embellishments to make them super-humanly cuuuuuute!


yet another reason to love my prince of a husband, is that he offered to run to the big box crafting store, in one of our busiest local shopping centers, *BY HIMSELF* today to fetch giftbags when a last-minute supply-check last night revealed that i have plenty of every size except the one i actually need!


as it turns out, i managed to make a smaller bag work, so his heroic offer can be gratefully turned down, but he didn't know that at the time, and he truly would have gone.


hope you are doing ok with your own holiday prep and/or that you have a helper as kind and thoughtful as lovely husband jeff to assist you! ♥♥♥

Tuesday, December 20, 2016

walkin' inna winter wonderland

this week, or rather, this fortnight* at shopping our stash, the challenge is called "winter wonderland" because we're looking for projects that celebrate winter, generally, rather than christmas or hanukkah. i've made a few more cards, which i'm hoping will serve as thank you notes or even january birthdays, but at the moment they're sitting in my xmas card box, because every year there's at least one person who surprises me with a card and i like to be able to respond! :)


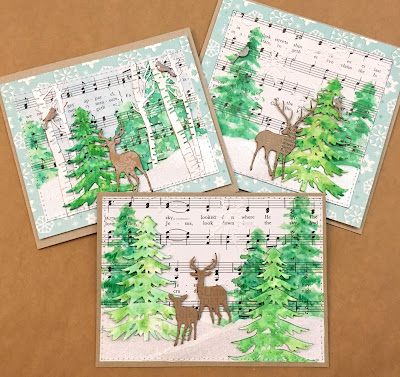
i'm sure you've noticed a certain resemblance to my colorburst evergreen cards from last week; for one thing, i still had deer and tree diecuts leftover from one of my december classes. plus i had these beautiful backgrounds i made at paper anthology a couple of weeks ago using a gorgeous impression obsession "cover a card" background stamp that i have since ordered because... well, just look at it, lol!


i still don't enjoy mass-producing cards, but i definitely see the advantage in working with a group of related items. plus it always feels like a big win to use up those last few scraps or diecuts or leftovers, as opposed to having to clean them up, doesn't it? 

deer and birch dies, plus birch background stamp: impression obsession; pine tree die: memory box; patterned paper: basic grey, glitz design, pion, k and co, tim holtz; glitter paper: american crafts pow (teal), best creation (white); cardstock: core'dinations; ink: ranger, colorbox; adhesives: elmers gluetape, 3m foam tape, gluedots, sewing machine

if you need more "winter wonderland" inspiration, be sure to check out my SOS design team darlings, who've all been working hard just to help you out!

*in honor of the holidays, this SOS challenge will run for two weeks instead of one!

Deck the Halls!

Warm winter greetings, darlings, I'm on the Eyelet Outlet Blog today with a super-fast project that would make a great last minute holiday gift OR maybe a bit of decor for your own home?


When I found these triangular balsa wood trees in the clearance section of a big box crafting store, I immediately pictured them covered in Eyelet Outlet Paper Flowers, Swirl Bling and Bumpy Heart Bling, and I seriously could not get them into my cart fast enough! Of course, if you have the tools, they'd be easy to create from scrap wood. For that matter, a few pieces of nice thick cardboard cut into triangles would work equally well; you could even draw some triangular shapes on a card or canvas and make the surrounding areas "background"! Whatever materials you choose, the method will be the same:


Cover your triangles with torn scraps of sheet music, text paper, old dictionary pages, etc. Use a high quality gluestick to get thorough, edge-to-edge coverage on your papers, and if you're working with 3D wooden shapes, a little coat of gluestick on the wood, as well, gives you extra adherence. Wrap the papers around the sides, the back, and onto the base, smoothing out any bubbles or wrinkles as you go. When your trees are covered, decide where you'd like to place your embellished Paper Flower stacks. This will help determine where your doilies should go... if you're using doilies, that is! To adhere doilies or any lacy, fragile items, use the gluestick again, but apply with an up and down "dabbing" motion, since sliding the gluestick can result in tearing the paper. Add the paper flowers strategically, so they will become the focal point of each tree. Since each Eyelet Outlet Solid Color Paper Flower Pack has forty flowers, in three graduated sizes, you'll be able to make each stack multi-layered. Place a Bumpy Heart Jewel in the center of each stack. Finally, add Clear Swirl Bling around the flowers for maximum drama. I love that these come on a clear plastic backing sheet, which makes it easy for me to move them around before deciding exactly where they should go. Feel free to trim or rearrange bits of the flourishes to fit your design better!

Not a big fan of collage? Cover your trees with patterned paper, giftwrap, paint or Holiday Washi Tape! Then fancy them up with flowers, bling, pearls, brads or... well, whatever Eyelet Outlet embellishments you love most!


Whether you are celebrating Christmas, Hanukkah, Solstice or Festivus, I wish you a wonderful weekend full of family, friends and maybe even a handmade gift or two! ♥♥♥

Sunday, December 18, 2016

hand lettering round up

i haven't had a lot of time for free-style art... or blogging for that matter, lol. but i try to sneak a bit in here and there:


@letteringbymhel and @inkcitra are the hostesses 
of the #WinterLetteringChallenge on instagram, 
which is really fun and inspiring; i've been watching more 
than i've actually participated so far, but that's ok.


and her videos really do make you feel like 
OF COURSE you can do that too! :)


@letteringbybeth did a little illustration of xmas lights 
that i just had to try for myself!


on two successive nights my entire handlettering output 
consisted of putting names on envelopes... 
but at least i got to try out a few more instagram-inspired 
lettering styles, like the knitted sweater and gradient letters!


finally, to show how long it's been since i did an IG update, here's a bit of lettering from *THANKSGIVING*!!!


i'm sure you're as consumed as i am with holiday prep, but i still hope this sunday finds you sneaking in a tiny bit of creative "me" time!!! ♥♥♥

Saturday, December 17, 2016

snow far, snow good

we had the first significant snowfall of 2016 here in central new jersey last night, though thankfully today it has warmed up enough to turn to rain and melt most of our accumulation. i'll tell you somewhere that i always LOVE to see snow, though, is on a papercrafting project, like these giftbags:


i stenciled the flakes with modeling paste on dark blue store-bought gift bags; then added sparkly ribbon and some stacked snowflake diecuts i made using a few more "surplus" color burst panels i made over the course of the last few months. for one reason or another, these guys weren't quite right at the time, but i never chuck them out, because i know that i will find a use for them!!! 


another place that snow is popular just now is the simon says stamp monday challenge blog, where they say, "let there be snow", so i'm linking up with them. 


in other news this week, the outside lights are on our house...


...we visited the annual gingerbread contest at peddler's village in lahaska, pa...


...had a most scrumptious christmas tea at teaberrys in flemington, nj; and made a few more eyelet outlet washi quilt cards, in order to call my 2016 xmas card production FINISHED and get the last few cards in the mail!
(can i get a, "WOOHOO"?!)


how has your week been, darlings? i hope you've found time for a treat or two! ♥♥♥

Tuesday, December 13, 2016

tag... you're it!

this week at shopping our stash, you can be seasonal or not, it's your choice. for "tag, you're it" we'd like to see... well... tags. but whether they are holiday-themed or not is up to you. as is whether you make the tag itself your final project, or just use a tag as part of a bigger piece, like i've done here:

tag ingredients: vintage lady from an old ideals magazine, pink paisley ledger paper, poinsettia from michaels, gold press on sentiment, gold doily and various ribbons, including that may arts leaf ribbon which is still possibly my all-time fave; card ingredients: patterned paper: lily bee design plus vintage sheet music, a scrap of doily and some gorgeous glitter gold tape from eyelet outlet

i actually made the fancy tag with the victorian lady on it either last year or the year before, as part of a "twelve tags of xmas" event on a website somewhere or other. but whereas i used the rest of them up... somehow... this one was still sitting at the bottom of my holiday card box. which was a perfect jumpstart, and i needed it, since frankly this past week kind of kicked my butt. to streamline the design process even further, i went looking for a sketch and found this awesomeness at sketch saturday, so all i needed to do was rotate it 90 degrees and add in the rest of the shapes, easy peasy!


there are lots of options this week, so luckily there's loads of inspiration from the DT over at SOS! g'wan and check it out, darlings! ♥

Monday, December 12, 2016

Dreamiest Washi Pillowboxes

If you're like me, giftcards are always part of your holiday giving, but store-bought packaging always feels like a bit of a cheat... especially when there are so many cool alternatives that we can *MAKE* ourselves. Today I'm up on the Eyelet Outlet Blog demonstrating one of the latter. The good old-fashioned pillowbox is still a favorite of mine, because the dimension makes it look like an actual gift. You can construct them from all sorts of materials, but my absolute favorite is plain old white cardstock decorated with Eyelet Outlet Holiday Washi Tape, because it's easy, quick, and you can customize the look for everyone on your giftcard gift list!


I still use an ancient print-n-cut pattern plus scissors to construct my pillowbox blanks, but if you have a pillowbox die or electronic cutting software, it'll be even easier! I keep two printed copies of my favorite pattern, one to trace the entire shape, the other to uses as a guide for scoring the curves. I like to completely cut out, score and fold all the moving parts before I begin the decoration phase. Since there are soooooooo many beautiful Eyelet Outlet Tapes, it's hard to choose just a few, so I decided to use lots of different ones to create a sort of woven effect on the blank pillowbox.


Start with one strip of tape (I chose Pine Tree) and place it on a diagonal, so that it covers both sides of the box, as well as the flap. Leave an inch or so at either edge, so you can wrap the ends around to secure them on the inside of the box.


Choose a second tape and place one or two strips of it perpendicularly to the first strip.


Work back and forth, adding layers in each direction, until two thirds of the box is covered. Use tapes of various widths, and let some overlap the edges of others, to add more variety to the design. I've mixed classic holiday designs like Tree Tape, Holiday DotsRed Tree Tape, Merry Christmas Skinny Tape, Season's Greetings, etc, with other red and green tapes in my collection, like Heart Washi and Skinny Hearts Tape.


When you get to the end, if you've accidentally covered your sentiment, as I did with my Merry Christmas Tape, just go ahead and add a second strip on top! The translucency of the design makes it easy to line up a second layer perfectly!


Use your favorite dry adhesive to secure the flap. I like Scor-Tape, because it's very strong and comes in a bunch of widths. But remember, that it's a lot easier to attach Candy Cane Brads, Solid Color Flowers and other embellishments before you fold the box (!!!) and secure the flap with your extra strong, super-sticky tape! Do you notice anything about this picture? Yes, I forgot it'd be hard to punch holes and place brads after the box was taped together. Hence the bold italics! If you'd like to be extra sure your box will stay together for all eternity, add another decorative tape strip or two after it's constructed.


Now that you're an expert pillowbox maker, I bet you won't be able to stop with just one Washi Tape masterpiece... I know I couldn't! ♥

Saturday, December 10, 2016

turn a tree into a FOREST!

i love dies. i know, i know, most people love stamps and just consider dies a sort of adjunct, but i really like the dies themselves. there are just so many possibilities: you can cut the same shape from patterned paper, vellum, text paper, glitter paper, a collage of ALL of those... or, as i mentioned the other day, you can cut them from colorburst essperiments! even the "unsuccessful" ones you didn't especially like on their own, take on a whole new life! but today, in addition to making pretty die cut shapes, i want to talk about using your dies to make a cool BACKGROUND. like these:


the best part is that this is SUPER-easy, and you probably already own all the stuff you'll need; i've used colorburst pigment powders and ken oliver crafts' liquid metals for my coloring elements, but you could easily swap out and use your favorite inks... even water based markers, scribbled onto something shiny and picked up with the sponge dabber!


1. diecut a tree 
mine is memoy box's "marvelous pine" and it's cut from watercolor paper, but use what you have! place the "negative" of the tree on your background, just like you would with any other stencil. consider where you want to place the trees before you get started. i like stencilled trees to be at the edges of the card, so the diecut one can have the center, later. i also like to let the trees go "off the edge" a bit, and to vary the heights of the trees.
(ps: at the side of the frame you can see that i have the lid of a jar a dark spot in it... that's actually a very small amount of lime colorburst and a few drops of water; i mention it b/c it's integral to step two.)


2. apply your lightest shade of green
use a sponge dabber to put an uneven coat of pretty wet, pretty light lime colorburst through the "stencil". you'll notice my trees are quite sketchy and not filled in... that's intentional... you want there to be some "space" for the second color.


3. apply a darker shade of green
replace the stencil over your mostly dry light green sketchy trees, don't worry about lining it up perfectly, the looser your trees are, the better they'll look! you can use the same sponge dabber, this time it'll pick up a tiny bit of pthalo colorburst with a few drops of water. try to place your darker color mostly in the BLANK spots, rather than on top of the light green, but don't worry about it too much...


4. apply an optional third shade of green
for this, you want an even smaller quantity of wet media. i literally used about 6-8 drops of verdi gris liquid metal, and i didn't bother to replace the stencil, just dabbed it randomly in 10-12 spots towards the center of each tree, using the edge of the sponge dabber.
(think "shadows" here... the darkest ones are going to be where the branches overlap, nearer to the trunk; but again, don't fuss... this is going to add sheen more than color and it will look cool no matter what, i promise!)


5. add the (optional) sky
you can see in the photo at the top of the post that i don't always bother to make my sky blue, and the cards are still cool, but since i was shooting the step-by-step of this, i decided to get fancy, lol.  in this case i've used seriously no more than 9 grains of cerulean colorburst and 3 drops of clear water, and i've used a biggish paint brush to move the color around my BONE DRY TREES. if you're feeling nervous about adding another wet element, you can substitute some pale blue water-based ink applied with a clean sponge dabber... ranger's tumbled glass distress ink works really well!
(you can see that my background paper wrinkled slightly from the application of the watercolor; it smoothed out when i used the heat gun to dry the panel. occasionally a panel will decide NOT to smooth out entirely, in which case i either iron it on the back-- with a piece of blank paper between my work and the iron; or carefully stick it to a piece of cardstock coated with gluestick; OR, just sew it to my card anyway and not worry about it!) 


6. add modeling paste snowflakes (if you want)
mine are composed of dreamweaver's white crackle embossing paste, and were applied through a tim holtz snowflake stencil. it's really crucial that your panel is BONE DRY before you begin, or the modeling paste may actually absorb some of the wet color. to speed up the process, you can use a heat gun. once the front of your panel is dry to the touch, i recommend turning it over and drying the back as well. especially if you're using watercolor paper... which has longer fibers in it, that sort of soak up the water...

 et voila!
the panel is done, but yes, there are a few more steps to make it into a card. i wound up trimming the sides of my panel a bit, so it would fit on a finished 5x7" card. but first, i overlapped two pieces of torn white glitter paper to act as as "snowy hills" at the bottom of the card. i gave the hand-painted diecut tree pride of place; after inking the edges with a slightly darker shade of green, i popped it up with some little slivers of strategically place foam tape. finally, i diecut a couple of sweet impression obsession deer. i sewed my entire panel to a rectangle of soft blue patterned paper, mounted it on a kraft A7 card... and it was VOILA for real this time: 


i hope you'll be inspired to look at your dies and punches with new eyes, and use them as stencils... or maybe in other ways i haven't even thought of yet? (in which case, be sure to zap me a link, k?!) ♥♥♥
i'm jumping in with the simon says stamp wednesday challenge blog's "ice inspiration" this week, having used many of the elements (though not quite all the colors) on their gorgeous mood board: