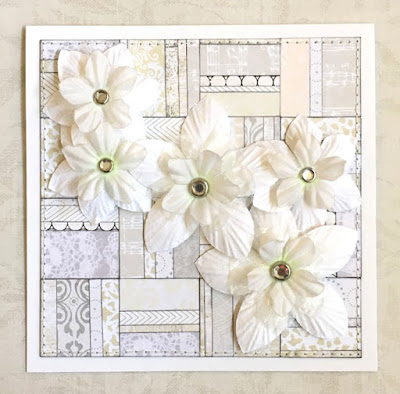
it's a very cool challenge (imo) this week at shopping our stash. we want to see projects that feature geometric patterns! they can be on the commercially produced patterned paper of your choice, or you can stamp, paint or otherwise create them on your own. or you can split the difference and make your own geometric pattern that's composed of patterned papers!* like this:
if you saw this card or this one, you'll know that i had (quite coincidentally) already been in a bit of a phase, making my own geometric patterns, inspired by some funky ICAD collages. so this challenge came at the perfect time for me! having already done chevron/herringbone, this time i thought i'd go back to the strips and see what else i could do with them. i came up with a bit of a parquet pattern** that was SUPER-easy (and fun!) to make. as with the chevrons, i started with a piece of scrap cardstock that was just a bit wider than i wanted my finished squares to be, which i'd run through the xyron machine, so that one side was covered in adhesive. then i started placing my trimmed-and-inked patterned paper strips side by side, until the cardstock was completely covered. then i trimmed the strip into 1.25" squares. i made more strips until i had enough squares (in this case, 16) to fill a 6x6" cardfront. it would've been quicker to make one BIG square and trim it down into little squares, but i wouldn't have been able to use small scraps of paper for this, and getting rid of a bunch of the "littles" was part of what i hoped to accomplish.
when i had all of my squares, i made myself a 5.5" square base of plain, xyroned cardstock, which became the base of the "parquet" piece. i started adding my squares, one by one. you'd think that the most important part of this sort of technique would be to get the EDGES absolutely straight, but in fact, it turns out that the interior angles are waaaaaaaaaaay more important!!! afterall, you can trim the edges, but if the center doesn't line up, there's no remedy. so, basically, with the wisdom of hindsight, i now know that if i ever do this again, i'll make my base piece a bit larger, mark the center, and start there.
but this time i started at an edge and it came out pretty much ok. in fact, i liked the finished design so much, i toyed with the idea of going all minimalist and just leaving the card flat. in the end, i contented myself with taking a fancy staged photo of the unadorned grid, and i added the flowers afterall!
don't forget to hop over to SOS and see the amazing creations of my super-inspiring design team sisters! ♥
*because there's one weirdo in every crowd, and usually it's ME, lol!
**i'm not sure WHY i am compelled to re-create all of the hardwood floor patterns in my house as greeting cards, but it's fun, so i'm rolling with it... :)


I knew you were going to come up with something amazing for this challenge...I mean it is definitely in your wheel house. Beautifully done, Lauren. You have the patience of Job!
ReplyDeleteHugz,
Chana
Omgoodness it is awesome. Love the design and just enough flowers to make it interesting without overpowering the gorgeous parquet design. Great tips too thanks.
ReplyDeleteI'm floored not only that you paper pieced all those bits of paper together, but looks like you inked all the edges too! Holy Moly Batman! That takes patience! This is absolutely amazing!
ReplyDeleteThat looks amazing like a weave.
ReplyDelete