Wednesday, January 30, 2019

Whole Lotta Love

Something I didn't realize until I was loading up my photos, is that I have not used any Eyelet Outlet Brads this week. *HOW* did that happen?! I have, however, used plenty of bling, tape, and enamels along with a super-useful mason jar stamp and die set, to make two fun Valentines.


I don't make nearly enough shaker cards. Which is weird because any time I do make them, I really love the results. In this case, I used the mason jar die to cut the shape from my top layer of paper and backed it with clear plastic that I saved from some packaging. I used several layers of foam tape to make an extra deep pocket, so that I could use Heart Jewel Bling as my shaker contents. To do so, I had to carefully peel the adhesive off each heart, so they'd be able to move around without getting stuck. An alternative is just to cover the adhesive backing liberally with powder or cornstarch, thus neutralizing it. (FYI: This works on stickers, too!) I "labeled" the jar with clear Heart Bling, made a mat with my favorite henna-inspired Wide Flower Washi Tape and called it good to go!

For my second card, I used Staz-On ink to stamp the mason jar onto a piece of plain cardstock which I'd made into a fun patterned paper by neatly lining up strips of Love Tape. I filled the jar with yellow and red Heart Enamels and mounted it on another tape-centric "paper" which is composed of Heart Washi and Skinny Red Dots Tape, placed at regular intervals on a piece of graph paper. 


I hope you'll be inspired to find fun new ways to combine your favorite stamp and die sets with beautiful Eyelet Outlet embellishments!

Tuesday, January 29, 2019

SOS388: ode to jessi

if you follow along at shopping our stash, you might have read that our dear friend and former SOS teammate jessi fogan sadly passed away a couple of weeks ago. this week, in her honor, we're asking you to be inspired by any of the many, MANY beautiful and amazing cards on jessi's blog, one crafty mama, and make a tribute version, linking to the original post. i chose this beautiful fish card, which jessi made in may of 2016, for an SOS challenge called the four elements. here's my take:

fish illustration from a vintage children's book; background made with several layers of "smooshed" turquoise colorburst, allowed to try between layers, then stamped with a fancy pants ocean wave in ranger archival "paradise teal"; orange chevron paper: echo park; sparkly foam thickers: american crafts; glossy white kromekote card and mat: the paper cut; tiny metal dots: colorbok; adhesives: elmers brand gluetape, 3m foam tape

jessi's card used a digi-stamp for the fish, and a background of smooshed distress inks, with a stamped sentiment. in my version, the fish is one i just happened to find in the pages of an old children's dictionary, and i remembered it as soon as i saw jessi's card. my background is smooshed turquoise colorburst, with stamped ocean waves on top. to bring in more of the bright orange in jessi's background, i added a mat of streaky chevron patterned paper which matches the sweet fish perfectly. the sentiment is one of my faves and i've created it using an ancient set of sparkly foam thickers.

i hope you'll head over to SOS and see the design team's tribute cards and then choose one of jessi's beautiful creations to inspire you! ♥

Sunday, January 27, 2019

a smattering of patterning

i haven't been able to participate every single day of pattern january on instagram, but i've still been jumping in here and there as time permits. and i continue to find anika starmer's prompts --not to mention the amazing variety of ways the other participants are interpreting them-- incredibly inspiring. here are a few more of mine:

day 10: beach
i confess i loved making this more than i love the finished product, but then, PROCESS is the main point of a daily sketchbook challenge, imo! it's a great time to practice, to brainstorm, to think of something you wouldn't normally have any reason to do. just stepping out of my normal, practical area of expertise can give me a whole new perspective. 

day 11: furniture
ok, yes, this one's a bit tangential: i painted some uber-bright madras plaid, of a sort you might see on patio furniture... you know... in the summer, when it's WARM OUT.
(ps: painting plaid... or stripes... or curvy lines... is a great way to build up your brush control, which is one of the most crucial skills for painting. outlining the results with a pen adds line control, which is equally important. and before you say, "i don't have a steady enough hand to paint straight lines" i should mention that NOBODY starts out with a steady enough hand to paint or free-draw straight lines; hence the need to practice!

day 12: fruit or veggie
i chose fruit, as you may have noticed. and i painted this last sunday, when i didn't have an idea for mandala monday the next day. because that's how scientific i am on these occasions, lol.


day 13: woodland
inspired by my fellow IG pattern enthusiast by aarup who posted her digital version of a gorgeous birch grove. i used an easy washi tape mask and two favorite shades of blue colorburst: cerulean and ultramarine. then outlined and added details with pen.

day 16: pen.man.ship
i somehow managed to post this on jan 23rd, which turned out to be national handwriting day. an attempt to seamlessly transition various rainbow shades using tombow dualbrush pens in about 14 colors! i'm somewhat proud that after practicing (and practicing... and practicing...) i now feel happy enough with my letterforms to not necessarily outline and touch them up.


day 17: weather
funky patterned clouds in a funky patterned sky. with tombow and posca pen details added last, when the watercolor was bone dry. inspired by the "no lines" watercolor method of stamping, i drew my basic cloud pattern using the lightest shade of blue tombow dualbrush i own, then painted the sky in cornflower and cerulean colorburst.

day 20: scallop
just a fabulously fun rainbow-fest here!
(ok seriously, this was really really fun to paint. but again, it's a brush control exercise in disguise. the point being to add successive rows of scallops, without waiting for the last to dry, by leaving a 1/16" gap of dry paper in between. using ten different, super-bright shades of colorburst, and turning it into an interesting-to-look-at pattern, is just a sweetener. like taking a fun, rowdy zumba class instead of slogging away on the treadmill by yourself!)

♥♥♥
hope you're having an awesome weekend and that
 you'll find time to do something fun and creative just for YOU!
♥♥♥

Friday, January 25, 2019

the best place for snow...

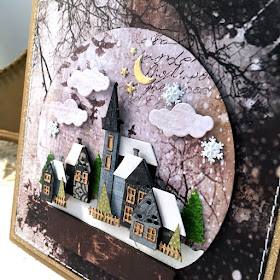
...is inside a snowglobe, imo! and since we're still celebrating "what santa brought us" at ♥JINGLE BELLES♥ i thought this would be a great time to break out the tim holtz/sizzix thinlits die set i treated myself to at paper anthology right before xmas!

"snowglobe #2" die set: tim holtz/sizzix; patterned paper: ciao bella "snow and the city" collection + scraps of glitz design, graphic 45, authentique and blue fern studio; pine tree and snowflake brads: eyelet outlet; gold metallic cardstock: idea-ology; gold glitter cardstock: american crafts POW; kraft cardstock base: bazzill; ink for edging: colorbox; adhesives: nuvo deluxe adhesive with a tiny applicator tip, tho for some of the really bitsy pieces i applied it with a tiny paintbrush!!!; elmers brand gluetape, 3m foam tape, sewing machine

i will tell you right now that this is a very VERY tweezer-intensive die set. and i am already sure that the snowglobe and stand will get more use than the village with its 46 (FORTY SIX!) separate, tiny, pieces including 1/8 x 1/4" window frames and 1/8 x 3/8" sections of picket fence. having said that... you can't really argue with the results, can you? i mean LOOK how flippin' cuuuuuute it is! i used various layers of foam tape to give a more dimensional look to the houses and added in a few perfectly-to-scale eyelet outlet pine tree and snowflake brads. the background of the snowglobe and the card base are both from a collection called, "snow and the city" from a new italian paper company called ciao bella that we just started stocking at paper anthology. you'll be hearing me rave more about them periodically, because i am quite smitten with both the quality of the paper and the beauty of the designs.


hop over to ♥JINGLE BELLES♥ to see what stephanie made this week, then start planning what you'll link up with us!

Wednesday, January 23, 2019

Love Ewe...

...more than yarn?! Surely not, lol. Because knitters like myself really loooooove yarn! And also Eyelet Outlet Knitting Brads, which include the beautiful purple yarn our sheep friend is knitting up. There are three more EO products on this card... can you spot them?


Most likely you noticed the purple Heart Enamels, which are a fave of mine. How about the Tape Measure Washi that acts as a mat around the edge? Admittedly, I trimmed the numbers off which disguises it a bit, but I wanted a skinny border, so I chopped it down. Finally we have the fun "I Love Ewe" which is one of the awesome sentiments from our Farm Animal Stamps. Just goes to show you that a little creativity can make familiar products into something new and cool, eh?


I hope you'll be inspired to use your favorite Eyelet Outlet items in your own creative way, as well. For more fab ideas be sure to check in with the design team on the EO Blog!

Tuesday, January 22, 2019

SOS378: inspired by quilting

this week at shopping our stash we are, as i've mentioned above, inspired by quilting. i had a couple of ideas, the first of which was to trim some hexagonal patches of paper and add them, quilt-like, onto another design that coordinated well. i'm happy with the result:


the papers on this card are from a newer prima line called "pretty pale" which definitely lives up to its name. but don't worry there are some much older stashy bits involved, too! the crystal hexie frames are from... ok, i'm not honestly sure, i've had them for a bit. they're a "say it in crystals" shape that i could not even find again in a google search, so i suppose they must be from a couple of years ago, at least. i placed each of the frames on a pretty section from a paper called "colorless" that is quite neutral, but it has little copper metallic patches that are super-elegant. once i had framed up a bunch of pretty hex-shaped sections, i trimmed neatly around them with scissors and used them like appliques, mounted on tiny squares of foam tape. the pretty tiny taupe butterflies are also from a few years ago and the flower is pretty ancient, i think. i was glad i had saved/hoarded it, however, because i love how it looks on this card.


as long as i was in the quilting vein, i couldn't resist making one more "strip quilt" card, similar to the ones we made in one of my september/october classes at paper anthology. i described the method for a similar card back in june, if you'd like to see how it's done. it's quite easy, since you start with a PANEL that has adhesive on, rather than applying adhesive to each of the strips.


once i had covered the entire panel, i did a bit of machine stitching on top and finished off with some elderly (but still beloved) prima burlap fabric dogwood flowers, plus some equally ancient leaves from an entirely different collection. again the papers are from "pretty pale".


 i hope you'll be inspired to channel your own "inner quilter" and join us this week at SOS! ♥

Friday, January 18, 2019

look what santa brought me!

it's time for one of my favorite ♥JINGLE BELLES♥ traditions, yes, it's that time again to show off the crafting goodies you got for xmas or hanukkah! and yes, it totally counts if the "santa" who treated you to something new before (or after) the holidays was *YOU*!!! just in case you have iron willpower and didn't receive or purchase ANYTHING new in december or january... (for the record, i'm only pretending to believe you, lol!) ...but just in case: break out something from your crafty stash that hasn't been used yet! here's what i made:


having run very low last year on one of my own personal crafting "must haves" ...adorable holiday-themed sticker sheets from doodlebug design... i treated myself to a few of those just after xmas, and while i was at it, i got a few papers too. it's the latter i've used here from the "christmas town" and "milk and cookies" lines. as it is nearly every january, the memory of how many of my lumpy bumpy cards turned out to be considered first class parcels and cost $3 to mail is fresh in my mind, so the next few weeks you'll see some quite flat and conservative cards such as this, that only have a few eyelet outlet enamels and brads, plus a bit of machine stitching for texture. luckily i once again had an awesome sketch saturday to spur me on:


be sure to hop over to ♥JINGLE BELLES♥ and see stephanie's lovely card and get ready to link up your own masterpiece!

Wednesday, January 16, 2019

Have a BEAR-y Nice Day!

Warning: This post contains Diabolical Puns; those who do not enjoy such humor should look away NOW! 

It's Lauren here again with more Valentines. Or rather, one official Valentine and one all-occasion card. But really... you could make them both all-occasion or both Valentines. Anyway, here are the cards in question, they both feature our adorable Eyelet Outlet Bear Brads:


"Bear Hugs" was the first idea that came to me when I saw these lovely little guys and I've made it into a Valentine, but really, you could send "Bear Hugs on Your Birthday" or "Thinking of You and Sending Bear Hugs" or even "Get Well Bear Hugs for You"!  Isn't it nice when cards can multi-task? 


When I thought of the "Un-BEAR-able" pun I was stumped for a bit as to how to use it on a card without being rude, lol! But finally it came to me. 


Of course there are plenty of additional ways to go: "Sending BEARY Good News"... "Wishing You a BEARY Happy Birthday" or even, "I'm em-BEAR-assed that I missed your birthday"! It turns out that Bear Brads are pretty handy to have around! ♥

comes from a very PUNNY family! 
(But you probably guessed that already...)

Tuesday, January 15, 2019

SOS386: hearts on fire

this week at shopping our stash the challenge is called, "hearts on fire" and the brief is -rather straightforwardly- to make something with a heart on it. it needn't be a valentine, but it can be if you'd like. i made altered rolodex cards for a swap with a botanical theme:

papers, florals and stencil: prima marketing; vintage book paper from an ancient, falling-apart garden manual; sentiment stamps: altenew; wooden stamps: cherry arte and stampendous; inks: ranger archival; heart dies: nestabilities; fern dies: spellbinders; pearls: eyelet outlet; sequins: from my stash; adhesives: xyron, 3m foam tape, gluedots, scor-tape by sookwang, nuvo deluxe for sequins

once again i had a brand new paper collection burning a hole in my creative pocket. because if you get to spend time somewhere awesome like paper anthology, you will tend to want to bring your work home with you lol. in this case it's another beautiful line from prima (they're on fire recently, imo) this one is called misty rose. but don't worry, i also have lots of fab older stashy stuffs incorporated, too. including a sentiment from a great set of stamps stephanie gave me months ago for my birthday. i hadn't used it yet, because honestly, i was not confident that i could line up both parts neatly. of course, with the MISTI, it's no trouble at all to do so... times 6 or 7 or however many you need, with ZERO mistakes!


i built my cards from pages of an old gardening book, xyroned onto sturdy cardstock. then i added a layer of plain white modeling paste through a floral stencil. which turned out to be practically invisible. so when it was bone dry, i rubbed a little bit of ink onto the raised bits to make it show up better. then i did some random stamping of leaves and a bit of a crackle pattern on top to grunge it up a little more.


more old-stash goodies in the form of fern diecuts leftover from a summer class; tiny ANCIENT prima flowers mixed in with new ones from the misty rose collection; eyelet outlet pearls; and sequins of unknown origin, lol. and together they add up to a bit of happy spring-like sunshine to swap with my junk journal junkies group!


hop over to SOS and see all the heart-y goodness from my design team darlings! ♥

Sunday, January 13, 2019

the pitter patter of pattern january

more fun sketchbook goodness, YAY! ♥

day 6: fair
i was thinking of a fun fair, so i went crazy with colorburst bunting. like ya do...

day 7: coral reef
this was a stumper because i decided i had to combine pattern january with mandala monday, which turned out to be harder than i thought. this doesn't entirely work (either as a mandala or a pattern, lol!) ...but... i definitely learned a lot AND got to use wisteria, cornflower and orchid colorburst!

day 8: kitchen
in a very verrrrrrrry tangential take, i painted some beuatiful arabesque tile i saw recently at home depot, that i would love to be our backsplash when we (eventually) re-do our kitchen. 
(technically, the tile i saw was neutral beige-on-beige, but that's not especially fun to paint, kwim?!)

day 9: starts with w
my "default mode" for pattern january is to go with very literal brush lettering whenever i can't decide what to do. this was one of those times. i cannot say i like this as a finished piece, but i had a lot of fun trying to make as many W color names as i could think of into visual patterns. i predict you might see some of my letter styles again, in something a little more finished looking.
(note: i've spelled "wedgwood" two different ways... BOTH are wrong...)

♥♥♥
pattern january is devised and hosted by anika starmer, aka a is for anika, on instagram and facebook. everyone who'd like to participate is welcome, in any media they enjoy!
♥♥♥

Friday, January 11, 2019

wrap stars!

we're still making cards that incorporate giftwrap or tags at ♥JINGLE BELLES♥ and you're still invited to join the fun!

gold and purple snowflake giftwraps saved from the recycling bag on xmas day; patterned paper: lawn fawn, bo bunny; alphabet stickers from the dollar store; pearls: eyelet outlet; adhesives: elmers brand gluetape, 3m foam tape, xyron, sewing machine

this week i've used two different wraps: some gorgeous gold embossed paper that was on one of my own gifts, plus the vibrant purple and white pattern, which was actually on a gift my aunt gave to my mother... but i scooped it up to make a card, lol. there was a large and thankfully unwrinkled section, which became the background of my card and then i fussy cut a few of the snowflakes, as well. luckily i had the current sketch saturday, so i knew exactly where all my elements should go!


hop on over to ♥JINGLE BELLES♥ to see stephanie's card, and link up your own wrap masterpiece! 

Wednesday, January 9, 2019

Valentine, Je T'Aime!

Hi again, today I'm showing off a couple of Valentines with a French accent!


I love that Eyelet Outlet Eiffel Tower Brads come in two shades -bright silver and annodized copper- and that you get a mix of both in every packet. My first card features the silver, as well as one each of our Sun and Cloud Brads, to make a tiny landscape within a small heart shape. I've also added Heart Pearls to dot the I and J in "je t'aime" and two strips of Skinny Dot Washi Tape to set off the yellow cardstock panel.


But that's not to say I don't love the copper Eiffel Towers, as well! Here's one now, along with a Heart Brad, set against a carefully snipped panel of Wide Travel Washi, to show just the Parisian destination. My large heart panel was made by neatly lining up strips of Script Tape on plain white cardstock and then diecutting the result just like any other patterned paper.


There are so many cool ways to use Eyelet Outlet brads and tapes to make amazing and unique Valentines, I hope you'll stop by the EO Blog soon to see what the design team is up to next! ♥

Tuesday, January 8, 2019

SOS385: Winter Blues

This week's challenge at Shopping Our Stash is called, "Winter Blues" so we'd like to see cards with a winter theme OR which feature the color blue OR both, if you're feeling especially ambitious! Here's what I made:


In the spirit of Full Disclosure I have to admit that nearly all the papers in this post are brand spankin' new... even the ones I used to cut the small triangles! Because quite coincidentally we got Prima's gorgeous new "Georgia Blues" collection at Paper Anthology just before Christmas and I've been *dying* to break into it. I've got some good older stuff in there too though, honest! For starters, the tan, blue and white flower + flourish is absolutely ancient. So imagine my surprise when it matched every single color in the new collection perfectly! The dark blue panel behind the pretty seed packet is actually denim, from a pair of jeans that I think were probably last worn during the Bush administration. The G.H.W. Bush administration!!! But whenever I retire a pair of jeans, especially the ones made from thinner denim material, I save them, for crafty purposes. Like Xyron-ing them to cardstock, cutting them into mats, and stitching photos or decorative paper to them!


Speaking of stitching, I've done quite a bit, lol; it just seemed to fit the shabby chic vibe of the collection. I used my trusty Tonic distressing tool around most of the edges, and I'm pretty sure that thing will be old enough to vote in the next election! I've only owned the Diamond Nesties for about a year, but they belonged to Elisabeth Ostrowski before that, and were old enough that when I asked to borrow them, I was allowed to keep them! And yes, for the record, I'm definitely back in my Argyle Phase, so apologies for what I'm pretty sure will be a spate of diamond-centric creations coming up.


Speaking of elderly stash items, when I was putting away the Xmas tree decor in the basement the other night, I stumbled upon a bin with a bunch of wooden and papier mache items for altering. Including this tiny birdhouse, which I couldn't resist fancying up a bit! 


Hop on over to SOS and see what the other design team darlings have cooked up for you after our refreshing winter break. Hope to see you... in blue... on the blog later this week! ♥

Sunday, January 6, 2019

pattern january!

i'm pretty excited that anika starmer is celebrating "pattern january" again this year on instagram and facebook. i'm planning to play along as often as possible. here's what i've done so far:

day 1: tea party
here's a secret: i'm really interested in handlettering again, so for the prompts where i'm not immediately sure what to do, i'm going to do something in the text art arena.
(i find a "default mode" HUGELY helpful when embarking on a daily challenge!)

day 2: wood grain
just in case you're wondering, you can get a really great wood look by painting alternating patches of burnt umber and sienna colorburst with a flat brush, letting it dry and then adding grainy details with a pretty dry fan brush in slightly darker versions of both colors... and maybe a little lamp black, as well. ;)

day 3: nocturnal
i had a lot of ideas for this one, but only one EYE-dea, lol!

day 4: prism
or... in this case... more of a prism break. definitely not my favorite in the series, but the nice thing about a daily challenge is you get another chance every single day!

day 5: sushi
more colorburst fun facts for you: a 3:1 mixture of pthalo green and lamp black gets you the perfect shade of nori; while 2:1 peony and lemon yellow is really very shrimp-like! :) 

ps: EVERYONE can play, all media are welcome and you needn't participate every single day. check out a is for anika on instagram for the prompt list and some really fab inspiration! ♥♥♥