Wednesday, January 31, 2024

A Valentine Toast (with Eggs!)

Breakfast, we're told, is the most important meal of the day, possibly because it's the most pun-worthy? Eyelet Outlet Bacon, Egg and Toast Brads are always ready to add their special charm to birthday cards, anniversary toasts, or, as in this case, adorable mini Valentines!

Here's a TOAST to all the awesome brads, tapes, bling and embellishments in the Eyelet Outlet Online Store, just waiting to make your next card EGG-stra special!

Tuesday, January 30, 2024

SOS514: Winter Wonderland

This fortnight at Shopping Our Stash we've got the white stuff, and we're challenging you to make a card or project which features a winter landscape OR, alternatively, you could make an all-white card. I chose the latter, see?

Ok technically, my card is not 100% white; there's a tiny bit of tan and a little black, as well; but it's mostly shades of white: a glossy white A7 card, bright white textured cardstock, a white glitter mat, collage-style patterned paper from Prima's Pretty Pale collection (circa 2019?) which I've debossed with Taylored Expressions' Rosy Posey embossing folder (circa 2020?), part of a paper doily, some drywall tape (seriously underrated, from a design standpoint, imo!), the last little piece from a pack of Eyelet Outlet Pearl Swirl Bling, a tumble of Petaloo's Vintage Velvet Magnolia flowers (circa 2015?) from which I swapped the green centers in favor of white Pearl Bradsand finally, a bit of white machine stitching to (both literally and figuratively) hold everything together.

The Winter Wonderland challenge runs through Monday evening, February 12th. Visit SOS to see the inspiring cards from the Crew and start planning what you will make!

Monday, January 29, 2024

Hey Friend, Hello

As you know, I'm absolutely smitten with Wendy Vecchi's Garden Collection from Spellbinders. Today I'm test driving the Garden Party Stamp and Die set, which also has coordinating stencils... meaning that coloring this gorgeous bouquet is effortless! I used Wendy's Archival Inks from Ranger in Buttercup, Sunflower and Goldenrod to color the roses, Pink Peony and Rosey Posey for the smaller flowers and a blend of Prickly Pear and Leaf Green on the foliage. The background was created by stamping (...and stamping...and stamping, lol...) the dymo-style Hey Friend and Hello sentiments over and over, on the diagonal until I had filled a Perfect Cardstock panel. Then I diecut the flower cluster from it's backer and used the same die on the background so I could inset the bouquet; adding a couple of (hand cut) extra blooms on top. Finally, I used the nearly-discarded outside piece of of cardstock from diecutting the biggest frame from Heartfelt Thanks and Scallops (for another card that I'll show you later this week) and matted on Goldenrod cardstock. The "Hello" sentiment comes from Wendy's Vintage Florals die set.

Bring On the COLOR!

It's a Deeply DYLUSION-al Mandala Monday, featuring a rainbow* of Dylusions Ink Sprays which I've used as liquid watercolors by spritzing them onto my craft sheet and picking up the color with a paintbrush. Lines and dots via Letter It Fineliners in black. Detail added with a white paint pen. Water drops splashed on and blotted off randomly at every stage.


The Dylusions Sprays in question are: Bubblegum Pink, Squeezed Orange, Lemon Zest, Cut Grass, London Blue and Funky Fuchsia; all of which (plus 30 more!) can be found at Ranger's Online Store!

Friday, January 26, 2024

Old and New, Redux

At Jingle Belles, we're headed into the second week of "Something Old... Something New" and there's still time for you to join the fun!


This week, my new item is this fabulous Simon Hurley create Winter Woodland Stamp Set from Ranger, which I've colored with my trusty (older) Tombow Dual Brush Pens from Paper Anthology. But the oldest thing here is the set of Spellbinders' classic Nestabilities Labels 2 die set, probably the second or third thing I purchased, back in the day, after I got my Cuttlebug! There's a mix of old and new foliage diecuts, old and new papers and of course I had to add a couple of Eyelet Outlet Poinsettia Brads.


"Something Old... Something New" runs at Jingle Belles until next Wednesday evening, January 31st.

Thursday, January 25, 2024

Meet Octavia

Octavia is a Baby Octopus who enjoys swimming, and would like to learn how to ride a sea horse someday. With eight arms, she is especially good at giving hugs. Her favorite color is (of course!) purple. 

Octavia is based on this free pattern from The Friendly Red Fox's website, where there are LOTS of free crochet patterns, tips and tutorials, definitely worth checking out. I used a combination of hand-me-down acrylic yarns for this, the purple and white are both Studio Samples by Nicole; the variegated yarn is Wendy Peter Pan from Thomas Ramsden, held together with a strand of the lilac to get a bulkier gauge. 

PS: True Story: When my nephew Matthew was about three he was VERY into sea creatures and  knew a lot about aquatic life. At one point I made reference to an octopus having eight arms, to which Matthew said, very politely, "I think you mean *TENTACLES* Aunt Lauren." ♥♥♥

Wednesday, January 24, 2024

Valentine Sweets

To make the perfect Valentine all you need is a fun sentiment, a cute color palette and of course a few sweet treats... in Eyelet Outlet Brad form! This trio of mini cards features our Cupcake Swirl Brads, Donuts and Ice Cream Cones; as well as Wood Washi, Pink Dot Tape and Strawberry Washi.

It's the best way to send your Valentine a sweet treat that fits into an envelope! Check out the Eyelet Outlet Store to find brads, tapes and embellishments perfect for all your cardmaking needs.

Tuesday, January 23, 2024

The Blues Are Still Blue*

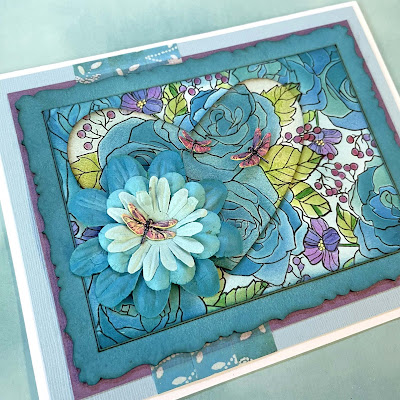
Central New Jersey continues to be cold and wintery but the bloomin' beautiful flowers in Wendy Vecchi's Garden Collection from Spellbinders definitely warm things up and Wendy's selection of blue Archival inks from Ranger is (arguably) the cure for the blues. This card has A LOT of blue... and A LOT of layers... as you may have noticed.


From the bottom working upwards we have: white cardstock (it's a 6 x 5" card... weird size but... that's what happened, lol); pale blue cardstock; lavender cardstock; Wendy Vecchi MAKE ART Washi Tape; Chippie from the Bases and Frames set, tinted with Bluebird Archival; white cardstock stamped with multiple repeats of the large flower cluster from Wendy's Garden Party Stamp and Die Set, colored using the coordinating layering stencils with Bluebird, Morning Glory, Cornflower, Cactus Flower, Violet, Rosey Posey and Leaf Green Archivals; Heart Chippie from the Bases and Frames set, stamped and colored in the same manner, then lined up over the same area in the background; stack of ancient paper flowers; Eyelet Outlet Dragonfly Brads.


Very much loving the convenience and quickness of using the layering stencils to add color. You can purchase the stamp and die set on its own, but I recommend the Garden Party Bundle. The stencils are numbered AND have registration marks at the four corners to make aligning them a no-brainer. and they're generously sized so that there's plenty of room to place all four magnets on the Stay-tion.


If it's a bit cold and grey where you are, why not immerse yourself in glorious color... it'll be Spring in no time! ♥

*"The Blues Are Still Blue" is my favorite Belle and Sebastian song. Just sayin'...

Monday, January 22, 2024

Diamonds Are a Mandala's Best Friend

The other day I came across a mandala from last winter, which started with a diamond motif in the center, rather than a circle and thought, "I should try that again!" so I did!


This time I made the diamond larger and more dramatic, then kept the other shapes fairly traditional and more or less symmetrical. I colored it by outlining each shape with a different pink, orange or yellow Tombow Dual Brush Pen, then used a waterbrush to spread/diffuse the colors. All the outlines were done with my Letter It Fineliners from Ranger, which are beautifully and reliably water-resistant!


Now I have ideas for mandalas with other shapes: hexagons, squares, maybe even triangles! Stay tuned... :)

Sunday, January 21, 2024

Holiday Jumpstart: Poinsettia Joy

"Poinsettia Joy" is the first Holiday Jumpstart Card Kit of 2024 and now available in-store and online at Paper Anthology!


Holiday Jumpstart is our pre-packaged kit that includes everything you need (except adhesives) to complete FIVE copies of this new original holiday card design. It’s called “Poinsettia Joy” since it features diecuts from Penny Black’s Stitched Poinsettia die set and Memory Box’s Brilliant Joy die set. 


All the details you need are in the Paper Anthology Blog Post or the Holiday Jumpstart Product Page!

Saturday, January 20, 2024

Hello!

It's time for more goodness from Wendy Vecchi's new Garden Collection for Spellbinders. This time I'm featuring the Flowers and Foliage Embossing Folder; as well as the Vintage Florals die set. The latter are cut from plain white Perfect Cardstock panels, then painted with Liquid Pearls for a shimmery, dimensional look.


I used the embossing folder on a panel of white Perfect Cardstock and a smaller panel of deep violet cardstock, which I then lined up on top of the white to make a continuous pattern. Of course as soon as I fitted them together it occurred to me that it would've been considerably easier to have affixed the violet piece to the white AND THEN embossed... but... well, hindsight is always 20/20, right?


I diecut all of the flower pieces, then painted the larger ones with Cornflower Blue Liquid Pearls accented with some Night Sky. The smaller flowers are done in Violet with some Petunia towards the center and the leaves are Prickly Pear. when they were dry, I used coordinating shades of Wendy's Archival Inks from Ranger in Night Sky, Violet and Fern Green to add a little more contrast around the edges. 


I wish I could capture all of the soft shimmer that the Liquid Pearls have added to the florals, but since I did not, maybe you'll give this technique a try and see for yourself?!

Friday, January 19, 2024

JB2402: Something Old... Something New

It's time for a new theme at Jingle Belles and this fortnight we're embracing the combination of old and new goodies, so here's an excuse to break out something cool that Santa brought you... then combine it with some of your older crafty items. Here's what I made:


My NEW item is Spellbinders' Stylish Merry Christmas die set, though I confess I got it at Paper Anthology monnnnnnnnnnnnnths ago but had (quite mystifyingly) never used it yet?! My OLD items are... well... pretty much everything else on this card! Including ancient Basic Grey and My Minds Eye papers and a Tim Holtz sticker book that I know was from The Ink Pad. The Eyelet Outlet Poinsettia Brads are a style that's several years old, though I just gotten yet another new pack because they are definitely on my "most used" list... since they seem to look good EVERYWHERE!

The Something Old... Something New challenge at Jingle Belles runs until Wednesday evening, January 31st and we'd love for you to join us! Why not hop over and see what Stephanie has made to inspire you, then start thinking what Old and New goodies you'll incorporate into your card!

Wednesday, January 17, 2024

I'm Not Saying You're Old...

Here's the perfect card for your favorite wine lover with a sense of humor. Eyelet Outlet Wine Brads, Grape Brads and Wine Washi pair perfectly with sarcasm and heartfelt wishes!

There's a huge selection of Food, Drink and Cooking Brads (plus pretty much any other hobby or interest you can name) in the Eyelet Outlet Store, check it out today!

Tuesday, January 16, 2024

SOS513: Once Upon a Time

Welcome to the first Shopping Our Stash challenge of 2024. If you've guessed by the title that we're looking for cards and projects inspired by fairy tales, well done, we can get right to what I made:


I think MFT's Rainbows & Unicorns stamp set is out of print, but I still love it; it's hard to imagine a better set of images for this challenge, and it also has half a dozen cute sentiments in the perfect font. I colored with my Tombows and was able to sneak in an Eyelet Outlet Frog Brad, a Sun, plus the Crown & Tiara set. I cut the clouds out of some uber-cute Simple Stories paper, added scrap mats and used up the last scrap of Creative Imaginations' paper, purchased when my eldest niece Riley (who's currently a senior in college!) was about nine and deeply into princesses. Luckily I now have grand-nieces (from the other side of the fam) who are the right age. 

The "Once Upon a Time" challenge at Shopping Our Stash runs until Monday evening, January 29th so why not unearth some of your older stash items and join the fun?

Monday, January 15, 2024

Pushing the Envelope

Prepare to DIE-cut and join me at Paper Anthology for this brand new two-card class that really DELIVERS!  Yes, you read that right, we'll only be making TWO cards this  time, but they're BIG cards, measuring 5.5 x 7" each... because they're built around Spellbinders' Envelope of Wonder die set which really makes an amazing statement. 

These can be Valentines, Galentines, extra-special birthday greetings or pretty much anything you choose. We'll be using Concord & 9th's Layers of Love stamp set for the sentiments, and students can choose from a variety of greetings, or hedge your bets and leave them blank. Oversized envelopes will be provided.

Garden Mandala

It's a bloomin' beautiful Mandala Monday, thanks to Wendy Vecchi's gorgeous new Garden Collection from Spellbinders. If you're new to mandala-making I have to tell you my all-time favorite trick: Using heart dies to make the "petals" of a mandala! Since it just so happens that Wendy's new Heartfelt Thanks and Scallops set has nested heart dies, the possibilities are pretty much endless. I wanted to make a card so I only used two of the sizes, but you could go all out and make a BIG art piece, using all five sizes in sequential order.


For this project I also used the Garden Party Stencils, the Flowers and Foliage Embossing Folder, and three of the sixteen dies in the amazing Vintage Florals set. And, of course, a selection of my favorite Wendy Vecchi Archival Inks, including Pink Peony, Rosey Posey, Sunflower, Leaf Green, Prickly Pear and Tea Rose. 


The first thing I made was the floral panel, using the Garden Party Stencils, but without the coordinating stamp or die. (I should mention here that these layering stencils are super-easy to line up and use with perfect alignment to use alone OR to color the stamped image; they have registration marks on all four corners, and they're numbered too!) On this occasion, I chose to line the stencil layers up verrrrrrrry loosely and then fill in any blank space around them with extra ink. At the very end, on top of the flowers, I used Wendy's Studio 490 Plaid Flannel Background, inked with light shades of yellow and green, and spritzed with Isoproply Alcohol. I love how it gave the finished panel a sort of textural look, like vintage table linens.


To make the center medallion, I cut a medium-sized circle from one of Wendy's MAKE ART Perfect Cardstock Panels, embossed it with the Flowers & Foliage folder, then used the Ranger Mini Ink Blending Tool with Domed Foam Applicators to add color to the flowers, foliage and background. In between applications, I spritzed the whole thing with rubbing alcohol to encourage the colors to blend into each other just a bit. 

I stamped another panel of white Perfect Cardstock with the Plaid Flannel Background first in Prickly Pear and then Tea Rose, and diecut a bunch of the medium-sized heart from Heartfelt Thanks and Scallops. I cut a second set of the same size from medium pink cardstock, then a set of the second-to-smallest heart in light pink, which I placed between and slightly behind the first ring of petals. I used the small double blossom die and the tiny leaf from the Vintage Florals set to add interest to both rounds of hearts. 


Here's one last picture of the center section, it's my attempt to capture the depth of the texture here. Because when Spellbinders calls something a 3D Embossing Folder they are not messing around! These products are currently available online at Spellbinders, Ranger and other fine retailers. Or, if you happen to be in Central New Jersey, these delightful goodies are also in stock at my favorite brick and mortar crafting store... Paper Anthology!

Sunday, January 14, 2024

New Art Journal

I will take any excuse to sit and make a random collage, and the christening of my brand new Dina Wakley 6x6 Kraft Journal from Ranger is definitely the perfect time to combine some of my favorite vintage goodies (sheet music, nature illustrations) and some of my favorite Dina elements (Collage Paper, Typed Ledgers) and even a brand new Simon Hurley create. stamp set (Watercolor Flowers).

I made a background of torn, strongly patina-ed, sheet music layered over a few different ledgers, then added bits of collaged script on top. I inked up some of the larger Watercolor Flowers with a combination of Oxide Inks (Prize Ribbon, Wilted Violet and Chipped Sapphire) then misted the stamps lightly with water to get sort of a blurry, faded look... like vintage fabric. 


I put the tissue paper lady on top, having selectively inked and shadowed her face; then added a cluster of white flowers from a gardening book and a hummingbird from one of those free giveaway calendars that my mom always saves for me. 


I could easily write more about this spread, but the fact is, my lovely little journal has 63 more blank pages and I could be adorning them, so I'll sign off for now!

Saturday, January 13, 2024

Wendy Vecchi's Garden Collection

Sooooooo excited to get my hands on Wendy Vecchi's beautiful Garden Collection from Spellbinders AND it's just arrived at Paper Anthology as well! In this little tag set I've used the Heartfelt Thanks and Scallops Die Set, the Flowers and Foliage 3D Embossing Folder and the amazing 16-die Vintage Florals set. The collection also includes Wendy's Garden Party Stamp and Die Set, which I haven't opened yet, so stay tuned for that!

I didn't sit down for crafty time until quite late last night, but I couldn't wait to make a few little goodies. Since I happened to have a beautiful piece of vintage map sitting on my work table, with white tags and my Wendy Vecchi Archival Inks, that's what I used. Though, in retrospect, the detail of the map means you cannot quiiiiite see all the amazing detail and texture of the Vintage Floral dies, so next time I think I'll go with plain cardstock.


One of my favorite things about Wendy is that she really is an avid cardmaker and papercrafter, so the sets she designs are both beautiful and useable, with amazing attention to scale and combinability... (Is that a word? Well, it should be, lol!) ...by which I mean that everything across the entire collection works together perfectly AND most elements can be used in multiple ways. Since Spellbinders is one of the brand leaders for diecutting, obviously the products are of high quality, work perfectly, and are items I'll reach for again and again! (Case in point: I still have multiple sets of Spellbinders' Nestabilities from several decades ago, which I still use constantly!)

This collection has just arrived at my LSS, Paper Anthology and will be listed on the website this week, or you can email elisabeth@paperanthology.com to reserve your favorites; or better yet stop by and see it IRL. It's also available directly from Spellbinders, too! To see more gorgeous makes, check out Wendy's Instagram or join the Make Art with Wendy Vecchi FaceBook Group!

Friday, January 12, 2024

This is What Santa Does in January

Or at least, this is what I imagine Santa doing in January. It's what I'd quite like to be doing in January, for that matter. But in this case, since these little images of Santa in Alohawear, sipping cocktails and hanging out with festive flamingos, all appeared on the giftwrap of one of my holiday presents a few weeks ago, it's also fair game for our "Wrap It Up" prompt at Jingle Belles, which runs until next Wednesday evening, January 17th. 


So before you ask, YES, there was quite a lot of teeny tiny fussycutting involved in this endeavor. But since the repeats are so small, there were LOTS of Santas on my "rescued" wrap; and cutting things out is one of those chores I don't mind doing, especially when it's close to bedtime, and I'm too tired to actually think of what to make, but not yet tired enough to go to bed. When cutting out something flimsy like giftwrap, I first back it with cardstock that I've run through my Xyron. I made faux-polariods from offcuts of white Kromekote inset with little squares of cloud patterned paper; added the Santas and accessories; mounted the design elements on my own leftover sandy/snowy wrapping paper; added red skinny mats, washi, and glittery diecut sentiments... et voila! Two more cards for the December pile!

You've got until Wednesday evening, January 17th, to join our Jingle Belles' "Wrap It Up" fun, and we hope you will. Hop over now to see Stephanie's card and check out the little prize that one lucky random cardmaker will scoop up!

Wednesday, January 10, 2024

You're Tops in My Book

Hearts, flowers and books are ALWAYS in season! Here's a card featuring Eyelet Outlet Book Brads, Book Washi and the adorable bears from Lawn Fawn's Den Sweet Den stamp set. This could be a Valentine, a Galentine, a Birthday Greeting or a Just Because Card. A label shape made of Book Tape is framed by a larger diecut of Wood Washi and the whole thing is framed with Script Tape. Book Brads, a Colored Daisy and a few Hearts finish off this sweet scene.

Whether your next card is for a reader, a sportsperson, a classic car enthusiast or a knitter... Eyelet Outlet has the brads, tapes and embellies you need!

Monday, January 8, 2024

Liquid Pearls and Stickles Rainbow Thank You Card

I'm delighted to be on the Ranger Project Page today with a timely Thank You Card tutorial, featuring bright and cheerful rainbow shades of Liquid Pearls (which I've thinned down a bit and used like sheer, shimmery acrylic paint; which... afterall... is what they actually are; thank you Patti Behan for that inspiring insight!) and set off with Glittery Stickles, gorgeous bright Archival Inks and White Embossing... which always looks very fresh and clean, imo. I'd love for you to check out the full post, if you have a minute!

Snow Far, Snow Good

Since my favorite place by far to see flakes of frozen precipitation is in artwork (the least favorite place being on my driveway!) here is a Super Snowy Mandala Monday with a wish that your week is off to a warm and cozy start. Scroll down to see a few fun digital manipulations. (Original artwork created by watercoloring with my Tombow Dual Brush Pens; digital fun perpetrated with filters from PSE9.)


and finally... back to the original:

Wednesday, January 3, 2024

2023 Eyelet Outlet Favorites

It's that time again, the Eyelet Outlet Design Team is picking our favorite projects of 2023; and at the same time, we're getting ready to make brand new inspiring creations for 2024! Here are five of my personal picks... in more or less chronological order. Click the bolded text to visit the original posts for additional description and direct product links.


It's impossible (imo) to Flamin-Go wrong with EO Flamingo and Beachy Brads. When a friend sent me this hilarious pun, I literally couldn't get to my supplies fast enough!


Girls Just Wanna Have Fun, and this vertical Girls Tape not only captures that vibe perfectly, it pairs seamlessly with pretty much any combination of Brads and Tapes that appeal to your favorite gal.


The new Sugar Skull Brads arrived at the end of the summer, and were instant faves. This Viva la Vida card, posted on Dia de los Muertos, turned out exactly like the picture that was in my head.


Eyelet Outlet Pinata Brads were also brand new this year and my first thought was to make a Smashing Shaker Card with EO Sequins inside. I stand by that decision.


The new Driving Brads pair brilliantly with Classic Car Brads, Compass Brads, and loads of tape styles; for instant Masculine Card perfection. 

Monday, January 1, 2024

Happy New Year!

And here's the first Mandala Monday of 2024! 

This very vibrant mandala features lots of my favorite shades of Wendy Vecchi Archival Inks from Ranger, including Rosy Posy, Sunflower, Prickly Pear, Sky Blue, Carnation Red, Leaf Green, Violet and Peachy Keen. Scroll down to see a little bit about the process, and how I finished off this extra-large piece.


I *think* I invented Ink Over Collage, or at least, I don't believe I've ever seen anyone else do it...? The first project I made with this process was the GIANT pair of Mandala Canvases from January of 2016. If you want to see a step-by-step tutorial featuring the process This Post is not bad. In the meantime, here's a bit more detail on today's mandala.


Ink Over Collage generally starts with (...wait for it...) a collage. I use plain white 110lb cardstock as a base, a good quality gluestick for my adhesive, and mostly white or slightly off-white vintage and found papers (sheet music, text pages, etc) that I tear and stick on fairly randomly. I'm not too worried about being absolutely symmetrical, but I usually like to start with a perfect circle; you can use an old school compass, a Helix Circlemaker or just trace a roll of masking tape or a Tupperware lid. You can definitely outline first and then fill in with color, but using Archival Inks and an Ink Applicator, Detail Applicator or dauber, I found it hard to be 100% accurate, so at some point, I started putting the ink on first and outlining around it (I use Letter It Fineliners) afterwards. 


Obviously you don't need to fill an entire 8.5 x 11" sheet, but in this case, I had a plan (which you'll see in the next step) so that's what I did. 

At this point, I should apologize for a bit of a cheat, because in between the photo above (where all the shapes are just solid Archival Ink) and the photo below (where there's LOTS more detail) I somehow skipped photographing the step where I added extra black line work, as well as tone-on-tone colors applied with markers, and some dots and outlines with a white paint pen. This intermediate step can take five minutes or a year, it just depends what you feel like doing on that particular occasion. 

I will say that for me (here's a bit of a secret) usually the places that have the heaviest lines or the most dots, details, cross-hatching, etc... are "inspired" by the fact that I made some sort of mistake that needed to be covered up; which then had to be carried consistently throughout the entire piece. (So now ya know!)


Here's where the aforesaid Plan came in; why I made such a big mandala, and why I placed it dead center of the paper: I knew I wanted to split it into four panels, to make a set of notecards!


After using my guillotine trimmer to make four equal rectangles, I rounded opposing corners, matted on coordinating cardstock, and machine stitched each one to a white A6 card... Et voila

Stay tuned for another Mandala Monday... approximately a week from now; in the meantime, Happy New Year to you!